
The secret to floors that always look freshly cleaned isn’t spending hours on your hands and knees scrubbing. It’s about building a simple, consistent routine that stops dirt from ever getting a real foothold.
Think of it as preventative care. Before we get into the heavy-duty stain removal and deep cleaning tricks, let’s lock in the foundational habits that do most of the work for you.
Establishing Your Core Tile Cleaning Routine

The real goal here is to manage the daily buildup of dust, grit, and tracked-in debris. Those tiny particles might seem harmless, but underfoot, they act like fine-grit sandpaper, slowly dulling your tile’s beautiful glaze with thousands of microscopic scratches. A quick daily pass is your best defense against this gradual wear and tear.
The First Line of Defense: Daily Sweeping
Make it a habit to remove loose debris every single day, especially in high-traffic zones like the kitchen, mudroom, and main entryways. This isn’t just about looking tidy; it’s about preserving the life of your floor.
- Vacuuming: Grab your vacuum but be sure to use a soft brush attachment. The spinning beater bar is great for carpets but its stiff bristles can scratch and damage a tile surface over time.
- Dry Mopping: A microfiber dust mop is honestly your best friend for tile floors. It uses static electricity to grab and trap fine dust, pet hair, and allergens far more effectively than a traditional broom, which often just pushes the mess around.
This simple step takes just a few minutes but makes a huge difference in the long-term shine and durability of your tile.
The Weekly Wet Mop Ritual
Once a week, it’s time to wash away the stickier, more stubborn grime that sweeping leaves behind. The most important part of this step is using the right cleaning solution. So many common household cleaners are too acidic or alkaline for tile—they can slowly eat away at your grout and leave a dulling, sticky film on the surface.
Your tile’s greatest ally is a pH-neutral cleaner. These formulas are powerful enough to dissolve everyday dirt without stripping away sealants or damaging the tile’s finish. Just look for products specifically labeled “pH-neutral” or “safe for ceramic and porcelain.”
Low maintenance is a key reason the ceramic tile market is booming, with projections to hit USD 380.61 billion by 2033. Industry data even shows that choosing ceramic can slash long-term maintenance costs by up to 40% compared to other flooring types. Why? Because a simple damp mop is often all it takes to restore its original shine. You can dig into the market trends and material benefits over at Grand View Research. This just proves that sticking to a simple, effective cleaning routine is a smart investment in your home.
To make your weekly clean even easier, here are the go-to tools I always recommend.
Your Weekly Tile Cleaning Toolkit
This quick-reference table breaks down the essentials for a fast, effective weekly tile cleaning routine. Having the right gear on hand makes all the difference.
| Tool or Solution | Primary Use | Insider Tip |
|---|---|---|
| Microfiber Dust Mop | Daily sweeping & dust removal | The static charge is key. Avoid fabric softener when washing the pad, as it can reduce its dust-grabbing ability. |
| Vacuum (Soft Brush) | Sucking up grit from grout lines | Go over grout lines in both directions to lift out any stubborn debris your dust mop might have missed. |
| Microfiber Spin Mop | Weekly wet mopping | The spinner wrings out the perfect amount of water, preventing puddles that can damage grout and leave streaks. |
| pH-Neutral Cleaner | Gentle, effective cleaning solution | You can also make your own with a few drops of mild dish soap in a gallon of warm water. Just be sure to rinse well! |
| Two-Bucket System | Keeping your cleaning water fresh | Use one bucket for your clean, soapy water and a second for wringing out the dirty mop. This stops you from just spreading dirty water around. |
With this simple toolkit and a consistent routine, you’ll find that keeping your tile floors looking brand new is surprisingly low-effort.
Your Go-To Methods for Everyday Cleaning
Once you’ve got a solid daily sweeping routine down, your weekly mopping stops feeling like a chore and becomes a quick, satisfying reset. The trick is to use a cleaning solution that actually cuts through the grime without being too harsh on your tile’s finish. For this job, two methods consistently come out on top: a classic DIY vinegar mix and the modern power of a steam mop.
The simple beauty of a vinegar-and-water solution is that it just works. White vinegar has a mild acidity that’s perfect for dissolving the invisible films of grease, soap scum, and hard water spots that build up over the week, especially in kitchens and bathrooms.
To get the mix right, just combine a half-cup of white vinegar with one gallon of warm water. This recipe is strong enough to clean your ceramic tile effectively but gentle enough that it won’t damage your grout over time. If you’re looking for more natural cleaning hacks, there are some great resources on the uncommon cleaning uses of vinegar around the house.
Choosing Your Cleaning Method
After mixing your solution, how you apply it makes a big difference. You can always use a traditional string mop and bucket, but I find a microfiber flat mop is far better at trapping dirt instead of just pushing it around. Dip the mop head, wring it out so it’s damp—not sopping wet—and work in smaller sections. This keeps dirty water from pooling in your grout lines.
If you’d rather skip the chemicals altogether, a steam mop is an incredible tool. It uses nothing but superheated water to sanitize surfaces and lift away stuck-on grime with very little elbow grease. The high heat kills 99.9% of germs and bacteria, making it a fantastic choice for anyone with pets or small kids crawling around.
Handling Different Tile Finishes
This is the final, crucial step that most people miss. Not all tile is the same, and your technique should change based on its finish.
- High-Gloss Tiles: These shiny floors look amazing but are notorious for showing water spots and streaks. The secret? After mopping, immediately go over the floor with a separate, dry microfiber cloth or pad. This extra two-minute step is what guarantees that brilliant, streak-free shine.
- Matte-Finish Tiles: Matte tiles have a wonderful, earthy look, but their slightly textured surface can hold onto dirt and cleaning residue. The key here is a simple rinse. After you’ve mopped with your cleaning solution, do a quick pass with a mop dampened with just plain, clean water. This lifts any leftover film that could dull the finish.
The real goal is to create a simple, repeatable habit. Whether you land on a vinegar solution or a steam mop, consistency is what keeps your floors looking brand new year after year.
Maintaining your tile isn’t just about looks; it’s about protecting your home’s value. Market analyses consistently show that homeowners prefer ceramic tile for its durability and ease of care—two big factors in its growing popularity in residential spaces.
To keep your investment in top shape, you can find more fantastic advice right here: https://originalmissiontile.com/6-fantastic-tips-for-ceramic-tile-flooring/
Tackling Tough Stains and Deep Grime
Even with a perfect weekly routine, life happens. A splash of red wine, a dropped plate of spaghetti, or a greasy kitchen spill can leave a stubborn mark that your daily mop just can’t handle. This is when you switch from maintenance to stain-fighting mode.
For most common food and drink stains—coffee, juice, sauce—a simple homemade paste is your best friend. It’s my go-to fix after a minor kitchen disaster.
- Make the Paste: Mix baking soda with a little warm water until you have a thick, toothpaste-like consistency.
- Apply and Wait: Spread the paste directly onto the stain, making sure it’s completely covered. Let it sit for at least 10 to 15 minutes. This gives the baking soda time to work its magic, gently lifting the stain from the tile.
- Scrub Gently: Use a soft-bristle brush (an old toothbrush is perfect for this) or a microfiber cloth and scrub the area in a circular motion. No aggressive scrubbing needed.
- Rinse Clean: Wipe the paste away with a damp cloth, then dry the spot completely to avoid leaving any water marks.
The Restorative Deep Clean
Sometimes the problem isn’t a single stain but years of built-up residue, often from the wrong cleaning products. If your tile looks perpetually hazy or your grout lines have gone from light gray to dark grime, it’s time for a restorative deep clean. This process strips away that old film and brings back the tile’s original finish.
First, you need to strip away that gunk. You can do this by mopping with a specialized tile-stripping solution or even just a strong mix of hot water and your favorite pH-neutral cleaner. The whole point is to dissolve the buildup that’s trapping dirt and dulling the shine.
After stripping, you might notice the grout lines are still discolored. This is where you bring out the bigger guns. A targeted application of an oxygenated bleach solution (the powdered kind mixed with water) or a bit of hydrogen peroxide applied with a brush can work wonders. Just let it bubble and foam for a few minutes before you scrub and rinse.
A deep clean isn’t just about making things look pretty; it’s about hitting the reset button on your floor. By stripping away old waxes and soap films, you make all your regular cleaning efforts more effective because your cleaner can finally reach the actual tile surface again.
This deep-cleaning ability is a huge selling point for ceramic tile in both homes and businesses. It’s no surprise that designers are gravitating toward matte finishes and durable porcelain variants (which hold a 52.4% market share). Their easy maintenance can cut replacement costs by up to 30% compared to less resilient materials. You can get a better sense of how material choices affect long-term care by checking out these ceramic tile market insights.
For really tough jobs, especially large outdoor tile patios, using the right equipment makes all the difference. You can supercharge your efforts by exploring techniques like optimizing cleaning power with a pressure washer soap injector to blast away the most challenging grime.
How To Revive and Protect Your Grout
Nothing kills the look of a beautiful tile floor faster than dingy, discolored grout. Grout is porous, which means it’s basically a tiny sponge for dirt, spills, and grime. Over time, even the cleanest tiles can look old and tired if the grout lines are neglected.
The good news? Bringing it back to life doesn’t always require harsh chemicals or hours of intense labor. For most everyday discoloration, a simple but powerful homemade paste is your best friend. I’ve used this method countless times to restore grout to its original color without damaging the tile.
Your Go-To DIY Grout Cleaning Paste
This recipe uses two common pantry items to create a paste that literally bubbles grime away.
- Make the Paste: In a small bowl, mix about a half-cup of baking soda with a few tablespoons of hydrogen peroxide. You’re aiming for a thick, spreadable consistency, almost like frosting.
- Apply and Wait: Grab an old toothbrush or a small grout brush and apply the paste directly onto the grout lines. Be generous. Make sure every inch is covered, then let it sit and work its magic for at least 15 minutes.
- Scrub Gently: After the paste has had time to bubble, give the grout lines a light scrub with your brush. You’ll see the grime lift away with surprisingly little effort.
- Rinse Thoroughly: Use a sponge and clean water to wipe away all the paste residue. Finish by drying the area with a microfiber cloth to prevent water spots and reveal the clean lines.
Now, some stains are tougher than others. For deep-set oily spots or mystery discoloration, you might need to bring in a commercial alkaline cleaner made for grout. These are formulated to break down grease and soap scum without the corrosive effects of acid-based cleaners.
Figuring out whether to use a DIY paste for a coffee spill or a stronger cleaner for a stubborn, oily mark can feel like a guessing game. This quick decision tree helps visualize the process.
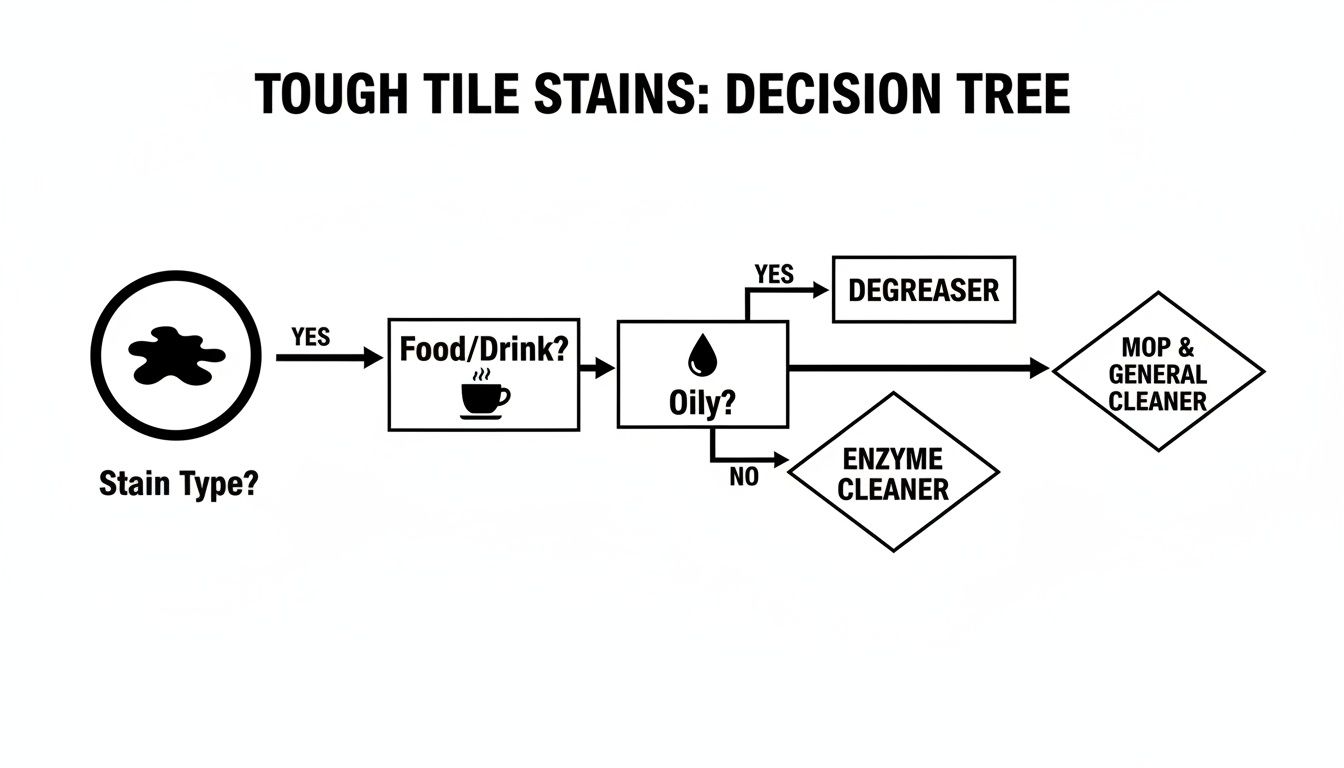
As the flowchart shows, the first step is always identifying the stain type—is it a simple spill or something more stubborn? That’ll point you to the right solution.
Not sure which grout cleaner is right for your situation? Let’s break it down.
Choosing Your Grout Cleaning Weapon
This quick comparison will help you decide between a DIY paste and a commercial cleaner.
| Consideration | DIY Baking Soda Paste | Commercial Alkaline Cleaner |
|---|---|---|
| Best For | Everyday grime, food/drink stains, light mildew | Deep-set grease, oil, soap scum, heavy discoloration |
| Strength | Gentle but effective for surface-level dirt | Stronger, formulated for tough, embedded stains |
| Cost | Very inexpensive; uses common household items | More expensive, but a little goes a long way |
| Safety | Non-toxic and safe for most tile types | Requires good ventilation and gloves; follow label |
| Effort | Mix, apply, light scrub, and rinse | Apply, wait, scrub, and rinse thoroughly |
For most routine cleaning, the DIY paste is all you need. But when that doesn’t cut it, a good alkaline cleaner is a powerful tool to have in your back pocket.
The Final, Game-Changing Step: Sealing
Once your grout is sparkling clean and completely dry, there’s one more crucial step that will save you hours of future scrubbing: sealing it. Grout sealer creates an invisible barrier that repels water, dirt, and stains, stopping them from soaking into the porous surface.
Sealing your grout after a deep clean is arguably more important than the cleaning itself. It’s a proactive step that transforms your grout from a dirt magnet into a stain-resistant surface, making daily maintenance significantly easier.
Applying sealer is straightforward. Most products come with a small brush applicator, so you just paint it onto the grout lines, wait the recommended time, and wipe any excess off the tile. This one step can keep your grout looking brand new for a year or more, depending on foot traffic.
For a deeper dive into the best products out there, our professional guide to finding the best grout sealers for floor tile is an excellent resource. Trust me, this protective measure ensures all your hard work actually lasts.
Long-Term Care to Protect Your Tile
A clean tile floor is one thing, but keeping it looking brand new for decades? That takes a little bit of foresight. It’s less about constant mopping and more about building smart habits that protect your tile from the kind of damage you can’t just wipe away.
One of the most common mistakes I see is people grabbing the wrong tool for the job. A tough scouring pad or a brush with stiff bristles might feel effective against stubborn grime, but they can etch permanent micro-scratches into your tile’s glaze. Over time, this dulls the finish, creating a worn-out look that no amount of cleaning can ever bring back.
To Seal or Not to Seal
The whole conversation around sealing tile seems complicated, but it really boils down to one simple question: is your tile porous?
- Glazed Ceramic and Porcelain Tile: These tiles have that baked-on, glass-like finish, which makes them essentially waterproof. The glaze acts as a built-in shield against moisture and stains. Because of this, you do not need to apply a sealer to the tile surface itself. In fact, trying to seal a glazed tile is not only pointless but can create a sticky film that actually attracts more dirt.
- Porous Tiles (Unglazed Ceramic, Terracotta, Cement): Now, these are a completely different story. Without that protective glaze, these tiles are like sponges, ready to soak up any spill that comes their way. This can lead to deep, permanent stains. For these materials, applying a high-quality penetrating sealer isn’t just a good idea—it’s a non-negotiable step to protect your investment. If you’re working with these materials, you can explore our detailed guide on choosing the right ceramic tile sealer.
No matter which tile you have, remember that your grout lines are almost always porous. Sealing them is a must.
Creating a Simple Inspection Schedule
Staying proactive is the key to preventing small issues from turning into big, expensive headaches. A quick, regular inspection schedule is your best defense against water damage and stubborn stains down the road.
The whole point of long-term care is to catch problems before they even start. A five-minute check-up every six months is all it takes to shield your tile and grout from the vast majority of common issues.
Just set a reminder on your calendar twice a year. Walk through your tiled areas—especially kitchens and bathrooms—and take a close look at the grout lines. You’re looking for any cracking, crumbling, or dark spots that might signal the sealer is wearing thin.
A quick test: just drop a bit of water on the grout. If it beads up nicely on the surface, you’re good to go. If it soaks in and darkens the grout, it’s time to reapply a fresh coat of grout sealer.
This simple habit is really the cornerstone of responsible tile ownership. Modern glazed ceramic tiles already offer incredible perks, like 99% bacteria resistance and a 50% reduction in cleaning time compared to unsealed stone. By keeping your grout protected, you’re maximizing those benefits and aligning with the low-water, sustainable cleaning practices promoted in LEED standards. To learn more, check out the eco-friendly advancements in ceramic tile manufacturing and see how they contribute to a healthier home.
Common Questions About Cleaning Ceramic Tile
When it comes to keeping tile looking its best, a few questions always seem to pop up. Even people who’ve owned tile floors for years run into tricky spots where the usual advice just doesn’t cut it. Let’s tackle some of the most common questions we hear.
Think of this as your quick troubleshooting guide for those “what if” moments. Getting the right answer can be the difference between a quick fix and accidentally damaging your beautiful tile or grout.
Can I Use Bleach on My Ceramic Tile and Grout?
While bleach is a beast when it comes to disinfecting, we strongly recommend keeping it away from your grout. It’s just too harsh. Over time, bleach can actually break down the structure of the grout, making it more porous and even discoloring it—especially if you have colored grout. It’s a classic short-term fix with long-term consequences.
For sanitizing, a steam mop or a simple diluted hydrogen peroxide solution is a much safer bet. As for the tile itself? Bleach is total overkill. A good pH-neutral cleaner has all the power you need for daily grime without putting your floors at risk.
How Often Should I Deep Clean My Tile Floors?
Honestly, it all comes down to foot traffic. Not every room gets the same workout, so your cleaning schedule shouldn’t be one-size-fits-all.
- High-Traffic Zones: Think kitchens, main hallways, and entryways. These spots benefit from a deep clean—including a good grout scrub—every 2-3 months.
- Low-Traffic Spaces: A guest bathroom or a formal dining room that doesn’t see much action can probably get by with a deep clean once or twice a year.
The real secret is that consistent weekly cleaning makes the deep clean so much easier. When you stay on top of the basics, the big clean-up is more of a quick refresh than a back-breaking chore.
What Is the Best Way to Clean Textured Ceramic Tile?
Ah, textured and matte-finish tiles. They look amazing but are notorious for grabbing onto dirt in all those little nooks and crannies. The trick is a one-two punch that lifts the dirt out instead of just pushing it around.
Start by vacuuming thoroughly with a soft brush attachment. This gets all the loose stuff out of the way. Then, go over it with a microfiber mop and a quality pH-neutral cleaner. If you still see some stubborn grime clinging to the texture, a gentle scrub with a soft-bristle nylon brush should do the trick. Just promise me you’ll never use a wire brush—it’ll scratch the tile permanently.
It’s also super important to avoid wax-based or oil-based cleaners on these surfaces. They leave behind a dull, sticky film that’s impossible to ignore on matte and textured tile, making it look dirty even when it’s clean.
Is It Necessary to Seal Glazed Ceramic Tile?
Nope, you can confidently cross this one off your list for any standard glazed ceramic tile. The glaze itself is like a baked-on, non-porous shield that provides fantastic protection against stains and moisture. Trying to add a sealer on top is not only a waste of time but can also leave a hazy film that dulls the finish.
However—and this is a big one—you absolutely should seal the grout lines between those tiles. Grout is basically a sponge. It will soak up spills, dirt, and grime if you leave it unprotected. Sealing your grout is probably the single best thing you can do to keep your entire floor looking clean and new.
At Original Mission Tile, we believe that the right care preserves the timeless beauty of your surfaces. Our handmade cement tiles are crafted to last a lifetime, and with these expert tips, you can ensure they always look their best.
Explore our collection of artisan tiles at https://originalmissiontile.com.