
Let’s be honest, walking into a tile showroom can feel like stepping into a sea of endless choices. It’s easy to get overwhelmed. The secret? Stop thinking about looks first. The best bathroom tile decisions start with a simple, practical framework built on performance, aesthetics, and budget—in that exact order.
Get the function right, and the beautiful form will follow.
Your Framework For Choosing Bathroom Tiles
Picking the perfect tile isn’t about finding one you love; it’s about finding the right one for the job that you also happen to love. Think of it like building a pyramid. You need a solid, functional base before you can add the beautiful, decorative peak. Otherwise, the whole thing comes tumbling down.
Our decision-making process is built on three pillars, tackled one at a time:
- Performance First: Before you fall for a specific pattern, you have to address the non-negotiables. Is it waterproof enough for a shower? Is it safe to walk on when wet? Can it stand up to daily traffic and cleaning chemicals?
- Aesthetics Second: Once the practical boxes are checked, the fun begins. This is where you get to play with scale, color, pattern, and grout to create a space that feels like you, whether that’s a serene, spa-like escape or a bathroom with bold, modern energy.
- Budget and Lifecycle Last: Finally, you’ll weigh your choices against your budget. This isn’t just about the price per square foot. We’re talking about the total lifecycle cost, which includes installation, trims, and any long-term maintenance it might need.
This flowchart maps out how you can move from the big practical questions down to the finer details without getting lost.
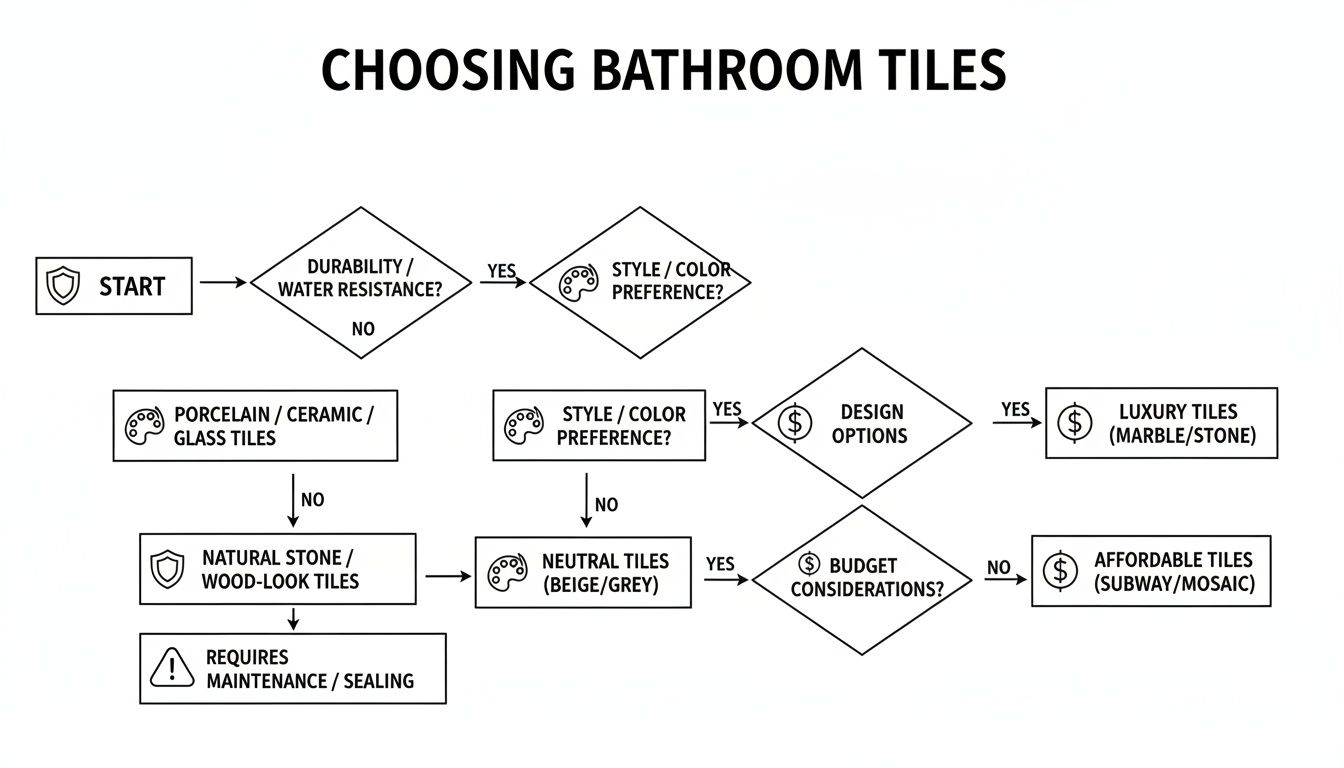
As you can see, starting with the tile’s job—like making sure it’s suitable for a wet zone—instantly narrows your options. This makes all the aesthetic choices that follow feel much more manageable.
Bathroom Tile Decision Matrix At a Glance
Here’s a quick-reference table to keep these priorities straight as you begin your search.
| Decision Factor | Key Considerations | Best For |
|---|---|---|
| Performance | Water absorption, slip-resistance (DCOF rating), durability (PEI rating), and ease of cleaning. | Prioritizing safety and longevity in high-moisture, high-traffic areas like shower floors and main bathroom floors. |
| Aesthetics | Scale, color, pattern, finish (matte vs. glossy), and grout color. | Creating a specific mood, making a small room feel larger, or adding a personal, decorative touch. |
| Budget & Lifecycle | Price per square foot, installation costs, trim pieces, sealer requirements, and long-term maintenance. | Making a financially sound choice that balances upfront investment with the tile’s expected lifespan and upkeep. |
Using this matrix helps you make balanced decisions, ensuring the tile you choose is as smart as it is stylish.
Aligning Practicality With Your Vision
The goal is to find that perfect intersection of function and beauty. Let’s say you’ve fallen in love with the look of large-format, glossy marble tiles. Beautiful, right? But on a shower floor, they’re a slip hazard waiting to happen.
The solution isn’t to abandon your vision. It’s to adapt it. Use those stunning large tiles on the walls, then find a smaller, matte-finish mosaic in the same marble for the shower floor. The smaller size and extra grout lines give you the grip you need, and the design stays cohesive.
By thinking about the “job” each tile needs to do—whether it’s providing a safe walking surface or creating a waterproof barrier—you naturally filter your options down to the most suitable candidates.
This methodical approach keeps you from making expensive mistakes. It ensures your final choice is stunning, sensible, and built to last. For a deeper dive into the selection process, this guide on how to choose bathroom tile like a pro offers some great additional tips.
In the next sections, we’ll break down each of these pillars, starting with the most important one: performance.
Prioritizing Performance in Bathroom Conditions
Before you fall in love with a striking pattern or a beautiful color, you have to think like an engineer. Your bathroom is a demanding environment—a place of constant moisture, temperature swings, and daily foot traffic.
Getting the technical details right isn’t just a good idea. It’s the only way to make sure your tile looks incredible for years to come.
The entire conversation around bathroom tile now starts with function. Wet areas are some of the highest-risk zones in a home, and performance is everything. Global tile production is expected to grow by around 4.5 billion square meters between 2021 and 2025, and a huge portion of that is destined for surfaces that must stand up to daily water exposure. You can see more details on this industry growth at Ceramic World Web.
This means your first filter for any tile should always be performance. Is it right for where it’s going?
Decoding Water Resistance Ratings
Not all tiles handle water the same way. The key metric here is the water absorption rate, which tells you exactly how porous a tile is. This is absolutely critical in a bathroom, where too much absorption can lead to tile failure or mold growth behind your walls.
Tiles are graded into four main categories:
- Non-vitreous: Absorbs more than 7% of its weight in water. Never use this in a bathroom.
- Semi-vitreous: Absorbs between 3% and 7%. Best saved for dry areas only.
- Vitreous: Absorbs 0.5% to 3%. This is a solid choice for bathroom floors and walls outside the direct splash zone of a shower.
- Impervious: Absorbs less than 0.5%. This is the gold standard for shower walls, floors, and tub surrounds. Porcelain tile is in this category, which is why it’s such a reliable workhorse.
So, what about beautiful, artisanal materials like handmade cement tiles? Their character comes from a unique composition that’s naturally more porous than factory-made porcelain. This doesn’t disqualify them at all; it just means they need one crucial extra step. Proper sealing during and after installation creates a protective barrier, making them perfectly suitable and stunning for any bathroom.
We’ve put together a full breakdown of using cement tiles on bathroom floors that walks through the sealing process and its benefits.
Navigating Slip Resistance for Safety
A beautiful floor is worthless if it’s unsafe. In a wet environment like a bathroom, slip resistance is a non-negotiable safety feature, especially on shower floors. The industry standard for measuring this is the DCOF (Dynamic Coefficient of Friction) rating.
For any surface that will be walked on when wet, look for a DCOF rating of 0.42 or higher. This value confirms the tile provides enough traction to prevent slips and falls.
The tile’s finish and even its size also play a huge role here. Polished, high-gloss tiles are notoriously slippery when wet and should be avoided for bathroom floors, especially inside the shower. Instead, look for tiles with a matte, unglazed, or textured finish.
Small tiles, like 2×2 mosaics or hexagons, are an excellent choice for shower floors. It’s not just about the tile itself—the sheer number of grout lines creates a grid of extra traction, significantly boosting safety underfoot. A large-format polished tile can look stunning on the wall, but its small-format, matte cousin is the real hero of the shower floor.
Understanding Durability for Floors and Walls
Finally, you need to consider how much wear and tear your tiles will face. The PEI (Porcelain Enamel Institute) rating measures a tile’s surface hardness and its ability to resist scratches and scuffs. It’s most important for floor tiles.
The PEI scale is simple, running from 1 to 5:
- PEI 1: Suitable for walls only; no foot traffic.
- PEI 2: Best for light-traffic areas like a guest bathroom floor.
- PEI 3: A great all-around choice for residential floors with normal traffic.
- PEI 4: Designed for moderate to heavy traffic, including light commercial use.
- PEI 5: Built for heavy-duty commercial applications.
For most homes, a tile with a PEI rating of 2 or 3 is more than enough. A guest bath that sees only occasional use will be perfectly fine with a PEI 2 tile, while a busy family bathroom would benefit from the added resilience of a PEI 3 or 4. When you match the tile’s durability to how you actually live, you ensure your floors will stand up to daily life without showing premature wear.
Defining Your Bathroom Tile Style
Now for the fun part. With the technical boxes checked, we can get into what really makes a bathroom yours: the style. This is where your personal taste takes over and you get to transform a purely functional room into a personal retreat.
Choosing the right look isn’t just about picking a color you like today. It’s about creating a mood—a cohesive design that feels right for years to come.
The secret is to think about scale, color, pattern, and even grout as individual tools. When you combine them with intention, they work together to build the exact atmosphere you’re aiming for, whether it’s bright and airy or dramatic and moody. Let’s break down how each choice shapes the final look.
The Impact of Tile Scale and Size
Tile size is one of the most powerful tools in your design arsenal, dramatically changing how spacious a room feels. This is especially true in bathrooms, which are often the most compact spaces in a home.
- Large-Format Tiles: Using tiles that are 12×24 inches or larger is a classic trick for making a small bathroom feel bigger and more serene. With fewer grout lines chopping up the view, the floor or walls read as a single, clean surface. The result is a modern, uncluttered aesthetic that can visually expand the room.
- Small-Format and Mosaic Tiles: On the flip side, smaller tiles like hexagons, penny rounds, or classic 2×2 mosaics bring in texture and intricate detail. They’re perfect for adding visual punch to a shower floor (where all those extra grout lines provide great slip resistance) or creating an eye-catching feature wall. Their smaller scale adds a handcrafted charm that big tiles just can’t match.
Here’s a go-to designer strategy: use the same material in different scales. Picture a gorgeous marble-look porcelain in a large 18×18 inch format on the floor, then repeated as a tiny 2-inch hex inside the shower. This creates a cohesive, high-end feel while still meeting the functional needs of each zone.
Harnessing Color and Pattern
Color sets the entire mood. When you’re deciding on a tile, the color palette is where your personality really gets to come through. It’s about more than just light versus dark; it’s about the feeling you want to have every time you step into the room.
What kind of atmosphere are you trying to create?
- Light and Bright: Whites, soft grays, and pale neutrals are timeless for a reason. They bounce light around, making any bathroom feel more open, airy, and clean. They also provide a versatile backdrop, letting you add pops of color with towels, art, or a painted vanity.
- Dark and Dramatic: Don’t be afraid of the dark. Deep blues, rich charcoals, or even black tiles can create a sophisticated, spa-like cocoon. It might seem counterintuitive, but a dark color in a small space can actually blur the room’s edges, creating a sense of depth and luxury.
Pattern, of course, is your chance to make a real statement. Whether you go for a bold geometric design on the floor or a classic handmade cement tile on a feature wall, pattern serves as the room’s focal point. It can act like a piece of art, setting the tone for the entire design. For a dose of inspiration, check out some of these stunning bathroom tile ideas to see how pattern can totally define a space.
The Decisive Role of Grout
Grout is so often treated as an afterthought, but it’s a critical design decision that can completely change the look of your tile. The color you pick determines whether your tiles blend together seamlessly or pop as individual shapes.
There are three main ways to think about grout color:
- Matching Grout: Choosing a grout that’s very close to your tile color creates a subtle, monolithic look. This is the perfect move when you want the tile pattern itself to be the star, minimizing the grid-like appearance of the grout lines.
- Contrasting Grout: Using a dark grout with a light tile (or vice versa) is all about emphasizing the shape of each tile. This delivers a bold, graphic effect that’s perfect for highlighting classic shapes like subway or hexagon tiles, turning the layout into a key design feature.
- Neutral Grout: A neutral gray or beige grout is the happy medium. It provides a bit of definition without the starkness of a high-contrast choice, and it has the huge practical benefit of being much easier to keep looking clean than pure white.
Ultimately, defining your bathroom’s style is a balancing act. You have to consider how the scale of your tile will play with your chosen color, how a pattern might energize the room, and how your grout will either highlight or soften the final look.
Managing Your Budget, Installation, and Long-Term Care
Falling in love with a tile is the fun part. The next—and arguably more important—part is getting it from the showroom to your floor and ensuring it stays beautiful for years to come. This is where the practical details of budget, installation, and upkeep come into play.
Thinking about these logistics upfront is the secret to turning a design dream into a successful project. It’s how you avoid surprise costs and make sure the tile you’ve so carefully chosen gets the expert installation it deserves.
Creating a Realistic Tile Budget
One of the most common mistakes we see is budgeting only for the tile itself. The true cost of a tile project goes far beyond the price per square foot. Building a complete budget is the only way to choose bathroom tiles without any financial headaches down the road.
Your total investment will include a few key components:
- The Tile Itself: This is your primary cost, usually calculated per square foot.
- Shipping and Delivery: Freight costs can be a significant line item, especially for heavy materials like handmade cement tile.
- Installation Materials: This covers everything from the thin-set mortar and waterproofing membranes to the grout and sealer.
- Professional Labor: Unless you’re a seasoned DIYer, hiring a qualified installer is a major part of the budget—often equaling or even exceeding the cost of the tile.
To avoid sticker shock, always get a complete estimate that covers all materials and labor before you commit. We’ve even built a handy resource to help you map everything out; check out our tile cost calculator and budget guide to get started.
A smart budget looks beyond the price per square foot. It accounts for every single component, from the tile adhesive to the installer’s time, giving you a complete picture of the final investment.
Understanding Timelines: In-Stock vs. Custom
Your project schedule can also steer your tile choice. If you’re on a tight deadline, in-stock options are your best friend. These tiles are often ready to ship within days, keeping your renovation on track without delays.
On the other hand, custom tiles, like those from Original Mission Tile’s Design Studio, offer the ultimate in personalization but require a longer lead time. The process involves design approvals and handcrafted production, which can take several weeks. If you have your heart set on a truly one-of-a-kind design, planning ahead is absolutely essential.
The Critical Role of Installation
Even the most exquisite tile can be completely ruined by a poor installation. This is especially true in a bathroom, where proper waterproofing and surface preparation are non-negotiable to prevent leaks, mold, and long-term structural damage.
Finding a qualified installer is paramount, particularly for specialty materials. Handmade cement tiles, for instance, have very different installation requirements compared to standard porcelain. An experienced pro will know how to prepare the surface correctly, when to seal the tiles (both before and after grouting), and how to handle the material with the care it deserves.
Before you hire anyone, always:
- Check References: Ask for photos of their previous work, specifically with the type of tile you’ve chosen.
- Verify Experience: Confirm they are familiar with your specific material, whether it’s cement, zellige, or large-format porcelain.
- Get a Detailed Quote: Make sure their estimate clearly outlines the full scope of work, including all surface prep and waterproofing steps.
Planning for Long-Term Maintenance and Care
The final piece of the puzzle is understanding what it will take to keep your tiles looking their best. Different materials come with vastly different care routines, and this “lifecycle cost” is a huge factor in your decision.
When clients ask us how to choose bathroom tiles, the maintenance conversation is front and center. The global ceramic and porcelain market—projected to hit USD 845.8 billion by 2034—is booming for a reason: many people want durable, low-maintenance finishes.
Handmade cement tiles, however, require a different kind of care. Think of it like maintaining a beautiful piece of hardwood furniture. It’s not difficult, but it needs a specific routine—initial sealing and periodic resealing—to protect its artisanal character from soaps, dyes, and hard water stains.
Even with the right tiles, maintaining a pristine bathroom takes ongoing effort, and it helps to know how to tackle specific issues like mold. For a deep dive into cleaning common bathroom problems, you can learn about effective black mold removal in showers. By matching a tile’s maintenance profile to your lifestyle, you ensure a choice you’ll love for the long haul.
To put this in perspective, here’s a quick comparison of the total cost of ownership for handmade cement versus mass-produced porcelain.
Lifecycle Cost Comparison: Cement vs. Porcelain Tile
| Consideration | Handmade Cement Tile (e.g., Original Mission Tile) | Standard Porcelain Tile |
|---|---|---|
| Upfront Cost | Moderate to High | Low to Moderate |
| Installation | Requires experienced installer; may cost more | Standard installation; widely available labor |
| Initial Sealing | Required before and after grouting | Not required |
| Routine Cleaning | pH-neutral cleaners only | Most standard cleaners are safe |
| Stain Resistance | Good (when properly sealed) | Excellent |
| Periodic Maintenance | Resealing required every 2-3 years | None required |
| Long-Term Value | Develops a unique patina; considered a premium feature | Consistent appearance; functional value |
| Repair | Individual tiles can be replaced | Individual tiles can be replaced |
While porcelain may seem cheaper upfront, the rich character and timeless beauty of a well-maintained cement tile floor can add significant aesthetic and resale value to your home. It’s a trade-off between minimal effort and artisanal charm.
Bringing Your Vision to Life: The Final Steps
You’ve wrestled with the technical details, landed on a look you love, and mapped out a budget. Now comes the exciting part—turning all that planning into a real, tangible bathroom. These are the final moves that take your tile from an idea to a finished installation.
This is where the rubber meets the road. It’s about making sure your choices look just as good in your home as they did in the showroom, locking in the right amount of material, and finding the right hands to bring it all together. Nail these details, and you’re set up for a smooth project and a stunning result.
Always, Always Start with Samples
If you take only one piece of advice from this guide, let it be this: get samples. This step is completely non-negotiable. What you see on a computer screen or under the harsh lights of a showroom is rarely what you get. The only way to truly know how a tile will feel in your bathroom is to see it in your bathroom.
Order a few samples of your top contenders. Don’t just glance at them—live with them. Place them on the floor, lean them against the shower wall, and see how they look next to your vanity. Check on them throughout the day. You’ll be amazed at how the cool morning light, warm afternoon sun, and your vanity lights at night can pull out different undertones. That perfect greige from the store might suddenly look lavender in your space.
Seeing a tile sample in your own home is the ultimate gut check. It’s your chance to confirm the color, texture, and scale work with your lighting and fixtures before you place a full order.
Measure Twice, Order Once
Once you’ve landed on “the one,” it’s time to figure out exactly how much you need. Getting your measurements right is the key to avoiding two very different kinds of headaches: the costly panic of running out mid-job or the wasteful expense of having boxes of tile left over.
Here’s a simple process to follow:
- Get Your Square Footage: Measure each surface you’re tiling—the floor, each shower wall, a niche, etc. For simple rectangles, it’s just length times width.
- Subtract Obstacles: Deduct the area for things you won’t be tiling, like a window or the face of a tub.
- Add Overage (The Important Part): This is critical. Always add extra to your total to cover cuts, accidental breakage, and any little mistakes during installation. The industry standard is to add 10-15% for overage. If you’re planning a complex layout like a herringbone pattern or tiling a room with lots of funky angles, stick closer to 15%.
Think of that extra tile as an insurance policy. Years from now, if a tile gets chipped or you need to make a repair, having leftovers from the original batch is the only way to guarantee a perfect color and size match.
Work with the Right Professionals
A gorgeous tile can be completely undermined by a bad installation. Working with experienced pros is the secret to a high-end finish, especially if you’ve chosen an artisanal material with its own set of quirks.
You might want to bring in help at two different stages:
- An Interior Designer: Feeling stuck on how to pull the whole room together? A designer is a master of cohesion. They can confirm your tile choice works beautifully with the vanity, lighting, and paint, ensuring the final space feels intentional and harmonious.
- A Skilled Installer: Finding a qualified tile setter is absolutely essential. This is especially true for handcrafted products like cement tile, which have very specific needs for installation and sealing. Don’t be shy—ask for references and photos of their work, specifically with the type of material you’ve chosen.
A great installer does so much more than just stick tiles to a wall. They ensure the substrate is perfectly prepped and waterproofed, the layout is balanced and symmetrical, and the finished job is built to last a lifetime. This is not the place to cut corners; your investment in quality labor will pay for itself every single day.
Still Have Questions About Bathroom Tiles? We Have Answers.
Even after you’ve narrowed down the big picture, the small details can feel overwhelming. It’s completely normal. Finalizing your tile choices often brings up a few last-minute questions, and getting them sorted is the key to moving forward without second-guessing yourself. Let’s tackle some of the most common ones we hear every day.
Getting these details right is what makes a design truly work for your daily life, not just look good on day one.
What’s the Best Tile for a Shower Floor?
When it comes to shower floors, two things trump everything else: safety and water resistance. Your best bet will almost always be smaller-format tiles, like classic mosaics or even 4×4 squares, in materials like porcelain or ceramic.
The logic is simple: more grout lines create more grip, which is exactly what you need on a wet, soapy surface. Always hunt for tiles with a matte or textured finish and a DCOF rating of 0.42 or higher. While those big, glossy tiles are stunning on a feature wall, they’re a serious hazard underfoot in a shower. Properly sealed cement tiles in a smaller format are also a fantastic choice, giving you that unique, handcrafted feel with excellent slip resistance.
Can I Put the Same Tile on the Floor and the Walls?
Absolutely. In fact, it’s a brilliant design move. Running the same tile from the floor up the walls creates a seamless, cohesive look that can make any bathroom—especially a small one—feel much larger and more serene.
There’s just one non-negotiable rule: the tile must be rated for floor use. Floor tiles are built tough enough for foot traffic, so they have no problem going on a wall. The reverse is never true. You can also play with the concept by using different scales of the same tile; think a large 12×24 on the floor and a matching 2×2 mosaic in the shower to add subtle texture while keeping the look unified.
This approach creates a calming, spa-like atmosphere. By wrapping the room in a single material, you instantly minimize visual clutter for a clean, expansive feel.
How Should I Pick a Grout Color?
Don’t underestimate grout color—it’s a powerful tool that can completely change the personality of your tile. The right choice depends entirely on the vibe you’re going for.
You generally have three paths to choose from:
- Matching Grout: Want the tile itself to be the star? Choose a grout color that melts into the tile. This creates a subtle, blended look that makes a surface feel monolithic and helps a small room feel bigger.
- Contrasting Grout: To make a bold, graphic statement that highlights the shape and pattern of your tiles, go for high contrast. Think of the classic look of dark charcoal grout with crisp white subway tiles—it’s pure impact.
- Neutral Grout: A soft gray or beige is the perfect middle ground. It provides a little definition without being as jarring as a high-contrast choice, and it’s far more forgiving and easier to keep clean than a bright white.
How Much Extra Tile Do I Really Need to Order?
The industry standard is to order 10-15% more tile than your project’s measured square footage. Think of this “overage” as your project’s insurance policy. It’s there to cover any cuts, accidental breakage during installation, or minor miscalculations along the way.
If you’re planning a more complex layout, like a herringbone or diagonal pattern, or if your bathroom has lots of corners and niches, you should definitely lean toward 15% or even 20%. Having a box or two of extra tile left over is also a lifesaver for future repairs. Trying to find a perfect match from a different production batch years down the road is next to impossible.
At Original Mission Tile, we believe the perfect tile is a blend of performance, beauty, and personal expression. Whether you’re drawn to the timeless charm of handmade cement or the clean lines of modern porcelain, our collection is here to bring your vision to life. Explore our in-stock and custom tile options to start your project today.