Sealing your tile isn’t just an extra step; it’s one of the smartest investments you can make in the beauty and lifespan of your surfaces. A good ceramic tile sealer acts like a shield, repelling stains and moisture. It also makes day-to-day cleaning worlds easier, especially for porous materials like unglazed ceramic or handmade cement tiles.
Why Sealing Your Tiles Is a Crucial Investment

Think of a tile sealer as an invisible raincoat for your floors and walls. Without one, porous surfaces like grout and unglazed tiles are like a cotton shirt in a downpour—they soak up everything. Spills, dirt, and moisture get absorbed, leading to permanent stains, discoloration, and even mildew growth deep inside the material.
Applying a sealer closes off all those microscopic pores. This simple step stops contaminants from ever getting a foothold, preserving the original color and craftsmanship of your tile for years.
Protect Your Grout and Tile
While many modern ceramic tiles have a non-porous glazed finish, the grout lines between them are almost always cement-based and incredibly absorbent. Grout is often the weak link in any tile installation.
Unsealed grout acts like a sponge, readily soaking up coffee, wine, or dirty mop water. This not only creates ugly stains but can weaken the grout’s structure over time, causing it to crack and crumble.
Sealing the entire surface—both tile and grout—creates a single, uniform barrier. It’s a small effort that transforms a vulnerable surface into a resilient one, ensuring your entire floor or wall is protected, not just the individual tiles.
Simplifying Maintenance and Cleaning
One of the best immediate benefits of sealing is how much easier cleaning becomes. Dirt and grime sit on top of the sealed surface instead of sinking in, so they wipe away with minimal effort. This proactive step is a cornerstone of smart property care. In fact, understanding the long-term benefits of sealing aligns with broader preventive maintenance best practices for any valuable asset.
This is especially critical for handmade tiles. Maintaining the unique character of cement tiles, for example, requires specific care, which we cover in our guide on https://originalmissiontile.com/cleaning-cement-tiles/.
This isn’t just our opinion; the market reflects a growing awareness. The global tile sealer market was valued at USD 3.01 billion in 2023 and is expected to keep growing, showing just how much homeowners and builders rely on these protective coatings. At the end of the day, sealing isn’t an expense—it’s a smart strategy to protect your home’s beauty and value.
Exploring the Two Main Families of Tile Sealers

When you first dive into the world of ceramic tile sealers, it can feel a little overwhelming. The good news is that they all fall into one of two main families: penetrating sealers and topical sealers. Knowing the difference isn’t just technical—it’s the key to making sure your tile looks and performs exactly as you envisioned for years to come.
Think of it like treating a high-quality leather boot. A penetrating sealer is like a conditioning oil that soaks deep into the material, protecting it from water and stains from the inside out. It doesn’t change the leather’s natural look or feel. A topical sealer, on the other hand, is like adding a shiny patent finish over the top—it sits on the surface, creating a visible, protective shell.
The Subsurface Guardian: Penetrating Sealers
Also known as impregnating sealers, these are the unsung heroes for any porous material. They are engineered with molecules small enough to dive deep into the microscopic pores of your tile and grout. Once they’re in, they bond with the material itself, creating a barrier without leaving any film on the surface.
This process sets up an invisible, breathable shield that repels both water and oil-based liquids. Spills bead right up on the surface instead of soaking in, giving you precious time to wipe them away before they can cause a permanent stain. Best of all, because the sealer works from within, it doesn’t alter the tile’s natural finish, texture, or color.
A key benefit of penetrating sealers is their preservation of the tile’s natural slip resistance and appearance. For materials like handmade cement tiles, where the silky, matte finish is a defining characteristic, this is the only way to protect the tile without compromising its design integrity.
Protecting these surfaces is more important than ever. The global ceramic tiles market was valued at a massive USD 195.20 billion in 2024, and with proper sealing boosting water resistance by over 90%, it’s a step no one should skip. This is especially true for artisanal products like our handmade cement encaustics from Original Mission Tile, which depend on sealing to preserve their beauty, as detailed in reports on the global ceramic tiles market.
The Surface Shield: Topical Sealers
Topical sealers, often just called coatings or surface sealers, work in a completely different way. Instead of soaking in, they form a protective film right on top of the tile. These are typically made from acrylics or urethanes that create a noticeable, physical layer.
This film can offer fantastic stain protection and comes in a range of finishes, from a subtle satin sheen to a high-gloss, wet look. While effective at blocking stains, they come with some significant trade-offs.
Because they sit on the surface, topical sealers are vulnerable to everyday wear and tear from foot traffic. Over time, they can scuff, scratch, yellow, or even start to peel, requiring a full-on stripping and reapplication process. This is far more labor-intensive than simply reapplying a penetrating sealer. They can also make surfaces dangerously slippery when wet and may trap moisture underneath, leading to a cloudy or hazy appearance over time.
Penetrating vs. Topical Sealers at a Glance
To make the choice even clearer, here’s a quick side-by-side comparison of the two main sealer families.
| Feature | Penetrating Sealer (Impregnating) | Topical Sealer (Coating) |
|---|---|---|
| How it Works | Soaks into the pores of the tile | Forms a protective film on the surface |
| Appearance | Invisible; preserves the tile’s natural look and finish | Creates a visible sheen, from satin to high-gloss |
| Best For | Porous materials: unglazed ceramic, cement tile, natural stone, grout | Non-porous surfaces like slate or quarry tile to add gloss |
| Slip Resistance | Does not affect the tile’s natural slip resistance | Can make surfaces more slippery, especially when wet |
| Longevity & Maintenance | Long-lasting (1-5+ years); easy reapplication without stripping | Wears down with traffic; requires stripping and reapplication |
| Breathability | Allows moisture vapor to escape | Can trap moisture, potentially causing a hazy or cloudy look |
| Primary Goal | Stain protection from within while maintaining original character | Surface-level stain blocking and a specific aesthetic (sheen) |
This table helps illustrate why the “right” choice depends entirely on your tile type and desired outcome.
Making the Right Choice for Your Project
For the vast majority of projects involving porous tiles—like unglazed ceramic, natural stone, terracotta, and especially handmade cement tiles—a penetrating sealer is the superior choice. It delivers robust, long-lasting protection without changing the authentic character of the material you fell in love with.
Topical sealers have a much more niche role. They are sometimes used on resilient, non-porous surfaces to achieve a specific high-gloss look, but they are almost never the right call for delicate, porous, or handmade tiles. Choosing the right family of ceramic tile sealers is the first and most important step toward ensuring your beautiful tile installation looks great for a lifetime.
How to Choose the Perfect Sealer for Your Tiles
Picking the right sealer can feel like a high-stakes decision, but it all comes down to a few key factors. It’s not about finding the single “best” product on the shelf, but the one that’s perfect for your specific tiles, their location, and the look you want to achieve. Get this right, and your tile installation will not only look incredible but will also stand up to everything daily life throws at it.
The most important factor to understand is porosity—how much liquid a tile can absorb. Think of it like this: a glazed ceramic tile is like a raincoat, with a vitrified, non-porous surface. A beautiful handmade cement tile, on the other hand, is like a dense sponge, ready to soak up any spill it meets.
Understanding this one characteristic is the key to making a smart choice. A non-porous tile doesn’t need its surface sealed, but its grout lines absolutely do. A porous tile needs complete protection across its entire body to block stains and moisture before they can set in.
Assess Your Tile’s Porosity
Before you even glance at a sealer label, you need to know your tile. Glazed ceramic and porcelain tiles have a layer of liquid glass fired onto their surface, which makes them inherently stain- and water-resistant. For these tiles, your main worry isn’t the tile face—it’s the grout.
Unglazed ceramic, terracotta, natural stone, and handmade cement tiles are a completely different story. These materials have a porous structure, meaning they will readily absorb liquids.
The Water Drop Test: This is the easiest way to check. Just place a few drops of water on a clean, dry tile. If the water beads up on the surface, your tile is non-porous. If it soaks in and darkens the tile, it’s porous and absolutely requires a high-quality penetrating sealer.
Match the Sealer to the Finish
Next up is aesthetics. How do you want your tiles to look once they’re sealed? This is where you decide between keeping the natural look or adding a bit of sheen.
- Natural/Matte Finish: If you want to keep the original, authentic appearance of your tile, a penetrating sealer is your only real option. It works from within the tile, offering invisible protection without creating any film on the surface. This is the go-to for materials like handmade cement tile, where that silky matte finish is a huge part of its charm.
- Sheen/Gloss Finish: If you’re after a “wet look” or a high-gloss shine, a topical sealer (also called a coating) is what you need. These sit on top of the tile and create a visible, often glossy, film. A word of caution: these are rarely a good fit for porous floor tiles, as they can scuff, yellow over time, and make surfaces dangerously slippery.
Consider the Location and Environment
Where are the tiles going to live? The environment plays a huge role in the kind of protection they’ll need. An indoor bathroom wall has very different demands than an outdoor patio or a busy kitchen floor.
Indoor vs. Outdoor Use
Not all sealers can handle the great outdoors. Products meant for exterior use must be UV-stable to keep them from yellowing or breaking down in direct sunlight. They also need to be tough enough to withstand freeze-thaw cycles and much greater exposure to moisture. Always, always check the label to make sure a sealer is rated for exterior applications if you’re using it outside.
VOC Levels for Interior Spaces
For any indoor project—especially in tight spaces like bathrooms—pay close attention to Volatile Organic Compounds (VOCs). Low-VOC or zero-VOC sealers are typically water-based and release fewer harmful fumes into your home’s air while they cure. They’re a much healthier choice for you and your family. The good news is that many high-performance water-based ceramic tile sealers now offer protection that’s every bit as good as their old-school, solvent-based counterparts.
Do Not Forget the Grout
If you remember one thing, make it this. This is the one rule that applies to nearly every single tile installation, and it’s the one most often skipped. Even if you’ve installed fully vitrified, non-porous porcelain tiles, your grout lines are almost certainly porous.
Grout is typically cement-based, which makes it a magnet for dirt, grime, and moisture. An unsealed grout line in a kitchen will quickly absorb spills from cooking, leading to permanent, ugly stains. You can learn more about how different tiles hold up in our guide on the best tile for a kitchen backsplash.
In a bathroom, unsealed grout is a breeding ground for mold and mildew—which is not just unsightly, but unhealthy. Applying a penetrating sealer over the entire surface (tile and grout together) creates a seamless, protected finish that makes cleanup a breeze and keeps your installation looking fresh for years. This is a non-negotiable step for long-term success.
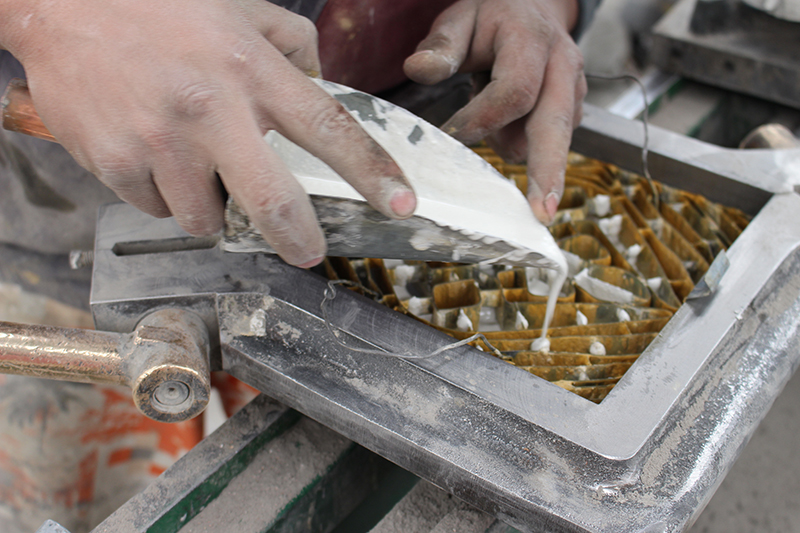
A Step-by-Step Guide to Flawless Sealer Application
Getting your ceramic tile sealer application right is the one thing that separates a durable, professional-looking floor from a streaky, sticky mess. This guide walks you through the whole process, so you can get a flawless finish whether you’re a seasoned pro or a first-time DIYer.
The most important step—and the one most people skip—is testing. Before you even think about sealing the entire surface, test your product on a spare tile or in a hidden spot like a closet corner. This quick check makes sure the sealer won’t do anything unexpected to the color or finish of your tile.
Prepare the Surface for Success
Good prep isn’t just a suggestion; it’s non-negotiable. A sealer can only do its job if it bonds to a surface that is perfectly clean, totally dry, and free of any dust or debris. If any grease or moisture is left behind, it gets trapped under the sealer, leading to weak spots and a cloudy, blotchy finish.
Before you start, get that ceramic tile surface immaculately clean. For the best results without causing any damage, it helps to understand safe home cleaning methods like soft washing. This approach removes all the grime without harming the tile or grout.
Here’s a quick prep checklist:
- Deep Clean: Scrub the tiles and grout lines with a pH-neutral cleaner. Stay away from harsh, acidic, or bleach-based products, which can eat away at your grout.
- Rinse Completely: Use plenty of clean water to rinse off all the cleaning residue. Leftover soap will mess with the sealer’s ability to stick.
- Dry Thoroughly: Let the entire surface dry completely. After a deep clean, this can take 24-48 hours. Rushing this is a classic mistake that traps moisture under the seal.
Gather Your Tools and Materials
Having the right tools ready to go makes the job smooth and easy. You don’t need a bunch of expensive gear, just the right items for the task at hand.
- Sealer: The specific penetrating or topical sealer you picked out for your tile.
- Applicators: Depending on the product, you might need a lint-free microfiber cloth, a foam brush, a paint pad, or even a low-pressure sprayer.
- Clean Cloths: Grab several extra clean, dry, lint-free cloths for wiping off any excess sealer.
- Safety Gear: Always wear gloves and keep the area well-ventilated by opening windows or using a fan.
This flowchart is a great final check to confirm you’ve got the right sealer for your tile’s porosity, the finish you want, and where it’s located.

As the chart shows, porous tiles in wet areas almost always need a penetrating sealer to keep their natural look while getting the protection they need.
The Application Process
Alright, your surface is prepped and your tools are ready. It’s time to seal. The golden rule here is to work in small, manageable sections and always apply thin, even coats.
Always read and follow the manufacturer’s instructions on the product label. Application methods and drying times can vary significantly between different ceramic tile sealers.
Application Steps:
- Apply a Thin Coat: Using your applicator, spread a thin, even layer of sealer over a small section (think a 3×3 foot area). Don’t let it puddle up.
- Allow Dwell Time: Let the sealer sit for the recommended time, usually somewhere between 5-15 minutes. This gives it time to soak into the pores of the tile and grout.
- Wipe Away Excess: This is the critical part. Before the sealer starts to dry on the surface, use a clean, dry cloth to wipe away all of the excess. Any sealer left sitting on top will dry into a tacky, hazy film.
- Repeat in Sections: Move on to the next section and repeat the process until you’ve covered the entire area.
- Consider a Second Coat: For very porous tiles, a second coat might be a good idea. Wait for the manufacturer’s recommended time between coats, then repeat the application steps.
The payoff for proper sealing is huge. A well-applied sealer can boost stain resistance by 80-95% and cut down your cleaning time by up to 50%—a major win for homeowners and remodelers.
Finally, you have to respect the curing time. Keep everyone (and everything wet) off the sealed surface for at least 24-72 hours, or whatever the product label says. A full cure can take several days, so be gentle with the surface at first.
Keeping Your Tiled Surfaces Beautiful for the Long Haul

The job isn’t over once the sealer dries. Think of that first application as just the beginning. Real, long-term protection comes from building a simple, sustainable care routine to keep your tile looking as good as the day it was installed.
A proactive approach starts with your daily cleaning. The most important rule? Stay away from harsh, acidic, or abrasive cleaners. Products with bleach, ammonia, or even vinegar will slowly eat away at the sealer, stripping its protective power and leaving your tile and grout exposed. Instead, make pH-neutral cleaners and a soft microfiber mop your best friends.
How to Know When It’s Time to Reseal
No sealer is a “set it and forget it” solution. Daily life—foot traffic, cleaning, and moisture—will eventually wear down that protective shield. The good news is your tiles will tell you exactly when they need a little TLC. You just have to know what to look for.
The easiest way to check is with the water drop test. It’s a simple, reliable method that takes only a minute. Just splash a few drops of water onto the tile and grout, then watch what happens.
- If the water beads up like rain on a freshly waxed car, your sealer is holding strong. You’re good to go.
- If the water soaks in and darkens the tile or grout within a few minutes, the barrier is gone. That’s your signal to reseal.
Do this quick test every six months or so in your busiest areas. It’s a five-minute checkup that can prevent years of battling stubborn stains and deep-set grime.
This is especially critical for porous, handcrafted materials. The stunning, saturated color of handmade cement tile, for instance, depends entirely on its sealer. A regular water test is the single best way to preserve its unique beauty.
Setting a Realistic Resealing Schedule
So, how often should you plan to reseal? The answer is: it depends. There’s no universal timeline. Your resealing schedule should be based entirely on how much wear and tear a specific area gets.
A smart maintenance plan adapts to real-world use.
- High-Traffic Areas (1-3 years): Think entryways, kitchen floors, and main hallways. These spots see the most action, so the sealer wears down fastest. Test them annually and plan to reseal every few years.
- Medium-Traffic Areas (3-5 years): This includes bathroom floors, laundry rooms, and kitchen backsplashes. They get moderate wear and moisture, so a resealing schedule of every 3-5 years is a solid guideline.
- Low-Traffic Areas (5+ years): Vertical surfaces like shower walls or decorative accent walls see very little direct contact. These can often go five years or more before needing a fresh coat of ceramic tile sealer.
By performing the water drop test and tailoring your schedule to actual usage, you turn maintenance from a reactive headache into a proactive strategy. This simple approach keeps your tiled surfaces protected and beautiful, preserving their value for years to come.
Common Questions About Tile Sealers
Even the most detailed project plans hit a few snags. This section is your go-to guide for the real-world questions we hear every day from designers, installers, and homeowners about tile sealers. Think of it as your cheat sheet for solving problems before they happen, so you can feel confident you’ll get a flawless finish.
We’ve pulled together the common concerns that pop up on job sites and in design meetings to give you practical, no-nonsense answers.
Do I Really Need to Seal Glazed Ceramic Tiles?
This is probably the question we hear most, and the answer is a big yes—but not for the reason you might think. The face of a glazed ceramic tile is already non-porous. It’s essentially glass, so it won’t stain. The problem is the grout.
Grout is the weak link. It’s almost always cement-based, which means it’s incredibly absorbent. Left unsealed, it will drink up every coffee spill, muddy footprint, and drop of moisture it meets, leading to stubborn stains, mold, and mildew.
So, while you aren’t sealing the tile itself, you’re sealing the entire system. When you apply a quality penetrating sealer over both the tile and the grout, you’re creating one continuous, protected surface that’s a breeze to clean. It’s a non-negotiable step for full protection.
How Is Sealing Handmade Cement Tile Different From Ceramic?
The difference is night and day, and getting this wrong is a costly mistake. A glazed ceramic tile is impervious, meaning liquids can’t get in from the top.
A handmade cement tile is the complete opposite. Its rich, velvety color isn’t a top coat; it’s part of the tile’s body, made from cement, sand, and mineral pigments. That beautiful, matte finish is also naturally porous.
A cement tile absolutely must be sealed to block stains from soaking into its core. The only right choice is a premium penetrating sealer, which works from the inside out to protect the tile while preserving its signature silky, matte look. Using a topical sealer is a huge error—it traps moisture and masks the tile’s authentic character.
What Happens If I Apply Too Much Sealer?
When it comes to sealer, more is definitely not better. A classic rookie mistake is putting on too much penetrating sealer or simply forgetting to wipe off the excess before it dries on the surface. When that happens, the unabsorbed sealer dries into a sticky, hazy film.
Not only does this residue look awful, but it’s also a magnet for dirt and dust. Your floors will end up looking streaky and permanently dirty.
If this happens to you, the only fix is a specialized sealer stripper and a lot of elbow grease to get the film off so you can start over. Always follow the manufacturer’s instructions to the letter. They nearly always tell you to wipe every bit of excess sealer off the surface within 5-15 minutes of applying it.
Can I Use the Same Sealer for Indoor and Outdoor Tiles?
Not usually, and this is another area where you need to be careful. It’s critical to check the product label to see if a sealer is rated for exterior use. An outdoor sealer has a much tougher job to do.
It has to be UV-stable to keep from yellowing, cracking, or breaking down under the sun. It also needs a special formula to handle huge temperature swings and way more moisture.
Here’s what you need in an outdoor sealer:
- UV Resistance: Protects against sun damage and fading.
- Breathability: Lets moisture vapor from the ground escape instead of getting trapped under the tile.
- Temperature Stability: Can survive freeze-thaw cycles without failing.
Some pro-grade ceramic tile sealers are designed to work both indoors and out, but many aren’t. If you use an indoor-only sealer on a patio, it will almost certainly fail within a single season, leaving your beautiful tile exposed to the elements.
At Original Mission Tile, we believe that understanding the nuances of materials is key to creating timeless spaces. Our handmade cement tiles are crafted to last a lifetime, and the right sealer is what ensures their beauty endures. Explore our authentic, artisan-made collections at https://originalmissiontile.com.