Getting the right amount of tile for your project comes down to a simple, three-part formula: figure out your total square footage, subtract any areas you won’t tile (like a kitchen island or bathtub), and then add extra for cuts and waste. That’s it. Nailing this process is the secret to a smooth project and avoiding last-minute, costly reorders.
Your Foundation for a Flawless Tile Project
The success of any tile job is decided long before the first tile is set. It all starts with thoughtful, precise measurements. This isn’t just about finding the area of a room; it’s about creating a strategic plan that accounts for tricky cuts, minimizes waste, and ensures every beautiful, handmade tile finds its perfect home.
Before you get started, it helps to have a good sense of the different types of tile flooring for kitchens and how their unique characteristics might affect your layout and cuts.
The Importance of Overage
Let’s talk about the most critical part of your calculation: overage. This is the extra tile you order beyond your exact square footage. Forgetting this buffer is the number one mistake that can bring an entire project to a screeching halt.
Think of overage as your project’s insurance policy. It’s there to cover you for:
- Cuts: Tile almost never fits a space perfectly. You’ll always be cutting pieces for edges, corners, and around obstacles like pipes or outlets.
- Mistakes: A tile can break, or a cut can go wrong. It happens to the best of us, even seasoned pros.
- Future Repairs: Having a few matching tiles stashed away is an absolute lifesaver if a tile gets chipped or cracked years down the road.
Any professional installer will tell you they never order the exact amount of tile needed. Plan for a minimum of 10% overage for simple, straight-lay patterns. For more complex layouts like herringbone or diagonal, bump that up to 15-20%. This small investment upfront saves a world of frustration later.
This isn’t a new concept. Since Original Mission Tile began crafting handmade cement tiles back in 1900 using traditional hydraulic-press methods, accurate measurement has been the bedrock of every great installation. In fact, if you look at historical job site records from the early days of the tile industry, miscalculations could lead to waste rates as high as 25-30%!
Gather Your Essential Tools
You don’t need a truck full of expensive gear to get started. A few simple tools are all it takes to get reliable numbers. Having these ready before you begin will make the whole process faster and far more accurate.
And while you’re planning, if you’re tiling a space that gets wet, you might want to check out our guide on how anti-slip tile can enhance safety.
To get the job done right, you really just need a few basics.
Essential Tile Measuring Toolkit
Gather these essential tools before you begin to ensure your measurements are accurate from the start.
| Tool | Why You Need It |
|---|---|
| Steel Tape Measure (25 ft.) | Your go-to for getting accurate wall and floor dimensions. Steel won’t stretch. |
| Notepad & Pencil | For sketching your room layout and jotting down every single measurement. |
| Calculator | To quickly and accurately calculate square footage and overage. |
| Laser Measure (Optional) | A great tool for measuring long, unobstructed distances quickly and on your own. |
With these items in hand, you’re ready to map out your space and calculate your tile needs with confidence.
Measuring Standard Floors and Walls
Getting your tile project started means turning your space into a set of reliable numbers. For simple rooms, like a rectangular kitchen floor or a few bathroom walls, the math itself isn’t complicated. But as anyone who’s done this before will tell you, the small details are what separate a flawless finish from a frustrating weekend project.
The foundation for any floor measurement is a simple formula: Length × Width = Square Footage.
Calculating a Basic Floor
For a standard rectangular room, grab your steel tape measure. Start by measuring the length of the room from one wall to the opposite wall. Next, do the same for the width. It’s always a good idea to measure each dimension in at least two different spots. Walls are almost never perfectly parallel, and you should always use the larger of the two measurements to be safe.
Let’s walk through a common example: a straightforward kitchen floor that is 10 feet wide and 12 feet long.
- Just multiply the length by the width: 10 ft × 12 ft = 120 square feet.
This 120 square feet is your base measurement. It’s the total area you need to cover, but it’s not the amount of tile you should order just yet. Think of it as your starting point before we add a smart buffer for cuts and waste, which we’ll get to later.
Measuring Walls and Dealing with Obstacles
Measuring walls uses the same length-times-width logic, but here you need to be smart about subtracting the areas you won’t be tiling. This is a classic spot where DIY projects go sideways, leading to over-ordering and wasted money. Common obstacles to account for include:
- Doorways: You’re not going to tile over a door opening.
- Windows: The area of the window needs to be subtracted from your total.
- Permanent Fixtures: Think bathtubs, large vanity cabinets, or built-in shower enclosures.
Let’s apply this to a real-world project, like a three-wall tub surround. Imagine each of the three walls is 5 feet wide, and the tile will go up 8 feet high.
- First, get the total wall area: (5 ft + 5 ft + 5 ft) wide × 8 ft high = 120 square feet.
- Next, measure any obstacles. Let’s say there’s a window on one wall that is 2 feet by 3 feet.
- Calculate the window area to subtract it: 2 ft × 3 ft = 6 square feet.
- Finally, find your actual tiling area: 120 sq ft (total) – 6 sq ft (window) = 114 square feet.
Pro Tip: When you’re measuring walls, always subtract the full area of major obstacles like windows and doors. But don’t sweat the small stuff. For minor interruptions like electrical outlets or single pipes, it’s not worth the complex math to subtract them. Your overage will more than cover the small cuts needed to fit around those.
Nailing these wall measurements is especially important for bathroom renovations where every inch counts. To see how these calculations translate into stunning real-world designs, take a look at our collection of inspiring shower ideas for your bathroom.
By carefully measuring your space and methodically subtracting obstacles, you’re creating an accurate blueprint. This simple step ensures you’re only buying the tile you truly need—plus that all-important buffer for cuts and mistakes.
Tackling Complex Layouts and Angled Walls
Perfectly square rooms are a rare find. Most spaces come with their own quirks, from L-shaped kitchens to walls that don’t quite meet at 90 degrees. This is where measuring for tile goes from simple math to a smart puzzle. The trick isn’t to measure the whole complex space at once, but to break it down into smaller, manageable rectangles.
Think about an L-shaped room. Instead of trying to calculate its area in one go, just slice it into two separate rectangles. Measure the length and width of each one, calculate their individual square footage, and then add the two numbers together. It’s a simple move that swaps guesswork for accuracy.
How Your Tile Pattern Changes Everything
The pattern you choose has a huge impact on how much tile you’ll actually need. A straightforward grid or running bond is the most material-efficient, since it creates the fewest weird cuts. But as soon as you get into more decorative layouts, your waste factor—and your overage—is going to climb.
- Diagonal Layout: Tiling on a 45-degree angle means nearly every tile that touches a wall will need to be cut, creating lots of little triangular offcuts.
- Herringbone or Chevron: These patterns are gorgeous, but they are notorious for creating waste. Every single row involves angled cuts, which means you can’t reuse most of the pieces you trim off.
- Complex Repeat Patterns: Our custom patterns, like star and cross or arabesque formats, use multiple shapes and sizes. This naturally generates more offcuts than a simple single-tile layout.
This infographic breaks down the basic measurement process you’ll use for any area before you start adding in the complexity of a pattern.
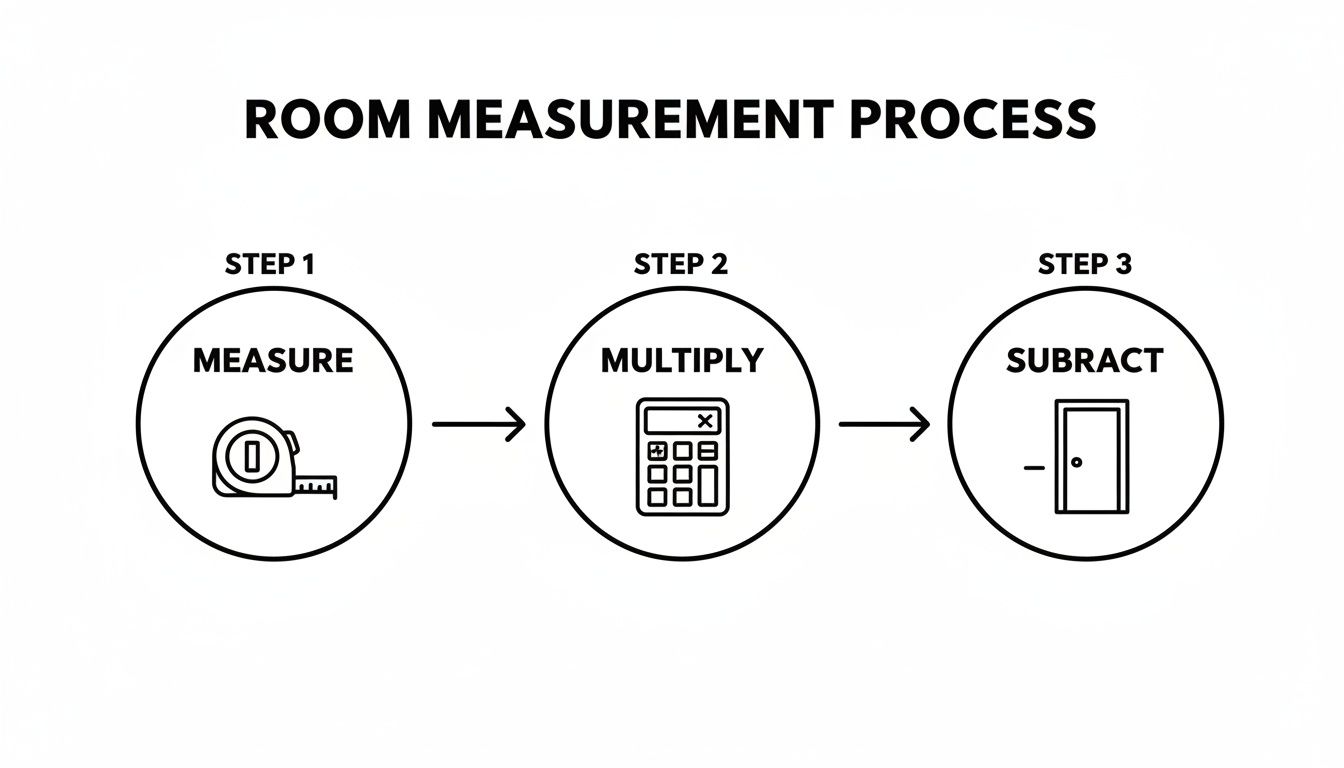
It’s a simple formula: measure the dimensions, multiply to find the total area, and then subtract any large obstacles like islands or tubs.
Calculating Overage for Intricate Designs
For a standard layout, ordering a 10% overage is a safe bet. But when you move to a more complex pattern, you absolutely must increase that buffer. A diagonal layout needs at least a 15% overage. For intricate herringbone or chevron patterns, you should plan for 20% extra. This isn’t just a suggestion; it’s the key to finishing your project without a stressful, last-minute tile order.
Don’t try to save a few dollars by skimping on your overage. The cost of shipping a few extra tiles later—if the same dye lot is even available—will always be more expensive and cause significant delays. Get it right from the start.
Inaccurate measurements are a huge issue across the industry, contributing to the 18% of U.S. installation claims filed each year. For example, on a 200 sq ft project using a diagonal layout, you’d order 230 sq ft (15% overage) to be safe. If you’re curious about industry standards, this technical focus on gauged porcelain tile offers a good look into how materials and methods have evolved.
Calculating Overage and Planning for Grout Lines
You can always spot an amateur tiling job by the frantic, last-minute run to the store. A professional one, on the other hand, always finishes with a few extra tiles left over. That difference comes down to mastering two details that make or break a high-quality finish: overage and grout joints.
These aren’t just technical terms; they’re the bridge between simply covering a space and creating a durable, beautiful installation that lasts.
Calculating your overage—the extra tile you order beyond your exact square footage—is your project’s most important safety net. Think of it as insurance. It’s the buffer that accounts for inevitable cuts around corners, doorways, and pipes. It covers accidental breakage during handling and gives you perfectly matched tiles for any future repairs.
Running out of material mid-project is a disaster, especially with handmade tiles where color and texture can vary slightly between batches.
How Much Overage Is Enough?
The right amount of extra tile depends entirely on your layout pattern and the complexity of your room. For a simple grid or running bond layout in a basic rectangular room, a 10% overage is the industry standard. It’s a safe cushion for most straightforward jobs.
However, as soon as you introduce more complex designs, that number needs to climb.
- Diagonal Layouts: Tiling on a 45-degree angle dramatically increases the number of cuts you’ll make along the edges. Plan for a minimum of 15% overage.
- Herringbone and Chevron: These intricate patterns are notorious for creating waste. The angled cuts on one end of a tile often can’t be used elsewhere, so a 20% overage is essential to avoid headaches.
- Large-Format Tiles: With bigger tiles (think 24×24 or larger), a single bad cut or break results in a lot more wasted material. It’s smart to lean toward a 15% overage even for simple layouts.
A common mistake is trying to save a few dollars by cutting the overage too close. Trust me, the cost and delay of rush-shipping a few extra tiles—assuming the same production batch is even available—will always outweigh the initial savings.
Here’s a quick-reference table to help you plan.
Recommended Overage by Tile Pattern and Project Type
Use this guide to calculate how much extra tile you’ll need based on the complexity of your layout.
| Tile Pattern / Project Type | Recommended Overage Percentage |
|---|---|
| Straight Lay / Grid / Running Bond | 10% |
| Large-Format Tile (Over 18″) | 15% |
| Diagonal Layout | 15% |
| Rooms with Many Corners/Obstacles | 15% |
| Herringbone / Chevron / Intricate Patterns | 20% |
| Repeat Pattern Murals | 20% or more |
Always round up your final number. It’s far better to have a few extra tiles in the garage than to be one tile short of finishing the job.
Factoring in Your Grout Lines
Grout lines might seem tiny, but they have a huge impact on your final layout. That thin 1/8-inch or 3/16-inch gap adds up across the length of a floor or wall, and ignoring it can shift your entire pattern, creating awkward alignment issues at the other end of the room.
While the grout joint doesn’t drastically change your total square footage order, accounting for it is vital for layout planning.
Before you even think about mixing thin-set, do a “dry lay.” This is non-negotiable. Lay out at least a few rows of tile on the floor with your chosen spacers to see exactly how your pattern will flow. This simple step helps you confirm your starting point and ensures the layout looks balanced and centered. It’s the best way to catch potential problems before they’re literally set in stone.
Turning Your Measurements Into a Tile Order
Okay, you’ve done the hard work. You have your numbers, you’ve factored in your overage, and now it’s time to translate all of that into a clear, actionable tile order. This part is especially important when you’re working with handmade cement tiles, as good communication ensures our artisans can craft your vision with total precision.
Getting the details right upfront is the secret to a smooth process and a perfect result.
This is the moment you move from raw numbers to a visual plan. One of the most powerful tools you can give us is a simple, hand-drawn sketch of your space. Don’t worry about making it a professional architectural rendering; a clear, labeled drawing is incredibly valuable.

What to Include in Your Project Sketch
Think of your sketch as a visual guide for our team. It helps us understand not just how much tile you need, but the intent behind your design. It turns your measurements into a tangible layout we can all see.
Be sure to include these key elements:
- Overall Dimensions: Clearly label the length and width of each area getting tile.
- Obstructions: Mark the locations and dimensions of windows, doors, cabinets, and any other fixtures that break up the tile.
- Tile Placement: Roughly show where specific patterns, borders, or accent tiles will go.
- Transitions: Note where one type of tile meets another, like where a patterned floor hits a solid-colored border.
This simple step helps prevent any misinterpretations and ensures your order is crafted to fit the unique character of your room. It’s particularly useful when planning intricate areas. For more ideas on material selection in detailed spaces, check out our guide on choosing the best tile for a kitchen backsplash.
Communicating Custom and Complex Orders
When it comes to custom designs or complex patterns, more detail is always better. If you’re placing an order with Original Mission Tile—especially if you’re using our Design Studio—providing this extra information helps our team bring your vision to life without any guesswork.
Providing a detailed sketch and clear notes is like giving our artisans a map to your design. It removes ambiguity and ensures that the handmade tiles you receive are crafted not just for your square footage, but for your specific layout, from corner cuts to pattern flow.
Think about specifying details like the starting point for a pattern. For instance, you could note, “center the main pattern on the fireplace,” or explain how you’d like a border to end at a doorway. The more information you can give us about your design goals, the more accurately we can support your project.
This collaborative approach is what makes ordering handmade tile a uniquely personal and rewarding experience, ensuring a perfect fit every time.
Got Questions? Let’s Talk Common Tile Measuring Puzzles
Even with a tape measure in hand and a good plan, questions pop up. It happens on every project. This is where a small bit of confusion can lead to a big headache down the road. Let’s walk through the most common sticking points I see and get them sorted out so you can move forward with confidence.
What Are the Biggest Measuring Mistakes People Make?
Hands down, the single biggest mistake is forgetting to factor in overage. Running out of tile mid-install is a project-stopping nightmare, especially with handmade tiles where matching a new batch can be tricky. Don’t let it happen to you.
Another classic error is measuring the total wall area but forgetting to subtract large obstacles like a built-in bathtub or a huge picture window. You’ll end up with way too much tile and a lighter wallet.
I also see people assume a room is a perfect square. They’ll measure one wall, jot it down, and just use that same number for the opposite side. Big mistake.
Always measure opposing walls separately. Homes settle, framing is rarely perfect, and walls are almost never truly parallel. A pro always takes both measurements and uses the larger one for calculations. This little step saves you from coming up short.
Finally, a lot of DIYers ignore the impact of grout joints on their layout. It seems small, but that tiny gap adds up fast over a long wall or floor, and it can throw your whole pattern out of whack.
How Much Extra Tile Should I Really Order?
There’s no single magic number for overage; it’s all tied to your layout’s complexity.
- For a simple, straight-lay pattern, the industry standard of 10% overage is a safe bet. It gives you just enough buffer for cuts and the occasional “oops.”
- Laying out a pattern with more angled cuts, like a diagonal or herringbone? Bump that up to 15%. Those angled cuts along the walls naturally create more waste.
- For large-format tiles, tricky custom patterns, or rooms with lots of jogs and angles, ordering 20% extra is the smartest money you’ll spend. It protects you from costly mistakes and leaves you with a few “attic stock” tiles for any future repairs.
Do I Actually Need to Account for Grout Lines?
Yes, absolutely. While those little grout lines won’t drastically change your total square footage for ordering tile, they are critical for your layout’s accuracy. A 1/8-inch grout joint might seem tiny, but repeated over a 20-foot floor, it can shift your final tile by several inches.
The best way to see this in action is to do a “dry lay” before you even think about mixing thin-set. Just lay out a few rows of tile on the floor with the spacers you plan to use. This quick visual check lets you see exactly how the pattern will flow, confirms your starting point is solid, and ensures you won’t end up with a weird, sliver-thin tile against the far wall.
How Do I Measure an L-Shaped Room?
Tackling an irregular space like an L-shaped room is much easier than it seems. The trick is to stop seeing it as one complex shape. Instead, just divide and conquer.
- Break that “L” down into two simple, separate rectangles. It’s like drawing a line in the sand.
- Measure the length and width of the first rectangle and calculate its square footage.
- Do the exact same thing for the second rectangle.
- Finally, just add the two areas together. That’s it! You’ve got your total, accurate square footage for the whole room.
A quick sketch of the room on a piece of paper where you can label the measurements for each section is a fantastic way to keep your numbers straight and prevent any mix-ups. This simple method turns a confusing task into basic math.
Ready to bring your vision to life with perfectly fitted, handmade tile? Explore the in-stock collections or create a custom masterpiece with the Design Studio at Original Mission Tile.