
The underlayment for tile floors isn’t just another layer—it’s the unsung hero of your entire installation. Think of it as the critical buffer between your subfloor and the beautiful tiles you’ve chosen. Its job is to create a perfectly stable, flat, and protected base, ensuring your investment lasts a lifetime.
Building Your Floor on a Solid Foundation
It’s easy to get lost in the fun stuff—the tile color, the pattern, the texture. But the real secret to a floor that looks just as good in ten years as it does on day one is hidden beneath the surface. The right underlayment isn’t an optional upgrade; it’s a non-negotiable part of the system.
You wouldn’t build a house on shaky ground, right? The same logic applies here. Laying premium tiles directly onto an unprepared subfloor is a recipe for disaster. A proper underlayment system does several essential jobs that protect your floor and guarantee a flawless finish.
The Three Core Jobs of Tile Underlayment
So, what does underlayment actually do? Its main goal is to create the ideal environment for tile, which is a rigid material that can’t handle much stress or moisture. It all boils down to three key functions:
- Crack Prevention: Subfloors move. Wood expands and contracts, and concrete can shift or develop hairline cracks. Underlayment absorbs that stress, essentially “uncoupling” the tile from the subfloor so that minor movements below don’t telegraph through and crack your tile or grout.
- Moisture Management: This is huge. Underlayment acts as a barrier, protecting a wood subfloor from any water that might find its way through grout joints. In basements, it stops moisture vapor from the concrete slab from weakening the tile adhesive.
- Surface Perfection: Let’s be honest, no subfloor is perfectly flat. Underlayment helps you achieve a smooth, level, and totally uniform surface, which is critical for getting those professional-looking results and ensuring every tile is fully supported.
A successful tile installation is a system where every layer works in harmony. Skipping or choosing the wrong underlayment is like removing the foundation from that system—it compromises everything built on top of it.
Setting the Stage for Success
This guide will walk you through everything you need to know about choosing the perfect underlayment for tile floors, with a special focus on unique materials like our handmade cement tiles. Building your floor on a solid foundation means looking at the whole picture. For example, knowing the best flooring for a living room can influence your other renovation choices, which trickles down to your underlayment decisions.
But before you can pick the right materials, you have to start with the basics. The first step is always getting your numbers right, so check out our guide on how to measure for tile to start your project with total accuracy.
How to Properly Assess Your Subfloor
Before you even think about choosing an underlayment, you’ve got to play detective. Your first mission is to investigate the subfloor—the surface you’re building on—and uncover any issues that could sabotage your beautiful new tile. This is, without a doubt, the single most important step. Nearly all tile failures, from ugly cracks to loose, wobbly tiles, start right here.
Think of your subfloor as the plot of land for your new floor. If it’s unstable, uneven, or holding moisture, whatever you build on top is doomed from the start. You’ll typically run into one of two subfloors: wood (like plywood or OSB) or a concrete slab. Each has its own personality and potential problems you need to spot and fix.
Checking for Flatness and Level
First, let’s get one thing straight: flat and level are not the same thing. A floor can be perfectly flat but not level (think of a gently sloping ramp), and that’s often fine. The real enemy of rigid tile is a floor that isn’t flat—one with dips, valleys, and humps.
To check for flatness, grab the longest, straightest edge you can find. A 6- or 8-foot level is perfect, but a true, straight 2×4 will do the trick. Lay it across the floor in every direction, like the spokes of a wheel. Now, get down low and look for gaps between your straightedge and the floor.
- The Tolerance Rule: For large format tiles (any side longer than 15 inches), the industry standard is super strict: no more than a 1/8-inch dip or hump over a 10-foot span.
- For Smaller Tiles: You have a little more wiggle room. The tolerance is typically no more than a 1/4-inch deviation in 10 feet.
If you find low spots, you’ll need to pour a self-leveling compound to fill them in. For high spots on concrete, you’ll have to grind them down. Don’t skip this—it’s non-negotiable for a lasting installation.
Ensuring Subfloor Stability and Deflection
Flatness is important, but stability is king. A subfloor that bounces or flexes is guaranteed to crack your tile and grout. That movement is called deflection, and it’s the arch-nemesis of any tile job.
Testing a wood subfloor is simple. Just walk firmly across the room, or even give it a little bounce. Does it feel springy? Do you hear the dishes rattling in the kitchen cabinets? Those are tell-tale signs of too much deflection. If you can get a look at the floor joists from a basement or crawlspace, check their spacing and condition.
A subfloor that is not stiff enough is the primary enemy of a tile installation. The entire floor system, including the joists, subfloor, and underlayment, must work together to create a rock-solid base that meets the L/360 deflection standard.
If you’re planning big changes or just aren’t sure about your floor’s integrity, it is always a good idea to bring in an expert. Seriously consider consulting a structural engineer to confirm the structure can handle the significant added weight of tile, mortar, and underlayment.
Addressing Moisture Concerns
Moisture is the final villain you need to watch out for, and it’s a sneaky one. With concrete slabs, especially in basements or on-grade foundations, moisture vapor can travel up through the concrete and destroy the bond between your underlayment and the slab.
There’s a simple way to test for it. Tape a 2×2 foot square of plastic sheeting down to the bare concrete, sealing all four edges. Leave it for 24-48 hours. When you pull it up, if you see condensation or the concrete looks dark and damp, you have a moisture problem. This means you absolutely need a vapor barrier in your system.
Getting moisture control right isn’t just about protecting your floor; it’s a huge part of modern, sustainable building. As standards like LEED and BREEAM become more common, high-performance underlayments that manage moisture are in high demand—they can extend a tile floor’s life by 15-25 years. In North America alone, an estimated 70% of all tile failures are traced back to poor moisture management, an expensive mistake that is easily prevented with the right prep work.
Choosing Your Tile Underlayment System
Once your subfloor is prepped and ready, it’s time for one of the most important decisions in any tile project: picking the right underlayment. This isn’t about finding one “best” product, but about matching the right technology to your specific floor.
Think of it like choosing tires for a car—you wouldn’t put slick racing tires on an off-road truck. The best choice depends entirely on the terrain. For us, that terrain is your subfloor, the type of tile you’ve chosen, and how the room will be used. Let’s break down the industry’s most trusted options, from the classic workhorses to modern problem-solvers.
This chart can help you map out the first steps of your subfloor assessment, which is critical for guiding your underlayment choice.
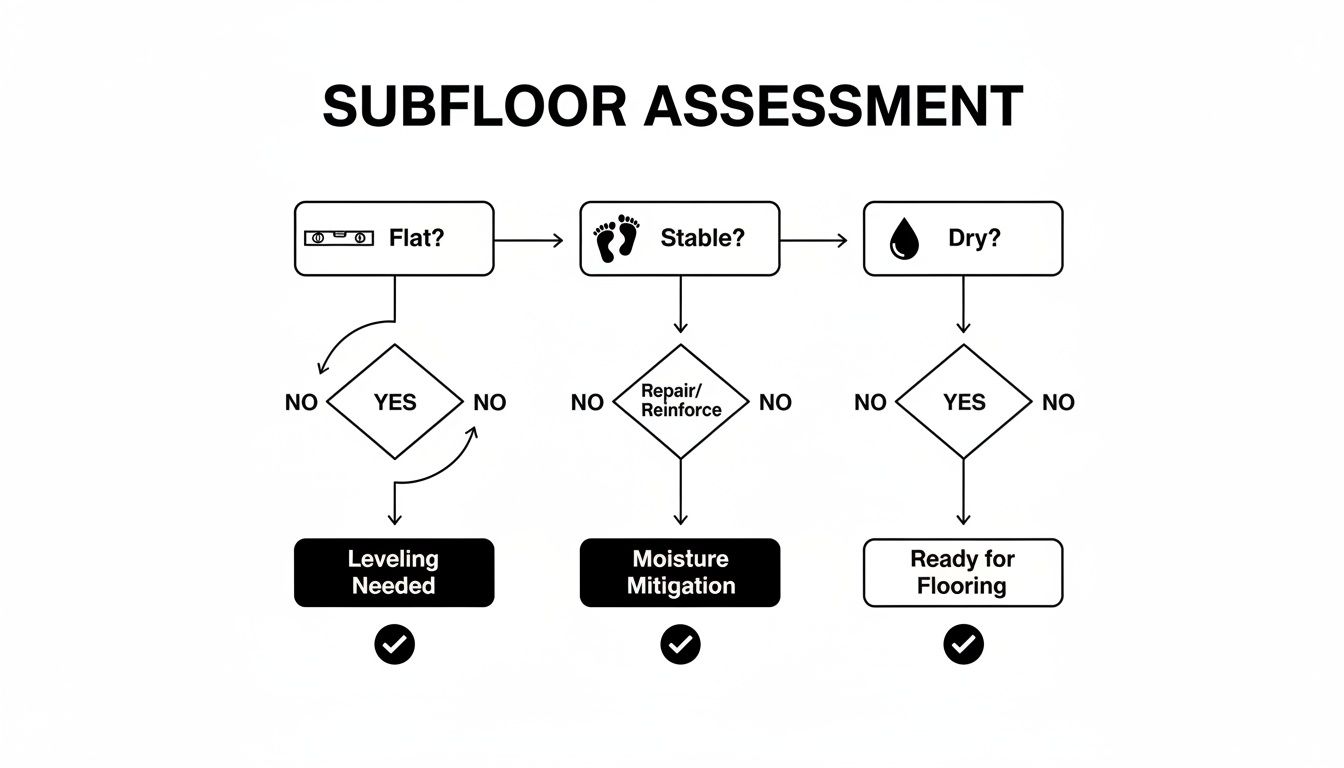
The bottom line is simple: every subfloor needs to be checked for flatness, stability, and moisture before you can even think about laying down an underlayment.
Cement Backer Board (CBU)
Cement backer board, or CBU, is the old reliable of the tile world. It’s a heavy sheet made of cement mixed with reinforcing fibers, creating a rock-solid surface that won’t swell, rot, or degrade with moisture like plywood can. For decades, it’s been the default choice for tile floors, especially in wet areas.
It really shines over wood subfloors, where it provides an ideal, stable surface for thin-set mortar to bond to. But here’s a crucial point: its main job is to provide stability, not to waterproof your floor. In a bathroom or shower, you still need to apply a liquid or sheet waterproofing membrane over the CBU to protect the structure below. For more ideas on creating a bulletproof wet area, check out our guide to designing beautiful and functional showers.
- Best For: Wood subfloors in both wet and dry areas; projects where a stiff, unbending surface is the top priority.
- Heads-Up: CBU is heavy and can be tough to cut. More importantly, it won’t stop cracks in a concrete slab from telegraphing up into your tile.
Uncoupling Membranes
Uncoupling membranes are a brilliant modern solution designed to solve one of the biggest tile-killers: subfloor movement. Imagine two tectonic plates shifting against each other—that’s what a concrete slab and a tile floor can do. An uncoupling membrane acts as a flexible buffer zone between them.
Products like the famous Schluter-DITRA use a geometric “waffle” pattern of cavities to create a thin layer of unbonded air space. This “uncouples” the tile from the subfloor, letting the slab shift, shrink, or expand independently without cracking the tile above. They also provide excellent waterproofing and vapor management, making them a fantastic all-in-one system for many jobs.
For a heavy, rigid material like handmade cement tile going over a concrete slab, an uncoupling membrane is the best insurance policy you can buy. It directly neutralizes the number one threat to your beautiful tile—reflective cracking from the substrate.
Self-Leveling Compounds
Sometimes, the biggest enemy isn’t movement or moisture, but a subfloor that’s a wavy, uneven mess. This is where self-leveling compounds come to the rescue. These are pourable, cement-based mixes that flow across the floor, filling in every dip and low spot to create a perfectly flat, smooth surface.
While mainly used to fix bad surfaces, some advanced self-levelers can also act as the final underlayment, particularly over concrete. They cure into a strong, dense, and perfectly flat base that’s ideal for tile adhesion. Just remember, they don’t provide any uncoupling or significant crack isolation on their own.
Tile Underlayment Systems At a Glance
Feeling a bit overwhelmed? Don’t be. Choosing the right system is just about diagnosing your subfloor’s needs and picking the right medicine. This quick table breaks down the core strengths of each option to help you decide.
| Underlayment Type | Best For | Key Benefit | Consideration |
|---|---|---|---|
| Cement Backer Board | Wood subfloors, wet areas | Delivers excellent rigidity and a perfect bonding surface for thin-set. | Doesn’t stop cracks; needs a separate waterproofing layer for wet zones. |
| Uncoupling Membrane | Concrete slabs, crack prevention | Isolates tile from subfloor movement, preventing ugly reflective cracks. | Higher upfront cost; needs a flat subfloor to be installed correctly. |
| Self-Leveling Compound | Fixing very uneven floors | Creates a perfectly flat, smooth surface for the best possible tile bond. | Doesn’t offer uncoupling or waterproofing on its own. |
At the end of the day, the right underlayment for tile floors is the one that directly addresses your subfloor’s biggest weakness. A bouncy wood subfloor needs the brute strength and rigidity of CBU. A concrete slab that’s prone to cracking demands the flexible protection of an uncoupling membrane.
Make the right diagnosis, and you’ll build a beautiful floor that’s made to last a lifetime.
Underlayment Needs for Handmade Cement Tile
Artisanal cement tiles are in a class of their own. Unlike mass-produced ceramic or porcelain, each tile is handcrafted with a hydraulic press—a method that creates a dense, rigid body without ever seeing the inside of a kiln. This unique process gives them their signature silky matte finish and deeply saturated, through-body color.
But that beautiful rigidity is also their biggest vulnerability. A standard ceramic tile might have a little bit of flex, but a cement tile has practically none. Think of it like the difference between a sheet of flexible plastic and a pane of glass. While the glass is stronger, it will crack under stresses that the plastic would simply absorb.
This means any movement, shift, or hairline crack in your subfloor can travel directly up through the mortar and fracture your beautiful, patterned tile. This is called reflective cracking, and it’s the number one enemy of a handmade cement tile installation.
Why Uncoupling Membranes Are Essential Insurance
Because cement tiles are so unforgiving of movement from below, creating a buffer zone isn’t just a good idea—it’s an absolute necessity. This is where an uncoupling membrane becomes one of the most critical parts of the entire flooring system. It acts as a flexible “slip sheet” that isolates the tile from the subfloor.
Imagine your house is sitting on tectonic plates. If the plates shift slightly, you want the house to remain intact, not split in two. An uncoupling membrane does exactly that for your floor, allowing the subfloor to expand, contract, or shift independently without harming the tile above.
For a rigid, high-end material like handmade cement tile, an uncoupling membrane is the best insurance policy you can buy. It is the only system specifically engineered to neutralize the primary threat of reflective cracking, preserving the intricate patterns and seamless appearance of your floor.
This protection is especially crucial over concrete slabs, which are notorious for developing minor cracks as they cure and settle over time. Without an uncoupling membrane, those cracks are almost guaranteed to show up in your tile.
Managing Moisture from Below
Beyond preventing cracks, another key challenge with cement tiles is their porous nature. While they are sealed from the top, they can still be susceptible to moisture vapor pushing up from beneath, especially when installed over a concrete slab on or below grade.
This upward-moving moisture can interfere with the mortar’s ability to cure properly and, over time, can lead to a weakened bond or even discoloration in the tile. High-quality uncoupling membranes solve this by providing an integrated vapor management system. Their channeled design allows moisture to spread out and dissipate harmlessly instead of being trapped against the tile adhesive.
This dual-action protection—crack isolation and moisture control—is what makes these modern systems the superior choice. Proper substrate preparation is one of the most important steps for any successful project, and you can explore all the different cement tile designs and styles that benefit from this level of protection.
Protecting Your Investment for Decades
Investing in authentic, handmade cement tile is a significant commitment to quality and timeless design. The underlayment is what ensures that investment pays off for generations. For professional installers, making the right choice here has a direct impact on project success and client satisfaction.
In fact, selecting the right underlayment for tile floors has been shown to reduce costly callbacks by up to 30% in demanding commercial and hospitality projects. As Original Mission Tile advises in its own installation guidance, a premium underlayment system ensures the inlaid pigments and velvety surface withstand decades of use, honoring the company’s heritage craftsmanship that dates back to 1900.
Ultimately, when you’re working with a specialized product like cement tile, the installation system has to be elevated to match. Skimping on the underlayment to save a tiny percentage of the total project cost is a risk that simply isn’t worth taking.
Key Installation Best Practices

A beautiful, long-lasting tile floor is really an assembly of carefully chosen parts, all working in perfect harmony. From the subfloor all the way up to the grout, every single layer depends on the one below it. Getting the installation right isn’t about one secret trick; it’s about following a chain of best practices that ensures the entire system holds up.
Cutting corners during installation is the fastest way to undermine even the best materials. This practical advice is designed to help you avoid the most common installation failures, so your tile project not only looks professional but truly stands the test of time.
Final Subfloor Preparation
Before a single piece of underlayment touches the floor, give the subfloor one last, critical inspection. It absolutely must be clean, flat, and structurally sound. That means no dust, no leftover construction debris, and no contaminants that could weaken the adhesive’s bond.
Check that every screw head or nail is driven flush with or slightly below the subfloor surface. A single raised screw can create a tiny pivot point under your underlayment, leading to frustrating creaks or movement down the road. Once that’s done, sweep and vacuum the entire area until it’s spotless.
Correct Underlayment Installation Techniques
The way you install your chosen underlayment for tile floors is just as critical as the material you picked. Each system has its own specific guidelines you must follow to the letter, but a few universal principles always apply.
When working with cement backer board (CBU), the layout is everything. You have to stagger the joints between the boards so they don’t line up with the seams of the plywood subfloor underneath. This one simple step dramatically boosts the rigidity of the entire floor assembly.
A common mistake is to lay CBU sheets in the same pattern as the subfloor panels. Always offset the seams, much like a bricklayer staggers bricks, to create a stronger, more integrated surface.
For uncoupling membranes, getting full thin-set coverage is non-negotiable. After troweling thin-set onto the subfloor with the flat side of your trowel, comb it with the notched side to create even ridges. When you press the membrane into the mortar, those ridges should collapse completely, creating a solid, void-free bond.
Selecting the Right Mortar and Trowel
The adhesive that holds your entire floor together is not a one-size-fits-all product. Mortars, usually called thin-set, are specifically engineered for different jobs. The Tile Council of North America (TCNA) provides clear standards for which mortar to use with which tile and substrate.
-
Modified vs. Unmodified: Modified thin-set has polymers mixed in that add flexibility and strength, which makes it perfect for bonding to plywood or over crack-isolation membranes. Unmodified thin-set is the go-to for setting tile onto cement board or most uncoupling membranes because it cures predictably through hydration alone.
-
Large Format Tile Mortar: Any time you’re working with a tile that has a side longer than 15 inches, you must use a specialized Large and Heavy Tile (LHT) mortar. These are formulated to be “non-slump,” preventing heavy tiles from slowly sinking and creating an uneven surface.
The size of your trowel’s notches is just as important. The goal is to achieve 95% mortar coverage on the back of every tile in interior dry areas. The trowel’s job is to apply enough mortar to hit that number after the tile is pressed into place.
Using a small trowel for a large tile simply won’t dispense enough mortar, leaving behind voids that become weak spots. These unsupported areas are precisely where tiles are most likely to crack under impact. As a best practice, always check your coverage on the first few tiles you set. Just lift one up and look at the back. If you see empty patches, you need a trowel with larger notches. This simple check can save you from a catastrophic installation failure.
Your Top Questions About Tile Underlayment, Answered
Working through the final details of a tile project always brings up a few last-minute questions. It’s totally normal. Here, we’re tackling the most common things we hear from homeowners and installers about getting the foundation right with underlayment for tile floors.
Do I Really Need Underlayment for My Tile Floor?
Yes, almost without exception. While you could technically lay tile directly on a perfect concrete slab, it’s a huge gamble. Underlayment is your floor’s first line of defense against the two things that kill tile jobs: subfloor movement and moisture.
For a premium, handmade material like cement tile, skipping this step is asking for trouble. It often leads to expensive, heartbreaking cracks. Think of underlayment as a non-negotiable insurance policy for your floor’s beauty and longevity.
What’s the Best Underlayment to Use in a Bathroom?
In wet zones like bathrooms and showers, your mission is twofold: create a rock-solid surface and make it completely waterproof. The best choice is a system that gives you a sealed, monolithic barrier, protecting the structure of your home from water damage.
You can get there in a couple of ways:
- Lay down cement backer board first, then apply a liquid or sheet waterproofing membrane over the top.
- Use an all-in-one system like Schluter-KERDI/schluter-kerdi/p/KERDI), where the membrane is both the underlayment and the waterproof layer.
Either approach works great. The goal is to keep the subfloor bone-dry, which is priority number one for any bathroom tile installation.
Can I Just Install Tile Directly on My Plywood Subfloor?
Please don’t. Tiling directly on plywood goes against all industry best practices and is a recipe for failure. Plywood is a wood product, which means it expands, contracts, and can even warp with changes in humidity. That movement, while subtle, is more than enough to crack rigid tile and pop grout joints over time.
You must install a proper underlayment over the plywood—like cement backer board or an uncoupling membrane. This creates the stable, isolated surface tile needs to stay put and look great for years to come.
How Thick Should the Underlayment Be?
The thickness depends entirely on the product you choose. Cement backer board for floors is usually 1/4-inch thick. Many modern uncoupling membranes are even thinner, often around 1/8-inch.
But here’s the key: it’s less about the underlayment’s thickness and more about the stiffness of the entire floor system. Your whole setup—joists, subfloor, and underlayment combined—has to meet the industry deflection standard (L/360). This prevents the floor from flexing underfoot, which is what causes cracks. Always follow the manufacturer’s instructions for the specific product you’re installing.
At Original Mission Tile, we know that a legendary floor starts with a flawless foundation. Our handmade cement tiles are crafted to last a lifetime, and the right underlayment system ensures they do. Explore our collection and build your project on a century of quality.
Discover the perfect tile for your next project at Original Mission Tile