Waterproofing a concrete wall isn’t just about slapping on a coat of paint. It’s a fundamental step in protecting your building’s structure from the slow, steady creep of moisture damage that leads to mold, structural decay, and seriously expensive repairs down the road. Think of it as creating a permanent barrier that keeps water out of the porous concrete in the first place.
This is a proactive move that protects your property’s integrity and, frankly, its value.
Why Waterproofing Your Concrete Walls Is Non-Negotiable

It’s easy to look at a concrete wall and think it’s an impenetrable fortress. The reality? Concrete acts a lot more like a rigid sponge. It’s naturally porous, meaning it will happily absorb water from the soil around it, which then wicks its way through the wall. This seemingly small detail is ground zero for some major, long-term headaches.
Ignoring the need to waterproof your concrete walls isn’t just about risking a damp basement—it’s an open invitation for a whole host of problems that can compromise your entire home. The goal isn’t just to stop a flood; it’s to halt the quiet, creeping damage that starts long before you ever see a puddle on the floor.
The Hidden Dangers of Unchecked Moisture
So, how does this subtle water intrusion show up? At first, you might just see efflorescence—a chalky, white powder that appears on the surface. While it might look harmless, efflorescence is a flashing red light. It’s physical proof that water is moving through your concrete, dissolving mineral salts, and depositing them on the surface as it evaporates.
That’s just the opening act. From there, the problems get worse:
- Spalling and Flaking: As water freezes and thaws inside the concrete, it expands, causing the surface to chip, pop, and break apart.
- Mold and Mildew: That persistent dampness creates the perfect breeding ground for mold, which tanks your indoor air quality and can create serious health issues.
- Structural Weakening: Over time, constant moisture can rust out the steel rebar inside the concrete, compromising the wall’s strength from within.
To help you spot these issues early, here’s a quick guide to what you might be seeing on your walls.
Decoding Common Moisture Problems
| Symptom | What It Looks Like | Potential Cause |
|---|---|---|
| Efflorescence | Fluffy or crystalline white powder on the surface. | Water is wicking through the concrete and evaporating, leaving mineral salts behind. |
| Spalling | Chipping, flaking, or pitted surfaces on the wall. | Freeze-thaw cycles where trapped water expands and breaks the concrete apart. |
| Dark Stains | Damp-looking patches or discolored areas that may feel cool or wet. | Active water intrusion from outside soil pressure or plumbing leaks. |
| Mold/Mildew | Black, green, or fuzzy spots, often accompanied by a musty odor. | High, persistent humidity and organic material (dust) on the surface. |
| Cracks | Vertical, horizontal, or stair-step cracks in the concrete or mortar joints. | Can be from normal settling, but water can exploit them and make them worse. |
Catching these signs early gives you a major advantage in stopping the damage before it gets out of control.
A waterproofed wall is the essential foundation for any high-quality finish. Without a dry and stable substrate, beautiful materials like handmade cement tiles can fail, with adhesives losing their bond and grout staining from efflorescence.
The Growing Need for Resilient Walls
The construction world is taking this seriously. Just look at the market for cementitious waterproofing, one of the most common methods: it’s projected to grow from US$11.3 billion in 2025 to US$13.9 billion by 2032. This isn’t just a fad; it’s a response to a real need. As cities grow, we need resilient buildings that can stand up to the environment, and unchecked water seepage is a leading cause of structural failures worldwide. You can dig into the full market research to see what’s driving these trends.
Ultimately, a proper waterproofing strategy is an investment in your property’s future. It protects the structural core of your home and makes sure any finishes you add—from paint to premium tiles—will look great for years to come.
Finding the True Source of Your Moisture Problem
Slapping a coat of waterproofing on a damp concrete wall without finding the leak is like putting a bandage on a broken arm. It might cover the problem for a little while, but you haven’t fixed anything. Before you spend a dime on any concrete wall waterproofing products, you have to play detective. The real success of your project depends entirely on figuring out why and how the water is getting in.
Often, the first clue is a persistent musty smell in your basement. That odor is a dead giveaway that water is somewhere it shouldn’t be, even if you can’t see a wet spot yet. Don’t ignore it—that’s the starting bell for your investigation.
Is It a Leak or Just Condensation?
First things first, you need to know if water is coming through the concrete or simply forming on its surface from humid air inside. This is a critical distinction. One problem requires serious waterproofing, while the other might just need a good dehumidifier and better airflow.
There’s a simple but incredibly effective way to find out: the “plastic sheet test.”
- Dry a Spot: Pick a section of the wall that feels damp or where you suspect an issue. Dry it completely with a towel.
- Tape Up Plastic: Take a one-foot square of plastic sheeting and tape it tightly to the dry spot. Use strong duct tape to seal all four edges completely.
- Wait and See: Leave it alone for 24 to 48 hours.
When you come back, the plastic will tell you the story. Is the moisture on the outside of the plastic, facing the room? That’s condensation. But if the moisture is trapped underneath the plastic, against the wall itself, you’ve confirmed it: water is seeping through the concrete from the outside.
Your Exterior Inspection Checklist
If the test points to a leak, it’s time to head outside. The overwhelming majority of water issues start on the exterior of your home. A quick walk around your property will often reveal the culprit right away.
Pinpointing the external cause is the most important step in concrete wall waterproofing. An interior coating can hold back minor dampness, but it will eventually fail against significant hydrostatic pressure from poorly managed exterior water.
Keep an eye out for these common offenders:
- Improper Grading: The ground right next to your foundation should slope away from the house. We’re talking a drop of at least six inches over the first ten feet. If the ground is flat or, even worse, slopes back toward the house, you’re basically directing every rainstorm straight at your foundation.
- Clogged Gutters and Downspouts: Look up. Are your gutters overflowing with leaves? Clogged gutters send water cascading down your walls. Just as important, make sure your downspouts extend at least four to six feet away from the foundation, dumping water far from the home.
- Problematic Window Wells: A clogged or poorly installed window well is just a bucket waiting to fill with water. That water sits right up against your foundation, looking for any tiny crack to get through.
- Foundation Cracks: Take a close look at any visible concrete. Even hairline cracks can be major entry points for water, and they only get worse over time with freeze-thaw cycles.
By systematically checking these things, you stop treating the symptom (a wet wall) and start solving the actual problem. This is the work that ensures your waterproofing job will be a lasting fix, not just a temporary patch. Once you know the “why,” you can move on to the “how” with confidence.
Choosing the Right Waterproofing Method for Your Project
When it comes to concrete wall waterproofing, picking the right approach isn’t about finding one “best” product. It’s all about matching the solution to your specific problem, your budget, and the reality of your property. Get this choice right, and you’ve got a lasting fix. Get it wrong, and you’re just patching a problem that’s bound to return.
There’s a world of difference between tackling a bit of interior dampness and fighting back against active water pressure from saturated soil outside. Each situation calls for a completely different game plan, from simple paint-on coatings to heavy-duty exterior membranes. A smart decision now will save you a ton of time, money, and headaches down the road.
Positive-Side vs. Negative-Side Waterproofing
Before you even look at products, you need to understand where you’ll be applying the fix. Waterproofing is broken down into two main camps based on where it’s installed.
-
Positive-Side Waterproofing goes on the exterior of the concrete wall—the side that’s in direct contact with the soil and water. This is by far the most effective way to go because it stops water before it even has a chance to soak into the concrete. It’s the go-to for new construction but means a whole lot of digging for existing homes.
-
Negative-Side Waterproofing is applied to the interior, or “dry” side, of the wall. These are your coatings and sealers designed to hold back moisture that has already penetrated the concrete. They’re much more accessible and DIY-friendly, but they work by resisting pressure from the inside. Think of them as best for minor moisture issues, not major leaks.
It’s like building a dam. A positive-side solution stops the water at its source. A negative-side solution is trying to hold back water that’s already breached the first line of defense.
This handy decision tree shows you exactly how to start figuring things out. It walks you from a simple test on your wall to determining if you’re dealing with an outside leak or just condensation inside.

As the chart makes clear, if you find moisture under the plastic sheet, you’ve got to turn your attention to the exterior. And that almost always points toward a positive-side solution.
Exploring Your Waterproofing Options
With that distinction clear, let’s dig into the most common methods out there. Each one has its own ideal use case, from quick interior jobs to robust, professional-grade systems.
Here’s a quick comparison to help you see the options side-by-side.
Waterproofing Method Comparison
| Method | Best Use Case | Application Side | Durability | DIY-Friendly? |
|---|---|---|---|---|
| Interior Coatings | Minor dampness, efflorescence | Negative | Moderate | Yes |
| Cementitious Membranes | Moderate moisture, pre-tiling | Negative/Positive | High | Moderate |
| Liquid Membranes | Foundations, new construction | Positive | Very High | No |
| Sheet Membranes | New construction, high water tables | Positive | Excellent | No |
This table should give you a good starting point for figuring out which direction to go. A simple interior coating can be a lifesaver for a slightly damp basement, but it’s no match for serious hydrostatic pressure.
Interior Concrete Sealers and Coatings
These are the most accessible products for homeowners and the first thing many people reach for. They’re typically acrylic or epoxy-based and go on just like thick paint on the inside of a basement or foundation wall. The idea is they soak into the concrete’s pores to form a waterproof film right on the surface.
- Best For: Minor dampness, powdery efflorescence, and moisture from high humidity.
- Pros: Very DIY-friendly, low cost, and no digging required.
- Cons: Not meant for active leaks or real hydrostatic pressure. It will likely fail if the water problem outside is severe.
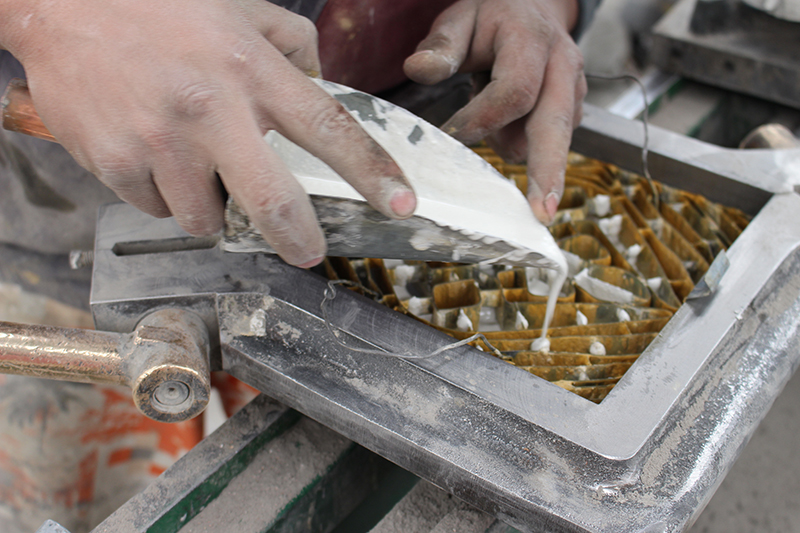
Cementitious Waterproofing Slurries
This approach is a big step up. You’re applying a cement-based slurry that actually bonds chemically with the concrete, becoming a part of the wall itself. Many of these mixes have crystalline additives that grow to fill micro-cracks and pores when they touch water, creating a surface that can self-seal.
A cementitious slurry is a tough, long-lasting negative-side solution that can handle some hydrostatic pressure. It leaves a seamless, hard-wearing finish that’s perfect for getting a wall ready for tile. If you’re thinking about tile finishes, take a look at our guide on the best ceramic tile sealers.
Liquid-Applied Waterproofing Membranes
Now we’re moving to the outside of the house. Liquid membranes are painted, sprayed, or troweled onto the foundation wall where they cure into a seamless, flexible, rubber-like barrier. They are fantastic at bridging small cracks that might form later. The most common types are polymer-modified asphalt and polyurethane coatings.
The global market for these membranes is huge for a reason—they work. Demand is projected to jump from USD 34.23 billion in 2026 to USD 53.33 billion by 2034, all thanks to a construction boom that needs reliable, long-term water protection.
This method requires excavation, but it offers top-tier positive-side protection that can move and shift with the structure without tearing.
Self-Adhering Sheet Membranes
For the absolute best in positive-side protection, sheet membranes are the answer. These are big rolls of rubberized asphalt bonded to a tough, waterproof polyethylene film. They’re applied directly to the exterior foundation wall, giving you a perfectly consistent, factory-controlled thickness that’s almost impossible to get with a liquid application.
- Best For: New construction or major renovations where the foundation is already exposed.
- Pros: Extremely durable, highly resistant to punctures, and creates a uniform barrier.
- Cons: Really needs professional installation, requires excavation, and every seam has to be perfect.
When you’re thinking about a full waterproofing strategy, remember that exterior drainage is just as critical. You can learn more about the different foundation waterproofing techniques that work hand-in-hand with these membrane systems.
Ultimately, choosing the right method all comes down to getting the diagnosis right. An interior coating might be perfect for a slightly musty wall, but it will peel right off when faced with the force of poor exterior drainage. If you match the intensity of the solution to the severity of the problem, you’ll ensure your hard work pays off with lasting protection for your home.
Applying Your Waterproofing Solution Like a Pro

You’ve diagnosed the problem and have the right product in hand. Now comes the part where you create that seamless, protective barrier. The success of any concrete wall waterproofing project really boils down to meticulous prep and application. Cutting corners here is a surefire way to watch your hard work fail, often in just a few months.
The biggest mistake I see homeowners (and even some pros) make is treating waterproofing like a simple paint job. It’s not. It’s a technical coating that needs a perfectly prepared canvas to bond correctly and do its job. Think of it less like painting a bedroom and more like applying a specialized industrial coating—every single step matters.
Surface Preparation: The Unskippable First Step
You could have the best waterproofing product on the market, but if you slap it onto a dirty, crumbling surface, it will peel right off, taking your time and money with it. The goal is to create a clean, solid, and slightly porous surface that the coating can physically and chemically grab onto for a permanent bond.
This is where you’ll spend most of your time, and it’s time well spent. A properly prepped wall is 90% of the job.
Professional Insight: Never underestimate the importance of profiling the concrete. So many DIY failures happen because the coating was applied to a surface that was too smooth or still had old paint on it. This prevents the product from creating that tenacious bond with the concrete itself.
Your prep work involves a few key actions:
- Thorough Cleaning: Start by getting rid of all dust, dirt, efflorescence, and any loose bits with a stiff wire brush and a shop vacuum. For stubborn grime or old paint, you might need to bring out the big guns, like a pressure washer or a grinder with a wire wheel.
- Degreasing: If the wall has any oil or grease stains, they have to go. Use a concrete degreaser because these contaminants act as a bond-breaker and will guarantee your coating fails.
- Crack and Hole Repair: This is a crucial step. Small, non-structural hairline cracks can often be filled by the waterproofing coating itself. But any active leaks, holes, or cracks wider than a credit card must be repaired first.
- Using Hydraulic Cement: For active leaks or bigger gaps, hydraulic cement is your best friend. This stuff is amazing—it expands as it cures and can set in just a few minutes, even with water actively flowing through the crack. It creates a powerful, waterproof plug that stops leaks on the spot.
Once all the repairs are done and the wall is clean, it’s time to make sure the coating will actually stick.
Achieving the Perfect Surface Profile
Most concrete walls, especially poured ones, are too smooth for a thick coating to adhere properly. You need to open up the pores of the concrete. This process is called etching or profiling, and it creates a texture similar to medium-grit sandpaper, giving the coating thousands of microscopic peaks and valleys to lock into.
For interior walls, a muriatic acid etch is a common way to do this. Just be sure to follow all the safety protocols—wear gloves, goggles, and a respirator, and make sure the area is well-ventilated. After etching, the wall has to be rinsed thoroughly and allowed to dry completely before you can move on.
Application Techniques for a Flawless Finish
Alright, here’s the main event. Always read the manufacturer’s instructions for your specific product, because mixing ratios and application methods can vary. Whether you’re using a brush, roller, or sprayer, the goal is consistency.
Here are some pro tips to keep in mind:
- Work into a Damp Surface (If Required): Many cementitious products need to be applied to a “saturated surface dry” (SSD) wall. This just means the wall is damp to the touch but has no standing water. Lightly misting the wall with a garden sprayer right before you start helps the product cure properly and bond better.
- Focus on a Consistent Thickness: The most common application mistake is spreading the coating too thin. A waterproofing membrane needs a specific thickness—measured in mils—to work. Applying it like regular paint won’t create a waterproof barrier.
- Pay Extra Attention to Corners and Joints: The joint where the wall meets the floor (the cove joint) is a common failure point. Make sure to apply a generous amount of material here, working it deep into the corner. A pro technique is to reinforce these areas with fiberglass mesh tape embedded between coats for extra strength.
The Power of Multiple Coats
Very few professional-grade waterproofing systems are a one-and-done solution. A two-coat application is almost always the standard, and for good reason. The first coat acts as a primer, filling the concrete’s pores and creating a solid base.
The second coat, which you should apply in a perpendicular direction to the first (e.g., first coat vertical, second coat horizontal), ensures you get complete coverage. This crosshatch pattern helps eliminate any pinholes or thin spots you might have missed on the first pass, creating a truly monolithic and seamless membrane.
Finally, you have to respect the curing time. Waterproofing coatings don’t just “dry” like paint; they go through a chemical reaction to gain their full strength and water-resistant properties. Rushing this process by exposing it to water too soon or trying to tile over it before it’s fully cured is a recipe for disaster. Patience is the final—and most critical—ingredient.
Pairing Waterproofing with Cement Tiles and Other Finishes

Think of a properly waterproofed concrete wall as the perfect canvas. It’s more than just a structural safeguard; it’s the stable, dry foundation you need to install beautiful finishes that last, like handmade cement tiles. But making that jump from a protected wall to a tiled one requires a bit of planning to make sure the two systems work together, not against each other.
The wrong combination can spell disaster. I’ve seen it happen—adhesives fail, tiles delaminate, and the whole project is compromised. The goal is to find a waterproofing product that not only blocks water but also gives your tile adhesive a surface it can really grab onto.
Ensuring Compatibility with Adhesives
For most tile jobs, a good thin-set mortar is your go-to adhesive. But for thin-set to work its magic, it needs a porous, stable surface to create a strong mechanical bond. This is where some waterproofing methods are a perfect match, and others are a total miss.
- Cementitious Membranes: These are often your best bet for prepping a wall for tile. They cure into a rough, cement-like finish that thin-set mortar loves, creating a single, solid system from the wall out.
- Liquid-Applied Membranes (Interior): Some of the newer elastomeric or acrylic products are formulated to be “tile-ready.” You just have to check the product’s technical data sheet to confirm it’s good to go for direct tile application.
- Asphaltic or Rubberized Coatings: Steer clear of these for tile prep. Their slick, overly flexible surfaces are a bond-breaker for thin-set, almost guaranteeing delamination down the road.
Picking the right base layer is the first step in protecting your tile investment.
The most beautiful tile in the world will fail on a poorly prepared surface. Efflorescence, driven by moisture wicking through untreated concrete, can travel through grout joints and permanently stain the face of your tiles, ruining the entire installation.
Curing Times and Final Preparations
Patience is key here. Before you even think about tiling, the waterproofing product needs to fully cure. This isn’t just about drying; it’s a chemical process that gives the material its full strength and water resistance. If you tile too soon, you’ll trap moisture and weaken the bond.
Always follow the manufacturer’s specific guidelines, but here are some general rules of thumb:
- Cementitious Slurries: Typically need a good 5-7 days to cure fully before you can start setting tile.
- Liquid-Applied Membranes: Might need 24-48 hours between coats and then several more days for a complete cure.
This attention to detail now extends to the concrete itself. Smart builders are increasingly using waterproofing admixtures mixed directly into the concrete, offering built-in protection. The global market for these admixtures is projected to more than double, hitting USD 15.3 billion by 2035, with crystalline types leading the charge. These materials actively grow crystals to block water paths and can even self-heal hairline cracks. You can dig into these innovative waterproofing technologies to see how they’re changing the game.
By carefully selecting a compatible waterproofing system and giving it the time it needs to cure, you’re creating the perfect bridge between structural integrity and beautiful design. Your stunning installation of handmade cement tiles won’t just look incredible—it will stay securely bonded and safe from moisture for decades.
Keeping Your Work Safe: Long-Term Care and When to Call a Pro
You’ve done the hard work and waterproofed your concrete walls—a huge win. But keeping that barrier healthy isn’t a one-and-done deal. Think of it like a quick seasonal check-up for your home’s armor against moisture. A little bit of attention now saves you from major headaches later.
A simple maintenance routine can catch small problems before they escalate. Twice a year, maybe once in the spring and again before winter sets in, take a slow walk around your foundation and give your interior walls a good look. This is the best way to protect your work and any finishes you’ve applied over it. If you’ve installed tile, our guide on cleaning cement tiles has some great tips for keeping those surfaces looking sharp.
Your Simple Maintenance Checklist
You don’t need any fancy tools for this, just your eyes. Keep this quick checklist in mind during your inspection:
- Scan for New Cracks: It’s normal for a house to settle, which can create tiny hairline cracks. Just make a note of where they are and keep an eye on them to see if they grow.
- Check for Peeling or Blistering: If you used an interior coating, any bubbling or peeling is a dead giveaway that water is pushing through from the outside.
- Inspect Your Seals: Pay close attention to the seals around pipes, vents, or windows that go through the concrete wall. These spots are common weak points.
- Clear Away Debris: Make sure that soil, mulch, and fallen leaves aren’t piled up against your foundation. And double-check that your gutters and downspouts are clean and channeling water far away from the house.
Knowing your limits is just as important as the DIY work itself. You can handle a small issue, but ignoring a significant problem can lead to serious structural damage, turning a manageable repair into a massive, expensive project.
Knowing When to Call in the Experts
Some problems are simply too big for a DIY fix. When your home’s structural integrity is on the line, calling a professional is the smartest—and safest—move you can make.
It’s time to pick up the phone if you spot any of these red flags:
- Major Structural Cracks: Any crack wider than a quarter-inch is a concern. If you see cracks running horizontally or in a stair-step pattern on a block wall, that’s a sign of serious pressure that needs an expert opinion, fast.
- Bowing or Bulging Walls: If you look down a wall and it appears to be leaning inward or bulging, that means there’s extreme hydrostatic pressure building up. This is a potential wall failure in the making and is not a DIY situation.
- Water That Keeps Coming Back: If you have standing water that reappears no matter what you do, a professional needs to diagnose the root cause. It could be a complex drainage issue or a high water table that your current system can’t handle.
Got Questions? We’ve Got Answers.
Even with the best guide, a few questions always pop up when you’re in the middle of a concrete wall waterproofing project. Here are some of the most common ones we hear, with quick, straight-to-the-point answers to keep you moving.
Can I Waterproof a Painted Concrete Wall?
You can, but you absolutely cannot paint a waterproofing coating directly over old paint. It’s a guaranteed failure.
Most waterproofing products, especially the cement-based ones, are designed to soak in and bond chemically with the concrete itself. If there’s a layer of paint in the way, your new coating is only sticking to the paint—and that bond just isn’t strong enough to hold back water pressure.
So, the old paint has to go. All of it. You’ve got a few options for stripping it:
- Grinding: A concrete grinder fitted with a diamond cup wheel is my go-to. It’s fast and effective.
- Sandblasting: This is the heavy-duty option. It’s aggressive and messy but strips paint like nothing else.
- Chemical Strippers: These can do the job, but be prepared for fumes and a thorough cleanup process. Good ventilation is non-negotiable.
Once you’re back to bare concrete, you can get back to the proper surface prep we talked about earlier.
How Long Does Concrete Waterproofing Last?
This one really depends on the system you choose and how well it’s installed. There’s a huge difference between a quick interior fix and a full exterior solution.
A professionally installed exterior membrane system can easily last for the life of the building—think 20 years or more. On the flip side, a DIY interior paint-on sealer might only give you 3-5 years of protection, especially if it’s fighting constant moisture.
The two biggest factors for longevity? Nailing the surface prep and, most importantly, fixing the exterior drainage issues that are causing the problem in the first place.
Is Waterproofing the Same as Dampproofing?
Nope, and it’s a critical distinction. They are not interchangeable.
Dampproofing is usually a thin, asphalt-based coating sprayed or rolled onto the outside of a foundation wall. It’s designed to block moisture from the soil, but it offers zero protection against actual water under pressure.
Waterproofing, however, is a much tougher, more complete system. It creates a seamless barrier that can stand up to hydrostatic pressure, keeping both liquid water and water vapor from ever reaching your wall.
At Original Mission Tile, we know a dry, solid wall is the only foundation for a tile installation that will last a lifetime. Once your space is protected, explore our handmade tile collections to find the perfect finish. https://originalmissiontile.com