
Here’s the rewritten section, designed to sound like an experienced human expert and match the provided examples.
The right mop for your tile floor is a bit like the right pan for your stove—what sears a steak beautifully might ruin a delicate crepe. For tile, the same rule applies. A microfiber mop is the perfect gentle touch for handmade cement tiles, while a steam mop can be a game-changer for tough, non-porous porcelain.
It all comes down to your tile’s material, finish, and porosity. Choosing correctly isn’t just about getting a good clean; it’s about protecting the tile you invested in for the long haul.
Why Your Tile Type Dictates Your Mop Choice
Think of your mop as a preservation tool, not just a cleaning one. You wouldn’t use a coarse scrub brush on a fine silk shirt, right? In the same way, the powerful cleaning action that makes a glazed porcelain floor gleam could be a disaster for a porous, artisanal surface like handmade cement tile.
The wrong mop can cause real, lasting damage:
- Fading the rich, inlaid color pigments
- Etching or dulling the tile’s surface finish
- Weakening the protective sealant
- Damaging delicate, hand-laid grout lines
Picking a mop that works with your tile’s specific traits is the secret to keeping it looking beautiful for years. For instance, the high heat from a steam mop is fantastic for sanitizing durable ceramic, but it can force moisture deep into cement tiles, leading to discoloration and long-term damage from within.
Matching The Mop To The Material
The first step is always to understand what your floors are made of. If you’re not sure, you can explore the common types of tile to see which category best fits your floor. This knowledge is everything, because a mop’s performance is tied directly to the surface it’s cleaning.
A spin mop offers great moisture control, making it a solid choice for most natural stone. But for the unique, porous nature of cement tiles, nothing beats the gentle-yet-effective clean of a simple flat microfiber mop.
This quick decision tree shows you exactly how your tile material points to the best mop for the job.

As the chart shows, there’s no single “best” mop—the material’s properties, especially how porous it is, are what really matter.
To give you a clearer picture, here’s a quick-reference table that breaks down the most common mop types and which tiles they get along with.
Quick Guide To Mop Types For Different Tile Surfaces
| Mop Type | Best For | Key Benefit | Cautionary Note |
|---|---|---|---|
| Microfiber Mop | Handmade Cement, Natural Stone, All Tile Types | Gentle; picks up fine dust; minimal water use | Ensure the pad is clean to avoid spreading dirt |
| Spin Mop | Porcelain, Ceramic, Sealed Natural Stone | Excellent moisture control; great for grout | Can hold too much water if not wrung out properly |
| Steam Mop | Glazed Porcelain & Ceramic | Sanitizes with heat; no chemicals needed | Avoid on cement, unsealed stone, or vinyl tiles |
| Sponge Mop | Smooth Glazed Tiles | Good for scrubbing sticky spots | Tends to push dirty water into grout lines |
| String Mop | Durable, non-porous floors (e.g., commercial) | High absorbency for big spills | Can leave floors too wet; not for delicate surfaces |
This table makes it easy to see the trade-offs. While a steam mop sounds high-tech, it’s often the simple microfiber mop that’s the hero for protecting artisanal surfaces.
This level of care is more important than ever. The floor cleaner market is projected to swell from $15 billion in 2025 to over $22 billion by 2033, a trend fueled by the rising popularity of hard flooring. With so many of us choosing beautiful tile, selecting the right tools is key to protecting our investments—especially handmade works of art from Original Mission Tile. In the U.S. residential market, which leads in cleaning service volume, a smart mop choice prevents costly damage to the beautiful surfaces under our feet.
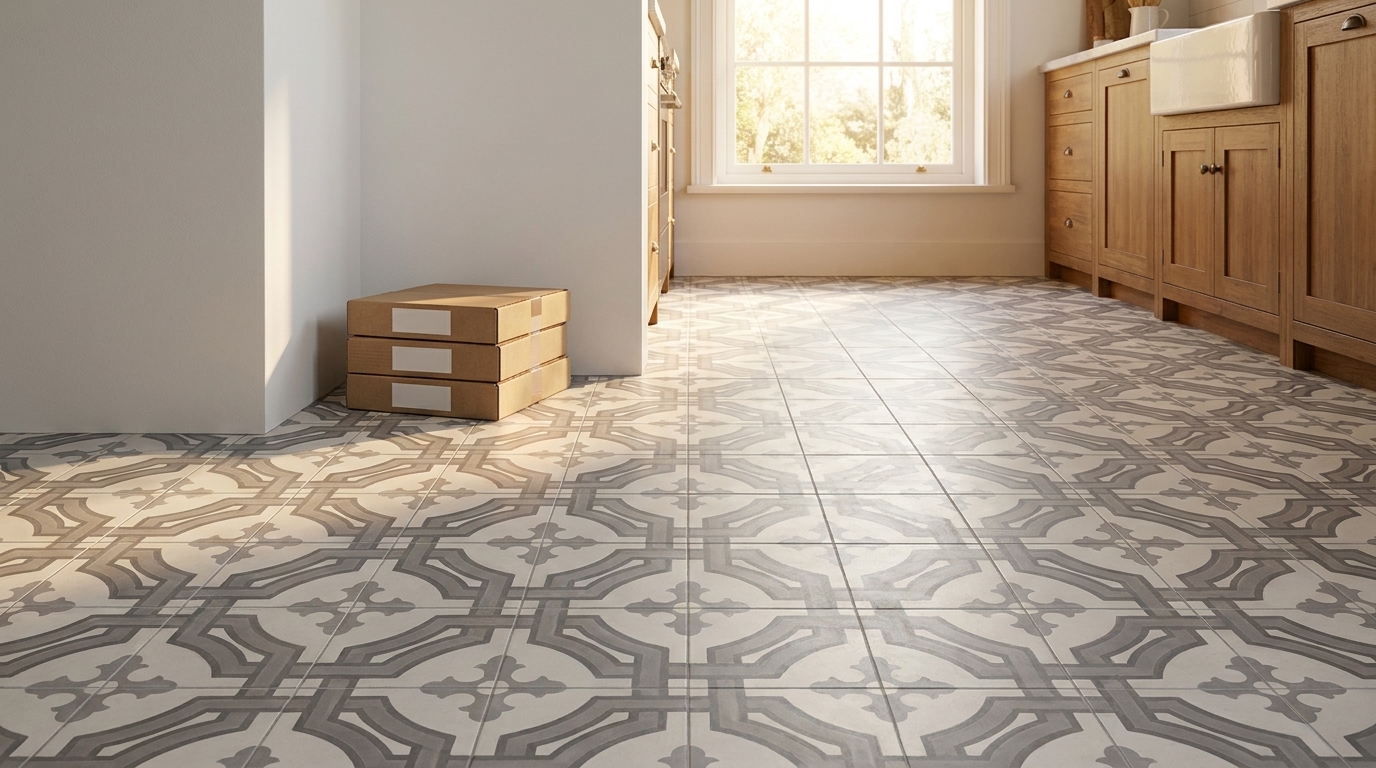
Protecting artisanal tile is all about preserving its unique character. Our handmade cement tiles have a distinct silky, matte finish that requires a delicate touch. A mop that oversaturates the surface or is paired with a harsh chemical can irreversibly dull that finish and erode the beautiful, inlaid pigments.
Understanding The Different Types Of Mops

Choosing the best mop for your tile floors isn’t as simple as grabbing the first one you see. Not all mops are created equal, and the wrong choice can do more harm than good—especially on delicate surfaces like handmade cement tile.
The right mop cleans effectively and protects your investment. The wrong one can cause irreversible damage by scratching the finish, weakening the sealant, or saturating the tile. Let’s break down the main contenders so you can pick the right tool for the job.
Microfiber Mops: The Gentle Champion
Microfiber flat mops are the undisputed winners for delicate tile. Think of them as dust magnets gliding across your floor. Their ultra-fine synthetic fibers create a static charge that grabs dust, dirt, and pet hair without needing much, if any, water.
This is exactly why they’re the best mop for tile floors that are porous, like handmade cement or unsealed stone. Because they require so little moisture, you completely avoid the risk of oversaturation, which can cause water spots, staining, and sealant damage.
Why They Work:
- Minimal Water Use: Protects porous tiles and sensitive sealants from water damage.
- Dry or Damp Cleaning: Works beautifully as a dust mop when dry and a gentle cleaner when slightly damp.
- Reusable and Eco-Friendly: Most pads are machine washable, making them a cost-effective and sustainable choice.
What to Consider:
- Limited Scrubbing Power: They aren’t built for caked-on, sticky messes. You’ll need some extra elbow grease.
- Requires Clean Pads: A dirty pad just pushes grime around. It’s smart to have a few clean ones on hand for larger jobs.
Spin Mops: The Master of Moisture Control
A spin mop is basically a salad spinner for your floor. Its key feature is a bucket with a built-in wringing system that gives you incredible control over how much water stays in the mop head.
This precision is invaluable. You can spin the mop until it’s just damp for a quick clean on sensitive floors, or leave it wetter for tough messes on durable porcelain or ceramic. The spinning action is also far more effective at pulling dirty water out than old-school wringing.
A common mistake is not wringing a spin mop out enough. For artisanal tiles from Original Mission Tile, you want the mop head to be merely damp, never dripping. This protects the tile’s matte finish and prevents water from seeping into the grout and porous body of the tile.
Steam Mops: The High-Heat Specialist
Steam mops use super-heated water to create high-pressure steam, sanitizing floors and loosening grime without any chemicals. For the right kind of tile, they are powerhouses, blasting away bacteria and stubborn spots with pure heat.
But that power comes with a huge warning. Steam is a combination of intense heat and moisture, a duo that can be disastrous for the wrong tiles.
- Porous Tiles (Cement, Terracotta): The steam can force its way into the tile body, weakening it from the inside and destroying the protective sealant.
- Vinyl or Laminate: The heat can cause the layers to warp, bubble, or peel apart.
- Unsealed Grout: High heat can make grout brittle, causing it to crack and crumble over time.
Because of these risks, steam mops should only be used on durable, non-porous surfaces like glazed porcelain and ceramic. Always check with your tile manufacturer before even thinking about using one.
String Mops: The Old-School Classic
The traditional string mop is what most people picture when they think of mopping. These mops use long, absorbent cotton strands and a simple wringer bucket. They hold a ton of water, which makes them great for cleaning up giant spills in a commercial setting.
For most homes, however, string mops are a poor choice. It’s almost impossible to control their moisture level, and they’re notorious for leaving floors soaking wet. This leads to water spots, grout damage, and serious issues with porous tiles. Plus, they tend to push dirt around more than they lift it.
Key Features That Define The Best Tile Mops
So, you’ve narrowed down the type of mop you need. Great. But that’s just the first step. Think of it like buying a car—knowing you want an SUV is easy, but the real decision is in the details: engine, handling, and interior finishes. The same goes for your mop.
These features aren’t just for show. They make a huge difference in how well you clean, how your back feels afterward, and—most importantly—the long-term health of your beautiful tile. For artisanal surfaces like our handmade cement tiles from Original Mission Tile, getting these details right is what keeps that finish pristine.
The Power Of A Great Mop Head
The heart of any mop is its head. While classic cotton is absorbent, modern microfiber is the gold standard for tile, especially for delicate matte finishes. Its tiny split fibers are absolute magnets for dust, dirt, and grime.
But not all microfiber is the same. Look for these qualities:
- High-Density Weave: Denser pads have more fibers per square inch. This means they grab way more dirt and absorb liquid more efficiently without just pushing a puddle around.
- Durable Construction: A well-made pad should survive hundreds of trips through the washing machine without fraying or losing its static-cling magic. That makes it a smarter, more sustainable choice.
- Softness: The fibers need to be soft enough that they won’t cause micro-scratches on sensitive surfaces like sealed cement or high-gloss porcelain.
The best microfiber heads use electrostatic force to lift dust and particles. It’s like a Swiffer, but with the power to scrub. This often means you can get a fantastic clean with just water, protecting your tile’s sealant and its rich pigments from harsh chemicals.
The demand for better floor care is exploding. The global professional cleaning market is on track to hit $97.5 billion by 2035, and a massive 40.2% of that growth is tied directly to floor care. For designers and architects specifying premium materials like Original Mission Tile, it’s a reminder that the right tools are essential. Innovations like microfiber swivel heads, which can lift up to 96% of fine dust, are no longer a luxury—they’re a necessity for protecting these surfaces without abrasion. You can dig into more data on the cleaning market’s impact in this detailed market report on openpr.com.
Ergonomics And Maneuverability
Mopping shouldn’t feel like a chore you dread. A well-designed mop makes the job faster, easier, and more thorough. If it’s awkward to handle, you’re guaranteed to miss spots around furniture and in corners.
Here’s what makes a mop a breeze to use:
- Adjustable Handle Length: This is a must. Setting the mop to a comfortable height saves your back and gives you much better control.
- 360-Degree Swivel Head: A head that pivots freely is non-negotiable. It’s the only way to get under cabinets, around toilet bases, and into tight corners without a struggle.
- Lightweight Construction: Lugging a heavy, water-logged mop around is exhausting. A lighter design is simply easier to manage, especially across large rooms.
The Importance Of Precise Moisture Control
For porous surfaces like handmade cement, terracotta, or unsealed natural stone, too much water is the enemy. Oversaturation can lead to stubborn water spots, break down your tile’s sealant, and even cause efflorescence—that chalky white film that can creep up through the tile.
This is why the wringing system is one of the most critical features of all.
A good wringing system lets you achieve that perfect “damp mop” state. The mop head should be just moist enough to clean effectively but not so wet that it leaves puddles behind. Spin mops with a foot pedal are fantastic for this, giving you total command over the mop’s dampness. For flat mops, look for high-quality pads that wring out easily and release water evenly.
Proper Mopping Techniques And Safe Cleaners

Having the best mop for your tile is a great start, but it’s only half the battle. How you use it—the technique and the cleaning solution—is what truly protects the beautiful, often handmade, surface under your feet. It’s the secret to lifting away dirt without causing slow, irreversible harm.
With delicate surfaces like handmade cement tiles, getting this right isn’t just a suggestion; it’s essential. Their porous nature and rich mineral pigments are easily damaged by harsh chemicals and sloppy mopping. A pro-level routine is what preserves their signature matte finish for decades to come.
Choosing Your Cleaning Solution Wisely
Here’s the single most important rule for cleaning artisanal tile: always use a pH-neutral cleaner. Think of it like washing a delicate wool sweater—you wouldn’t throw it in with work jeans and heavy-duty detergent. Acidic or alkaline cleaners can actually cause a chemical reaction with the pigments in cement tiles, leading to fading or “etching” that permanently dulls the finish.
Never use common household cleaners like vinegar (acidic) or bleach (alkaline) on handmade cement tiles. They are far too aggressive. These products can strip the sealant, bleach the color, and eat away at the grout, causing damage that’s expensive—and often impossible—to fix.
Your best bet is a cleaner made specifically for natural stone or cement tiles. These are formulated to be gentle but effective. But honestly, a simple DIY solution often works just as well.
Safe Cleaning Solutions For Handmade Tile
- pH-Neutral Cleaner: Look for a pre-mixed cleaner that clearly says it’s pH-neutral and safe for natural stone or cement.
- Simple Soap and Water: A few drops of a mild, non-acidic dish soap (like the original blue Dawn) in a gallon of warm water is a time-tested, safe bet.
- Specialized DIY Mix: For a slightly deeper clean without the risk, mix 2 tablespoons of Borax into one gallon of warm water.
Before you go all-in with a new cleaner, always test it on a small, hidden spot first to make sure it doesn’t affect your tile’s color or finish. For a deeper dive, check out our complete guide to cleaning cement tiles.
Master The Two-Bucket Mopping Method
Ever mopped your floor only to find it looks streaky or feels a bit sticky afterward? You were probably just spreading dirty water around. The two-bucket method is a simple but brilliant trick used by professional cleaners to fix this exact problem.
Here’s the setup:
- Bucket #1 (Solution Bucket): Fill this with your pH-neutral cleaning solution and warm water. This is your “clean” bucket.
- Bucket #2 (Rinse Bucket): Fill this with plain, clean water. This is where you’ll rinse the grime off your mop.
The process is easy. You dip your mop into the solution bucket, clean a section of the floor, and then—before dipping it back into the solution—you rinse it out in the rinse bucket. Wring it out completely, and only then does it go back into the clean solution. This one extra step keeps your clean water from turning into a bucket of mud.
The Art Of The Figure-Eight Pattern
How you move the mop matters just as much as what’s in your bucket. Pushing a mop back and forth in straight lines just shoves dirt into the grout lines. Instead, adopt the figure-eight pattern.
This technique involves moving the mop in a continuous, overlapping “S” motion, always pulling the mop back toward you. This movement actually traps and lifts dirt into the mop head instead of just pushing it around.
Always start at the farthest corner of the room and work your way toward the exit so you don’t have to walk over your freshly cleaned floor. And remember, wring your mop until it’s just damp, never sopping wet. Oversaturating the floor is a fast way to damage both your tile and your grout.
Common Mistakes To Avoid When Mopping Tile

Even with the perfect mop, a few simple mistakes can ruin your hard work—and in some cases, permanently damage your beautiful tile. When it comes to floors, especially porous handmade cement tiles, knowing what not to do is just as important as knowing what to do.
Think of it like this: your tile floor is an investment. You wouldn’t use a harsh chemical on a fine piece of wooden furniture. By side-stepping these common pitfalls, you’re not just cleaning; you’re preserving the life and beauty of your floor for years to come.
Using Way Too Much Water
This is the number one mistake we see. It’s easy to think a sopping wet mop means a deeper clean, but with tile—and especially grout—the opposite is true. Excess water doesn’t just make floors dangerously slick and take forever to dry; it seeps into any unsealed or porous surface.
For handmade cement tiles, this is a recipe for disaster. When water soaks into the tile and slowly evaporates, it can pull natural mineral salts to the surface. The result? A chalky white film called efflorescence. This powdery residue is notoriously difficult to remove and can completely dull the rich, vibrant color of your tiles.
Always wring your mop head out until it’s just damp, never dripping. Your goal is to lift away dirt with minimal moisture. This protects the tile itself and the sealant that guards it. A good spin mop or a thoroughly wrung-out microfiber flat mop is your best friend here.
Choosing The Wrong Cleaning Solution
Not all cleaners are created equal, and the wrong one can be a fast track to heartache. Harsh acidic cleaners (like vinegar) or strong alkaline solutions (like bleach and ammonia) can chemically “burn” certain tiles. This is especially true for the mineral pigments in our handmade cement tiles from Original Mission Tile.
These aggressive cleaners can strip away the protective sealant, causing permanent fading, etching, or discoloration. The professional cleaning industry, a massive market projected to hit $859.20 billion by 2034, is built on knowing which products to use. Pros understand that preserving high-end surfaces is everything. In North America, which holds 37.52% of that market, avoiding damage is paramount. Using the wrong alkaline cleaner can cause up to 12% annual degradation on surfaces like pigmented cement. For more on the market trends that shape professional cleaning protocols, you can read the full research on fortunebusinessinsights.com.
Aggressive Scrubbing And Abrasive Tools
When you’re staring down a stubborn scuff mark or a dried-on spill, it’s tempting to grab a stiff-bristled brush or a green scouring pad. Please don’t. While these tools will definitely remove the spot, they’ll take your tile’s finish right along with it.
Aggressive scrubbing creates tiny scratches and micro-abrasions that permanently dull the surface. Worse yet, these new scratches become magnets for trapping even more dirt over time, making your floors look perpetually dingy. These and other common cleaning mistakes can dramatically shorten the life of your beautiful floors. The fix is always gentle patience, not brute force.
A Simple Maintenance Plan For Your Tile Floors
Your beautiful tile floors—especially handmade works of art—don’t need complicated care. They just need a simple, consistent routine. Protecting your investment really just boils down to a repeatable maintenance plan that pulls together everything we’ve talked about.
Think of it as a three-part cycle: sealing, daily upkeep, and weekly cleaning. Each step supports the others to protect your tile for the long haul. It’s like owning a car—a weekly wash is nice, but you still need those regular oil changes to keep the engine healthy. Your tile needs more than just mopping to truly last.
This is exactly where your choice of the best mop for tile becomes so important. It’s the tool that connects your daily sweeping with your deeper cleaning, making sure every move you make preserves—not harms—that gorgeous surface.
Your Long-Term Care Cycle
A durable, beautiful floor is the result of a simple, repeatable process. This routine stops dirt from getting ground in and protects your tile’s finish and structure from damage over time.
-
Seal and Reseal: Sealing is your floor’s first line of defense, especially for porous materials like our handmade cement tiles. Think of it as a high-quality raincoat that sheds stains and moisture before they have a chance to soak in. Always check the manufacturer’s guide, but most cement tiles need to be resealed every 2-3 years. You can learn more about picking the right ceramic tile sealers to properly protect your floors.
-
Daily Sweeping: Before a mop ever touches your floor, you have to get rid of the loose stuff. A daily sweep or vacuum (using a hard floor attachment) removes tiny bits of grit and sand. This prevents them from being ground into the tile by foot traffic, which is what causes those micro-scratches that dull the finish.
-
Weekly Damp Mopping: This is your regular reset. Using a quality microfiber mop, a pH-neutral cleaner, and the two-bucket method, you lift away the grime that builds up over the week. Just remember, the goal is a damp—not wet—mop. This protects both the tile and the grout from getting too saturated.
A Final Checklist For Pristine Floors
This quick roadmap sums up the most important takeaways. Sticking to these rules ensures you’re not just cleaning your floors, but actively preserving their beauty for years to come.
Your maintenance plan is your floor’s life insurance policy. Consistent, gentle care is far more effective than infrequent, aggressive cleaning. The goal is to prevent problems before they start.
- Always Start Dry: Sweep or vacuum first. No exceptions.
- Use pH-Neutral Cleaners: This protects the tile’s pigments and sealant from harsh chemical damage.
- Embrace the Damp Mop: Avoid puddles and excess water, especially on porous cement tiles.
- Clean Spills Immediately: Don’t give stains a chance to set into the tile.
- Never Use Abrasives: Skip the harsh brushes and scouring pads that can scratch the finish.
- Inspect Your Sealant Annually: A simple water drop test tells you everything. Does the drop bead up, or does it soak in? If it soaks in, it’s time to reseal.
Tile Mopping FAQs: Your Top Questions, Answered
Even with a solid plan, a few questions always come up when caring for specialty tile. Here are the answers to the questions we hear most often from designers and homeowners—the details that keep your handmade tiles looking their absolute best.
How Often Should I Mop My Handmade Cement Tile Floor?
This really comes down to foot traffic. For most homes, a weekly damp-mopping with a pH-neutral cleaner is perfect for keeping things fresh.
If you’re talking about a hardworking kitchen, a busy mudroom, or an entryway, you’ll probably want to bump that up to twice a week. In a commercial space, daily mopping is standard. Just don’t forget to sweep or vacuum up loose grit before you mop—that’s what prevents fine scratches.
Can I Use A Steam Mop On My Sealed Cement Tiles?
We get this one a lot, and our advice is always a firm no—even on perfectly sealed cement tiles. Think of your sealer like a high-quality raincoat. A steam mop is like a pressure washer that can slowly but surely blast that protective coat away.
The combination of intense heat and pressurized steam can weaken the sealant, forcing moisture into the porous body of the tile. Over time, this can cause:
- Cloudy spots or discoloration that appears trapped under the surface.
- Efflorescence (that chalky white powder) to bloom on the tile.
- The tile itself to break down.
A good microfiber mop with very little water is a much safer bet for protecting your investment.
What Is The Two-Bucket Method And Why Does It Matter?
The two-bucket method is a pro-level trick that stops you from just spreading dirty water around your floor. It’s incredibly simple: one bucket holds your clean, pH-neutral solution, and the other is filled with plain rinse water.
You mop a section, then rinse the dirty mop in the plain water bucket before ever dipping it back into your clean solution. This way, you’re always lifting grime off the floor instead of just pushing it around. It’s the secret to keeping your grout lines from looking dingy and making sure your tile’s true color stays vibrant.
My Matte Tiles Look Dull After Mopping. What Am I Doing Wrong?
A dull, hazy film on matte tiles nearly always points to one of two things: cleaner residue or too much water. If the cleaner you’re using isn’t truly pH-neutral, it can leave behind a microscopic film that kills the tile’s soft finish.
Similarly, if your mop is too wet, it leaves mineral deposits behind as the water evaporates, creating that cloudy look. The fix is simple: switch to a cleaner made specifically for stone or cement tile, and always wring your mop until it’s just damp, never dripping.
Ready to bring timeless, handmade beauty to your next project? The artisans at Original Mission Tile have been crafting exquisite cement tiles since 1900. Explore our in-stock collections or create a one-of-a-kind design.