You’ve chosen cement tile because you wanted something with presence. Not a printed imitation. Not a glazed surface that looks the same in every light. You wanted depth, hand, and a finish that feels grounded the moment you walk into the room.
Then the practical questions start. How do you clean it without dulling it? What kind of sealer belongs on a handmade tile? Why does one floor age beautifully while another looks tired too soon?
Those questions matter because cement tile isn’t porcelain pretending to be handmade. It’s a different material with different strengths. If you care for it correctly, the reward is a floor or wall that develops character instead of wearing out.
The Enduring Beauty of Your Handmade Cement Tile
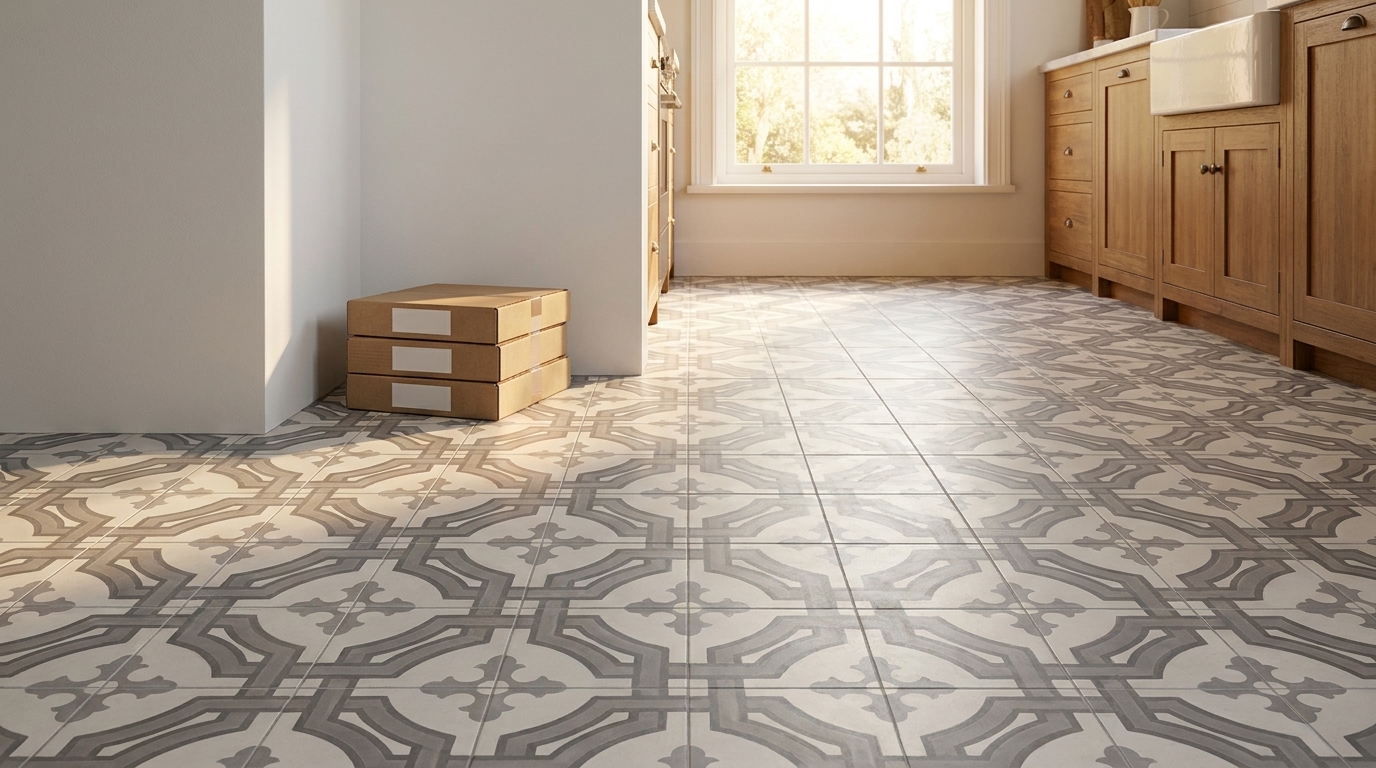
A newly installed cement tile floor often looks almost too perfect to touch. The patterns are crisp, the colors have that quiet mineral depth, and the matte surface catches light in a way glazed tile never does. Most owners want to preserve that first impression, but the ultimate goal is better than that. A well-kept handmade floor shouldn’t stay frozen in time. It should mature with grace.
That’s the nature of hydraulic-pressed cement tile. At Original Mission Tile, that tradition goes back to 1900. These tiles are made from cement, sand, marble dust, and mineral pigments, then pressed rather than fired. The color isn’t printed on top. It’s inlaid into the wearing surface, which is why the material feels substantial and honest underfoot.
Why handmade cement tile needs different care
Cement tile maintenance starts with understanding what the tile is, and what it is not. It isn’t ceramic. It isn’t porcelain. It doesn’t have a hard glaze acting as a shield above the design. The same porous structure that gives cement tile its richness also means careless cleaning can leave marks, pull pigment at the surface, or let stains settle deeper than they would on a fired product.
That doesn’t make the tile fragile. It means it responds to informed care.
The wider market confirms why that matters. The global cement tile market was valued at $33.7 billion in 2023 and is projected to reach $61.4 billion by 2032, with a 6.9% CAGR, driven in part by ease of maintenance and long-term appeal, according to cement tile market projections. More people are choosing the material, but not everyone understands the difference between low-maintenance and no-maintenance.
A handmade tile rewards simple discipline.
Care is part of the craft
Owners sometimes hear “maintenance” and think burden. In practice, the right routine is closer to stewardship. Sweep before grit turns into abrasion. Mop with the proper cleaner before residue builds. Seal the tile so spills stay on the surface long enough to be removed.
Good cement tile maintenance doesn’t fight the material. It works with the way the tile was made.
That’s especially true with the silky matte finish that defines classic cement tile. A shiny topical coating may look like protection at first, but it changes the whole expression of the floor. The goal is to preserve the natural finish, not bury it.
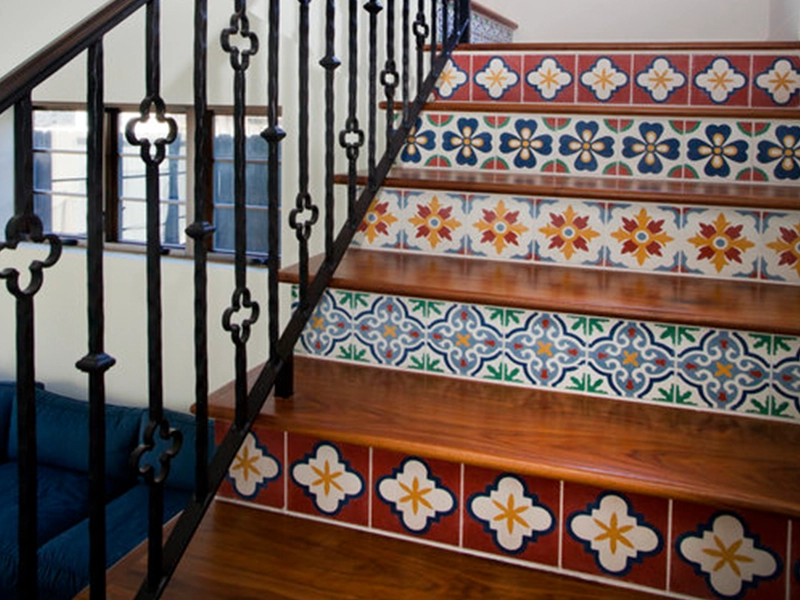
For designers and homeowners comparing materials, that’s why handmade cement tile options remain so compelling. They offer durability, pattern, and patina in one surface, but they ask for a little respect in return.
What longevity really looks like
The longest-lasting cement tile installations don’t stay pristine because nobody lived on them. They last because someone followed a few sound habits from the beginning. Traffic was controlled after installation. Grit was removed routinely. Harsh cleaners never touched the floor. Sealer was treated as a maintenance layer, not a one-time task.
That’s how these tiles earn their reputation. Their beauty comes from craft. Their longevity comes from care.
Your Daily, Weekly, and Monthly Maintenance Rituals
The best cement tile maintenance plan is the one you will keep. It doesn’t need drama. It needs rhythm.
Most damage starts small. Sand at an entry. Sticky residue in a kitchen. Cleaner left to dry on the surface. None of those feels urgent in the moment, but together they change the look of the floor. In high-traffic commercial settings, proactive cleaning prevents 95% of structural issues, and the same principle applies at home. Daily sweeping removes debris that causes surface degradation, while deep cleaning every 3 to 6 months with pH-neutral solutions helps preserve the matte finish, according to proactive cleaning guidance for hard surfaces.

Daily habits that prevent most problems
Daily care is mostly dry care. Use a soft broom, dust mop, or microfiber pad to remove grit before it gets ground into the surface. Entryways, kitchens, and hallways need the most attention because they collect abrasive dirt first.
If you vacuum, use a hard-floor setting and avoid attachments that drag stiff wheels or rough edges across the tile. The floor doesn’t need aggressive scrubbing. It needs debris removed promptly.
For busy households, I prefer a microfiber dust mop over a broom because it captures fine dust instead of moving it around. If you want a practical overview of tool selection, this guide to the best mop for tile floors is useful for comparing soft, non-abrasive options.
Do this, not that
Sweep or dust mop often: Fine grit is the enemy of a matte cement surface.
Use pH-neutral cleaner: Strong alkaline and acidic products can dull the finish.
Wring the mop well: Damp is right. Wet is not.
Blot spills quickly: Don’t let liquids sit and migrate into the tile.
Skip bleach, acids, and abrasive pads: They solve one problem by creating another.
Weekly cleaning that keeps the finish honest
Once or twice a week, depending on traffic, damp mop with clean water and a pH-neutral cleaner made for natural stone or cementitious surfaces. Use a soft mop head. Change the water when it turns cloudy. Dirty water leaves a film, and film is often mistaken for wear.
The mop should be damp, not loaded. Handmade cement tile doesn’t benefit from standing water. Excess moisture can carry dirt into micro-pores, settle into grout, and leave the floor looking tired even when it’s technically clean.
A few practical rules help:
- Mix lightly: Follow the cleaner label and avoid making the solution stronger than required.
- Work in sections: Mop a manageable area, then let it dry fully before judging the result.
- Rinse when needed: If the cleaner leaves any residue, follow with clean water and a well-wrung mop.
- Dry high-use zones: Buffing with a soft cloth or white pad can restore the clean matte look.
Monthly inspection and touch-up cleaning
Monthly maintenance is where owners catch small issues before they become repair work. Walk the floor in daylight. Look at entries, sink fronts, stove areas, and the path beside a kitchen island. Those are the places where cement tile tells the truth first.
Check for these signs:
| Frequency | Task | Tools & Products |
|---|---|---|
| Daily | Remove loose grit and dust | Soft broom, microfiber dust mop, vacuum on hard-floor setting |
| Weekly | Damp mop with gentle cleaner | Microfiber mop, bucket, pH-neutral cleaner, clean water |
| Monthly | Inspect finish, grout, and stain-prone zones | Soft cloth, white buffing pad, pH-neutral cleaner |
| Every 3 to 6 months | Deep clean and evaluate sealer performance | Soft brush, microfiber towels, pH-neutral cleaner, water drop test materials |
Call it a maintenance schedule, but it’s really pattern recognition. You’re watching for dull traffic lanes, sticky buildup near cooking areas, darkening around wet zones, and grout haze that wasn’t fully removed during installation.
When monthly care needs to go deeper
Sometimes the floor is clean, but it doesn’t look clean. That usually means residue, not failure. In that case, do a more deliberate wash with fresh pH-neutral solution, two buckets if necessary, and several passes with clean rinsing water. A soft white pad can help loosen surface film without scratching.
If furniture sits directly on the tile, check the feet and glides. A dragged chair can leave marks that people blame on the tile when metal or grit under the leg is responsible.
A matte handmade tile should look soft and alive. If it starts looking cloudy, the cause is usually residue, abrasion, or sealer condition, not age.
That’s why routine matters. Good cement tile maintenance isn’t a heroic annual rescue. It’s a series of small, calm actions that keep the floor from ever needing one.
Mastering the Sealing Process for Lasting Protection
If there’s one place where experience matters most, it’s sealing. Handmade cement tile is porous by nature. That porosity is part of its character, but it also means the tile needs protection before daily life begins.
A proper sealing sequence can prevent up to 95% of stain penetration. After the tile is 100% dry post-installation, apply two coats of a penetrating sealer. After grouting, apply a final seal coat. In low-traffic residential areas, a successful seal can last over 10 years, according to this step-by-step sealing guidance.

Penetrating sealer versus topical coating
For traditional cement tile, the correct choice is usually a penetrating or impregnating sealer. It soaks into the tile and helps resist moisture and stains while preserving the natural matte appearance.
A topical sealer behaves differently. It sits on the surface and can create a film. That film may add sheen, but it also changes the look and feel of the tile. In real-world use, it can scratch, peel, cloud, or wear unevenly in traffic lanes. On a handmade floor, that often looks worse than honest age.
That’s why professionals who understand the material tend to favor a penetrating treatment. If you want a broad primer on technique and sequencing, Flacks Flooring has a practical guide on how to seal tile like a pro that pairs well with tile-specific instructions.
The correct post-installation sequence
Timing matters as much as product choice. If the tile still holds moisture, sealing too early can trap that moisture and create trouble later.
Use this sequence:
Let the installation dry fully
The tile must be completely dry. Not surface-dry. Fully dry through the body. That’s the condition needed before the first sealer application.Apply the first coat evenly
Use a clean applicator, such as a microfiber pad, lambswool applicator, or soft cloth. Wet the surface evenly without leaving puddles.Apply the second coat after the recommended interval
The verified protocol calls for two coats. Give the first coat time to absorb before applying the second.Use sealer as grout release protection
This makes grout cleanup easier and lowers the risk of stubborn haze settling into the tile face.Grout carefully and clean immediately
Don’t let residue sit. Cement tile rewards fast, gentle cleanup.Apply the final seal coat after grouting
This seals both tile and grout into one functioning surface system.
What works in the field
A sealer should disappear into the tile, not announce itself. If the floor looks plastic, overly glossy, or patchy, something has gone wrong. Either the tile wasn’t fully dry, too much product was left on the surface, or a film-forming product was used where a penetrating sealer belonged.
I trust simple indicators more than marketing language. After the sealer cures, put a few drops of water on the tile. Watch what happens. If the water beads on the surface for a time before darkening the tile, protection is still working. If the tile drinks it in almost immediately, the sealer is fading and it’s time to prepare for resealing.
Practical rule: Sealer should protect the tile while leaving the handmade surface looking like cement tile, not coated tile.
How to reseal without creating buildup
Resealing should never be automatic. First determine whether the floor needs it. High-use kitchens, entries, restaurants, and outdoor installations often need more frequent evaluation than a low-traffic powder room.
Before resealing:
- Clean the tile thoroughly: Remove dirt, oils, waxy residues, and cleaner buildup.
- Let the surface dry completely: Moisture under fresh sealer is a common cause of blotching.
- Test in a discreet area: Confirm that absorption and appearance are even.
- Apply thin, controlled coats: More product doesn’t mean more protection.
- Buff off excess: Don’t leave residue sitting on the face.
If you need product comparisons, cement tile sealer guidance can help clarify what kind of sealer is appropriate for porous tile surfaces and where installers often go wrong.
Mistakes that shorten the life of the finish
The most common errors are predictable. Sealing damp tile. Using acidic cleaners during grout cleanup. Leaving excess sealer to dry on the face. Reapplying over a dirty floor. Reaching for a glossy coating because “shine equals protection.”
It doesn’t.
A handmade cement tile floor should still look like mineral, pigment, and pressed craftsmanship after sealing. Good protection is quiet. It gives you time to wipe up spills, clean traffic, and live on the floor without sacrificing the surface that made you choose it in the first place.
A Practical Guide to Stain Removal and Minor Repairs
Even a well-maintained floor gets tested. Someone leaves olive oil by the stove. Coffee splashes at breakfast. Hard water dries near a shower edge. None of that means the tile has failed. It means the tile is being used.
General cleaning advice often misses the harsher realities of restaurants, bars, and busy kitchens. That gap matters because grease and oil behave differently on porous cement surfaces, and unsealed or poorly maintained commercial floors can show patina two to three times faster than residential ones, as noted in Original Mission Tile’s care guidance for encaustic tile.

First identify the stain
Don’t throw random products at the problem. Start by asking what landed on the tile.
- Oil-based stains usually darken the surface and spread softly.
- Food and drink stains often leave a more defined mark with color in the center.
- Mineral spots tend to appear pale, chalky, or ringed.
- Organic messes can carry both staining and sanitation concerns.
Blot fresh spills. Don’t scrub aggressively. Scrubbing pushes material sideways and can work it deeper into a porous tile.
How to use a poultice
For stains that have moved below the surface, a poultice is often the right approach. It works by drawing the stain back out as the paste dries.
A practical method is simple:
- Clean the area gently with pH-neutral cleaner and let it dry.
- Choose an absorbent base such as baking soda or another fine, non-abrasive absorbent powder.
- Mix it into a paste with a suitable liquid for the stain type. Keep the mixture thick enough to stay in place.
- Apply over the stain slightly beyond the visible edge.
- Cover loosely if needed to slow drying at the start, then allow it to dry fully.
- Lift and inspect. Repeat if the stain lightens but doesn’t disappear.
For oil, the goal is to draw out fats rather than dissolve them across the tile face. For coffee or wine, patience matters more than force. Several light treatments are safer than one harsh one.
Don’t chase a stain with acids, bleach, or abrasive pads. On cement tile, that often trades a spot for a scar.
Minor scratches and small chips
Surface scuffs sometimes come from dragged grit, furniture feet, or jobsite traffic after installation. Start with the least invasive response. Clean the area thoroughly and inspect it dry. Many “scratches” are transferred metal, rubber, or residue.
For very slight surface marks, a soft white pad can improve the appearance. For tiny chips, color-matched repair may be possible, but the success depends on tile color, pattern complexity, and where the damage sits. A small edge nick on a plain field tile is one thing. A chip through a patterned motif is another.
Use restraint. Overworking a repair can make it more visible.
When cleanup is also a health issue
Outdoor entry tiles and covered patios sometimes collect bird droppings. The staining is one problem. The hygiene risk is another. In those cases, safe handling matters before stain treatment does. If the contamination is significant, this guide to biohazard cleanup for bird droppings offers practical safety context for cleanup before you return to standard tile care.
Know when to call a restoration specialist
Some problems are bigger than maintenance. Call a pro if you see deep oil saturation, widespread grout haze that won’t release, sealer failure across large areas, structural cracking, or a patchy finish caused by incompatible products.
A good tile or stone restoration specialist can diagnose whether the issue sits in the sealer, the grout residue, or the tile itself. That distinction matters. The wrong DIY fix often locks the problem in place.
The right mindset is simple. Treat stains as a diagnostic job, not a panic event. Handmade cement tile can recover from more than is commonly believed, but it responds best to careful, specific action.
Adapting Maintenance for Commercial and Outdoor Spaces
Residential floors live one kind of life. Restaurant entries, hotel corridors, retail spaces, courtyards, and poolside walkways live another. The tile may be the same material, but the maintenance logic changes with traffic, moisture, food exposure, and weather.
That’s where many specifications go wrong. A product gets chosen for its visual impact, then maintained as if every space were a quiet powder room. It isn’t. Cement tile maintenance has to match the environment.

Commercial interiors need tighter routines
In hospitality and food-service work, the two biggest pressures are traffic and contamination. Grit from the street abrades the surface. Oils, syrups, wine, and cleaning residues create layered problems if the floor isn’t cleaned correctly and promptly.
A residential owner can often get away with a missed week. A restaurant can’t.
The better commercial protocol usually includes:
- More frequent dry debris removal: Entry grit and kitchen residue need to come off the floor before they’re compacted by foot traffic.
- Strict cleaner selection: Food-service staff often default to strong degreasers that are too harsh for cement tile.
- Spot response during service hours: The longer grease sits, the harder it is to remove without affecting the finish.
- Regular sealer evaluation: The floor may still look acceptable while protection has already weakened.
The trade-off is straightforward. The more aggressively a business cleans with the wrong product, the faster the floor loses the very look the designer specified. A gentler but disciplined routine usually preserves both appearance and serviceability better.
In commercial work, the right maintenance plan is part of the specification, not an afterthought handed to staff on opening day.
Outdoor tile faces different enemies
Exterior installations don’t usually deal with fryer oil, but they do face water, humidity, runoff, airborne dirt, and organic growth. In humid climates, moss and algae are more than cosmetic. They hold moisture at the surface and make the tile harder to keep clean.
For outdoor tiles in humid climates, preventing moss and algae is critical because they can accelerate deterioration by 20 to 30%. Proper sealing reduces water absorption by up to 85%, and modern bio-based sealers can inhibit algal growth by 60% in humid trials, according to guidance on weather-related tile deterioration.
How outdoor maintenance differs from indoor care
Outdoor care needs a few upgrades:
| Setting | Main Risk | Maintenance Emphasis | What to Avoid |
|---|---|---|---|
| Residential interior | Grit, spills, residue | Dry sweeping, damp mopping, sealer checks | Acidic cleaners, over-wetting |
| Commercial interior | Heavy traffic, grease, rapid soiling | Frequent debris removal, quick spill response, stricter staff protocols | Harsh degreasers, delayed cleanup |
| Outdoor covered area | Dirt, runoff, humidity | Sweeping, drainage awareness, sealer monitoring | Standing water, trapped debris |
| Outdoor exposed area | Rain, organic growth, weather stress | Surface cleaning, algae prevention, moisture control | Film-forming coatings, neglected drainage |
What works outdoors and what doesn’t
Outdoor success starts with the installation, but maintenance keeps it viable. Keep leaves, soil, and plant debris off the tile. Organic matter traps moisture and feeds growth. Watch where water drains after rain or irrigation. If runoff repeatedly crosses the same section of tile, that area will age differently from the rest.
For humid settings, cleaning the surface before growth establishes itself is easier than trying to reverse a slippery green film later. If the project sits in a subtropical climate, sealer choice matters more than many owners realize. The goal is still breathability with protection, not a thick surface coating that traps problems underneath.
Advice for architects, developers, and operators
Commercial and outdoor projects need maintenance language in the handoff package. Don’t leave staff guessing. Specify approved cleaner types, spill procedures, mop materials, and inspection intervals. If the project includes a restaurant patio, pool terrace, or breezeway, assign responsibility for debris removal and drainage monitoring from day one.
That sounds basic, but it’s what preserves intent. Handmade cement tile can absolutely perform in demanding spaces. It just needs the care plan to be as considered as the pattern selection.
Common Questions About Cement Tile Maintenance
Owners usually ask the same few questions once they’ve lived with the tile for a while. The right answers are short, but the reasoning matters.
Can I use a steam cleaner on cement tiles
No. Steam forces heat and moisture into a porous material and can interfere with the sealer, drive residue into the surface, or create uneven appearance as the floor dries. Cement tile responds better to controlled damp cleaning than to heat-driven cleaning.
What is the chalky white film on my tile
That’s often efflorescence, which is a mineral residue carried to the surface by moisture. It can appear after installation or when moisture moves through the substrate or grout. The fix depends on the cause, not just the appearance. Start by reducing the moisture source, then use a tile-safe cleaning approach rather than acidic shortcuts.
A white film is rarely a reason to panic. It’s a reason to ask where the moisture is coming from.
How do I protect cement tile during a renovation
Keep foot traffic off newly installed floors for the required curing period, and when other trades are working nearby, protect the surface with breathable, non-staining coverings over a clean floor. Avoid anything that traps moisture tightly against the tile. Before covering, make sure the tile is clean. Dirt under protection becomes sandpaper.
My sealer looks blotchy. What happened
Blotchy sealer usually points to one of four problems. The tile wasn’t fully dry. The floor wasn’t cleaned well before application. Too much product was left on the surface. Or the tile absorbed sealer unevenly because some areas were already contaminated.
A test area would usually reveal this before the entire floor was treated.
Can I use vinegar, bleach, or bathroom descaler
No. These products are common in household cleaning, but they’re a poor fit for handmade cement tile. They can etch, discolor, or strip protection. Stick with pH-neutral cleaners and mechanical patience.
Should every mark be removed completely
Not always. Cement tile is one of the few surfaces that can gain beauty from use, but that only happens when the wear is clean, even, and honest. Embedded grease, chemical damage, and neglected residue are not patina. Soft mellowing in a well-kept floor is.
How do I know when it’s time to bring in a professional
Call a specialist when the problem is widespread, when the finish has become uneven after sealing, when stains no longer respond to careful poultice treatment, or when cracks suggest movement rather than surface wear. Good maintenance handles routine life. Restoration handles failure, incompatibility, or damage beyond the surface.
The principle behind all of these questions is the same. Handmade cement tile rewards restraint. Gentle cleaning, thoughtful sealing, and quick response beat aggressive products almost every time.
If you’re planning a new installation or trying to care for an older handmade floor properly, Original Mission Tile offers practical guidance rooted in traditional hydraulic-pressed tile making. The right maintenance approach starts with understanding the material, and that’s where good results usually begin.