Without a doubt, the best grout sealers for floor tile are penetrating (impregnating) sealers. They work by creating an invisible, breathable barrier that protects porous grout from the inside out, all without changing its natural look. This makes them the go-to choice for almost any residential job, especially in high-moisture spots like bathrooms and kitchens.
Why Choosing the Right Grout Sealer Is Non-Negotiable

After you’ve installed beautiful floor tile, those thin grout lines might seem like an afterthought. They aren’t. Protecting your grout is the single most important step you can take to preserve your floor’s long-term beauty and structural integrity. A quality grout sealer isn’t an optional add-on; it’s a critical investment.
Unsealed, cement-based grout is incredibly porous. Think of it as a tiny, rigid sponge, ready to absorb anything that hits it. A splash of coffee, a drip of wine, or cooking oil can create permanent, ugly stains that no amount of scrubbing will ever fix.
Understanding Grout Vulnerability
Moisture is an even bigger problem. In bathrooms, kitchens, and entryways, water seeps right into unprotected grout. This creates the perfect damp, dark breeding ground for mold and mildew. Not only does this discolor the grout, but it can also hurt your indoor air quality and, over time, even weaken the tile’s bond.
Picking the best grout sealer for floor tile really boils down to two fundamental types: penetrating and topical. Your choice here will directly affect how your floor looks, how it holds up, and how much work it takes to maintain.
- Penetrating Sealers: These formulas soak deep into the grout’s pores, forming an invisible, subsurface barrier. They do a great job blocking water and oil but still allow moisture vapor to escape—a crucial feature for natural materials like handmade cement tiles.
- Topical Sealers: These create a protective film right on top of the grout’s surface. While they offer very robust protection, they often alter the grout’s sheen. More importantly, they can trap moisture, which can lead to big problems with certain types of tile.
The decision to seal your grout is a decision to protect your entire flooring investment. It simplifies cleaning, prevents permanent damage, and ensures your tile remains a feature you’re proud of for years.
The table below breaks down the core differences, helping you see why one might be a much better fit for your specific project.
Comparing Sealer Functionality at a Glance
| Feature | Penetrating Sealer | Topical Sealer |
|---|---|---|
| Protection Method | Absorbs into grout pores | Forms a surface film |
| Final Appearance | Invisible, natural finish | Can add a slight sheen |
| Breathability | High (allows vapor to escape) | Low (can trap moisture) |
| Ideal Use Case | Most residential floors, wet areas | High-wear commercial spaces |
Comparing Grout Sealer Types: Penetrating vs. Topical
Picking the right grout sealer isn’t about finding the “best” one on the shelf. It’s about choosing the right technology for your specific floor, tile, and environment. The two core options—penetrating and topical sealers—work in fundamentally different ways. One protects from the inside out, while the other creates a barrier on top.
Penetrating sealers, also called impregnating sealers, work by soaking deep into the porous grout. Think of it like a sponge absorbing water. They use a carrier, either water or a solvent, to pull tiny polymer molecules down into the grout’s microscopic pores. When the carrier evaporates, those molecules bond to the material, creating an invisible shield that repels water and oil.
What’s critical here is that this process doesn’t clog the pores. The sealer lives inside the grout but doesn’t form a film over the top, which means the grout can still “breathe.” This is a make-or-break feature for floors over concrete slabs or with porous tiles (like our handmade cement tiles), as it allows moisture vapor from below to escape naturally instead of getting trapped.
How Penetrating Sealers Protect From Within
The biggest win for penetrating sealers is that they’re invisible. They don’t change the color or add any sheen, so your grout looks exactly as intended—just protected. The protection becomes a part of the grout itself, not a coating sitting on the surface.
Because this shield is subsurface, it’s incredibly durable against daily life. You can’t scuff it, peel it, or wear it away with foot traffic. For most homes—especially in kitchens, bathrooms, and entryways—a quality penetrating sealer hits the sweet spot between powerful protection and aesthetic honesty.
Key Takeaway: Penetrating sealers create an invisible, breathable barrier inside the grout. This makes them the go-to choice for maintaining the natural look of grout and for use with porous tiles or anywhere substrate moisture is a concern.
Topical sealers are much more straightforward: they work like a coat of clear paint. These products, usually acrylic-based, form a continuous, non-porous film right on top of the grout lines. This film physically blocks dirt, spills, and other contaminants from ever touching the grout.
The Role of Topical Surface Coatings
From a cleaning perspective, topical sealers are fantastic. Spills and grime sit on the surface of the coating, making them incredibly easy to just wipe away. Many also add a gloss or semi-gloss finish, which can be a deliberate design choice to enhance the grout’s appearance. Some versions even include colorants to completely change the grout’s color.
But this surface film comes with some major trade-offs. The big one? Topical sealers aren’t breathable. If any moisture gets trapped underneath—either from below or during cleaning—it can cause the sealer to look cloudy, start peeling, or even contribute to efflorescence (those chalky white mineral deposits).
And since all the protection is on the surface, it’s vulnerable. Foot traffic can wear it down over time, creating pathways for dirt to get in. Reapplication isn’t as simple as adding another coat; you often have to completely strip the old layer off first. This makes them a tough sell for most residential floors but sometimes a fit for commercial spaces with aggressive, frequent cleaning schedules.
Water-Based vs. Solvent-Based Formulas
Inside both the penetrating and topical camps, you’ll find two main formulas: water-based and solvent-based. The name just refers to the liquid carrier that delivers the active sealing ingredients.
- Water-Based Sealers: These are low in VOCs (Volatile Organic Compounds), have very little odor, and clean up easily with just soap and water. Modern formulas have come a long way, and their performance now rivals many solvent-based options, making them the default for most indoor jobs.
- Solvent-Based Sealers: These formulas often use smaller molecules that can penetrate dense materials a bit deeper, which can sometimes translate to better performance and longer life. The downside is the strong smell—they’re flammable and require serious ventilation during application.
The impact of choosing the right sealer is bigger than you might think. Analysts project the tile and grout sealer market will reach USD 2.5 billion by 2025, and for good reason. Real-world data shows that properly sealed grout can slash long-term maintenance costs by 30-40%. You can explore the full market research on the tile and grout sealer industry to see the numbers. It’s clear that a good sealer isn’t just an add-on; it’s an investment in your tile’s longevity.
Core Differences Between Penetrating and Topical Sealers
To make the choice clearer, it helps to see the two technologies side-by-side. Each has a distinct purpose, and knowing the difference is key to getting a result that lasts.
| Performance Attribute | Penetrating Sealer (Subsurface Protection) | Topical Sealer (Surface Coating) |
|---|---|---|
| Protection Mechanism | Soaks into the grout to repel liquids from within. | Forms a physical film over the grout surface. |
| Final Appearance | Invisible; preserves the grout’s natural look and feel. | Often adds a slight sheen or gloss; can alter the look. |
| Breathability | High: Lets moisture vapor pass through freely. | Low: Traps moisture, which can cause clouding or peeling. |
| Wear and Tear | Highly resistant to wear since it’s protected below the surface. | Can scuff, peel, or wear away with foot traffic. |
| Ideal for Cement Tile | Excellent: Preserves the natural look and crucial breathability. | Not Recommended: Can trap moisture and ruin the tile’s finish. |
| Reapplication | Simple clean and re-coat process. | Often requires completely stripping the old layer first. |
Ultimately, choosing between penetrating and topical sealers comes down to your project’s specific needs. For natural materials like cement tile or in any area where you want invisible protection that lasts, a penetrating sealer is almost always the right call.
Matching the Sealer to Your Tile and Environment
Picking between a penetrating or topical sealer is only half the battle. The real test of the best grout sealers for floor tile is how they hold up in a specific, real-world setting. A sealer that looks fantastic in a dry, low-traffic hallway could fail spectacularly in a steamy master bathroom. The right choice is always situational.
To make a smart decision, you have to read the room. This means looking beyond the tile itself and factoring in moisture exposure, foot traffic, UV light, and the porosity of both the tile and the grout. A mismatch can be a disaster—think of a non-breathable topical sealer on a terracotta patio. It will almost certainly trap moisture and fail within a single season.
This pragmatic approach changes the question from “What’s the best sealer?” to “What’s the best sealer for my floor?” By breaking down common scenarios, we can connect the technical specs of sealers to the practical demands of daily life.
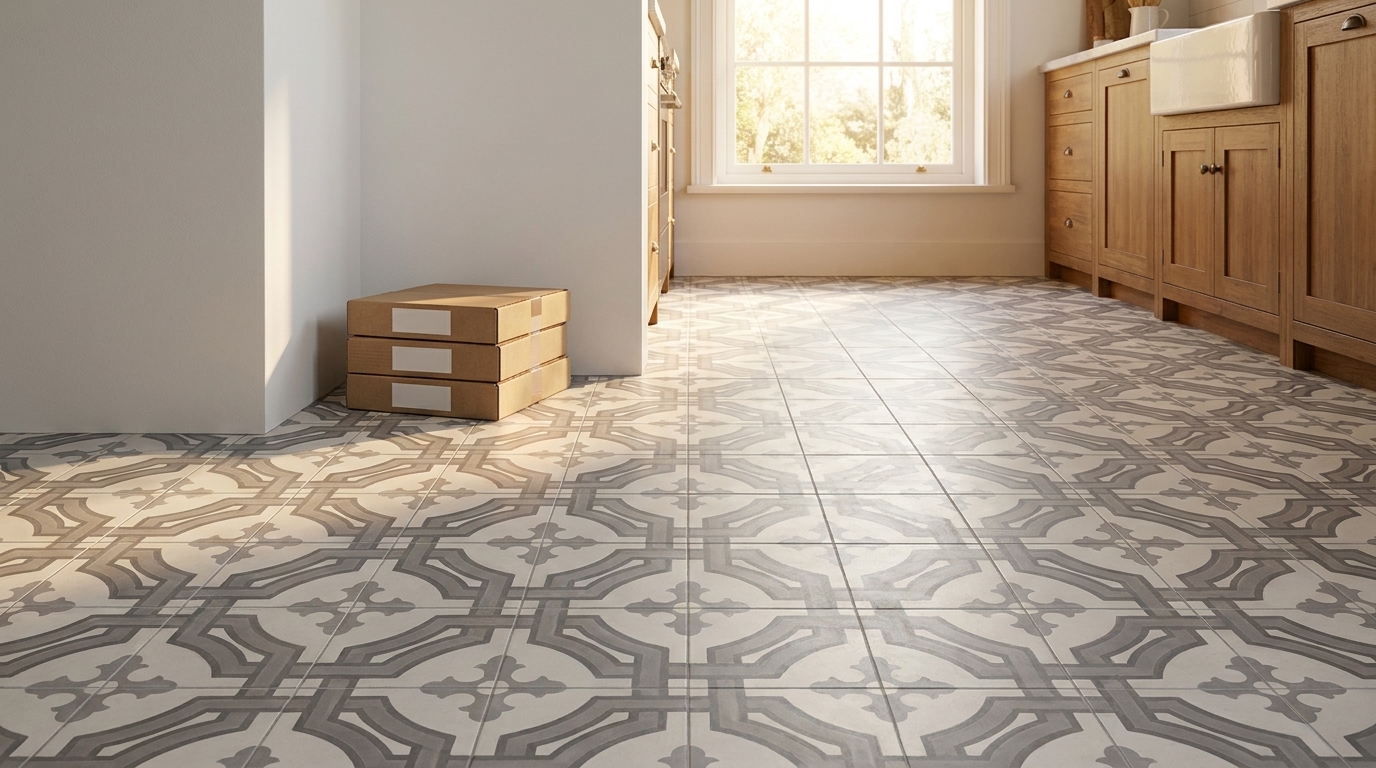
High-Moisture Master Bathroom with Cement Tiles
Let’s start with a classic challenge: a master bathroom with gorgeous, handmade cement tiles. This setup presents a dual problem: constant humidity from showers and the natural porosity of the tiles themselves. Cement tiles are like stone—they have to breathe. If moisture vapor from the subfloor or humidity in the air gets trapped, you’ll see efflorescence (that chalky white residue) or even damage to the tile.
In this scenario, a penetrating sealer is the only viable option. It soaks deep into the grout, providing robust water repellency from the inside out while leaving the pores open just enough for vapor to escape. For cement tiles, that breathability is non-negotiable.
A topical sealer would be a catastrophe here. It would create a plastic-like film over the grout, trapping every bit of moisture trying to get out. You’d end up with a cloudy mess, peeling, and mildew growing right under the film.
For any high-moisture area with porous, natural materials like cement, travertine, or slate, always default to a high-quality, breathable penetrating sealer. It protects the grout without choking the life out of a floor system that needs to breathe.
Bustling Commercial Kitchen Floor
Now, let’s flip to the other end of the spectrum: a busy commercial kitchen with tough, non-porous porcelain floor tiles. The main concerns here aren’t breathability but extreme durability, stain resistance against grease and harsh chemicals, and easy cleaning to meet health codes. The floor gets constant foot traffic and aggressive daily mopping.
This is one of the few places where a high-performance epoxy or urethane-based topical sealer might actually be the better choice. Since porcelain tile is virtually non-porous, trapping moisture inside the tile itself isn’t a major risk. The topical sealer forms a hard, continuous film over the grout lines, essentially creating a smooth, monolithic surface.
This barrier stops oils, acids, and food waste from soaking into the grout, which makes cleanup fast and effective. Yes, the film can wear down, but the aggressive cleaning schedules in a commercial kitchen often account for this. Here, hygiene and absolute stain prevention are the top priorities, and a topical coating delivers that.
This decision tree helps simplify the initial choice, breaking it down by your main concern: moisture or wear.

As the chart shows, high-moisture areas demand breathability, pointing you directly to penetrating sealers. High-wear zones, on the other hand, prioritize surface durability, making topicals a potential contender.
Outdoor Patio with Terracotta Pavers
Outdoor installations bring a whole new set of environmental attacks. A patio with terracotta pavers has to deal with rain, snow, freeze-thaw cycles, and relentless UV radiation from the sun. Terracotta is extremely porous, and so are the wide grout joints typically used with it.
For this job, a UV-stable, deep-penetrating solvent-based sealer is almost always the right call. Here’s why that matters:
- UV Stability: A lot of standard indoor sealers will break down, yellow, and fail in direct sunlight. You need a formula built specifically for outdoor use.
- Moisture Control: The sealer has to provide serious water repellency. If the pavers get saturated with water, you’re looking at freeze-thaw damage, algae growth, and spalling.
- Breathability: Just like with the interior cement tiles, the entire system has to be able to dry out. A penetrating sealer allows any moisture that does get in to also get out.
A topical sealer on an outdoor patio would be a very poor choice. It would trap water, which can lead to spalling (flaking or chipping) during a freeze. It would also quickly peel and degrade under the sun’s UV rays. When you’re trying to match a sealer to a challenging environment, it helps to understand all your options; for instance, some guides on waterproof flooring options for basements, including tile offer insights that apply to any moisture-prone area.
By carefully matching the sealer’s strengths to the specific demands of the tile and its environment, you ensure you’re getting real performance and long-term protection for your investment.
Professional Grout Sealer Application: A Step-by-Step Guide
Even the most advanced grout sealer on the market is useless if it’s applied poorly. A true professional-grade finish isn’t about speed. It’s about careful prep work and a steady, patient hand. Follow these steps, and your sealer will create the durable, long-lasting barrier you’re looking for.
Before you even think about popping the top on a bottle of sealer, everything hinges on three non-negotiable conditions. Your grout has to be fully cured, impeccably clean, and bone-dry. Sealing over damp, dirty, or fresh grout is a recipe for disaster—it traps moisture and grime, guaranteeing a weak bond, ugly discoloration, and failure down the line.
Pre-Application Checklist
First, let’s get your tools in order. Rushing this part almost always leads to a messy, ineffective job that you’ll just have to redo later.
- Grout Sealer: The right penetrating or topical sealer for your specific tile and grout.
- Applicator: Your choice of a small artist’s brush, a roller-style applicator, or an applicator bottle with a brush tip.
- Clean Cloths: Grab several clean, dry, lint-free microfiber cloths. You’ll need them.
- Grout Cleaner: A pH-neutral cleaner made specifically for grout. Don’t substitute.
- Protective Gear: Nitrile gloves and safety glasses are always a good idea.
Once you have your supplies, the real work starts. For a new installation, this means waiting. You have to let the grout fully cure. Most cement-based grouts need at least 48 to 72 hours, but the manufacturer’s directions are the final word. Sealing too early traps water, which weakens the grout and ruins the sealer’s ability to bond.
Resealing an existing floor? The cleaning process is everything. Use your pH-neutral cleaner and a stiff nylon brush to scrub every single grout line. Once you’re done scrubbing, rinse the whole area with clean water to get rid of any residue, then let it dry completely. This can take up to 24 hours.
Pro Tip: Not sure if your old sealer is still working? Do a quick water test. Put a few drops of water on a grout line. If the water beads up, the sealer is holding. If it soaks in and darkens the grout, the surface is porous and ready for a fresh coat.
The Sealing Process, Step-by-Step
With your grout perfectly prepped, you’re ready to apply. Work in small, manageable sections, like a 4×4 foot area, to stay in control and keep things neat.
- Apply Sealer to Grout Lines: Use your applicator to put a liberal, even coat of sealer directly onto the grout joint. You want to fully saturate the grout without flooding the tile itself. An applicator bottle with a built-in brush tip usually gives the best mix of precision and speed.
- Avoid Over-Application on Tiles: Be meticulous here. A little sealer on the tile edge is unavoidable, but try your best to keep it on the grout line. This is absolutely critical with porous materials like handmade cement tiles, where spilled sealer can soak in and create permanent dark spots. For a masterclass in handling these beautiful but tricky materials, this guide on installing cement tiles offers invaluable insights.
- Wipe Away All Excess Immediately: This is the step people mess up most often. Do not let sealer dry on the face of your tile. Within 5-10 minutes of application (check your product’s specific instructions), use a clean microfiber cloth to wipe every bit of excess sealer off the tile surface. A second, dry cloth is great for buffing away any remaining haze.
- Allow for Proper Penetration: After the first coat, the sealer needs time to soak in. The manufacturer will specify how long to wait—usually anywhere from 15 minutes to an hour—before you can apply a second coat.
Post-Application and Curing
For most residential floors, two coats of sealer is the sweet spot for maximum protection. Just repeat the application and wiping process for the second coat, making sure you work methodically across the floor.
After the final coat is on and all the excess is wiped clean, the curing begins. Curing is not the same as drying. It’s the chemical process where the sealer hardens and cross-links to achieve its full strength and protective power.
Most sealers need 24 to 48 hours to fully cure. During this time, keep the floor protected from all moisture, spills, and foot traffic. Respecting the cure time is what ensures you get the durable, stain-resistant finish you paid for.
How to Maintain and Reapply Grout Sealer for Lasting Protection

Putting down a quality grout sealer is a great first move, but it’s not a one-and-done job. To truly protect your investment, you need a smart, long-term maintenance strategy. Think of it this way: a sealed floor isn’t maintenance-free, it’s maintenance-simplified. Proactive care is what keeps it looking great.
The number one threat to your sealer’s lifespan? Your cleaning routine. Harsh, acidic, or highly alkaline cleaners can chemically strip away that protective barrier you just applied. Things like bleach, ammonia-based products, and abrasive powders will quickly degrade the sealer, leaving your grout exposed to stains and moisture all over again.
Safe Cleaning Practices for Sealed Grout
The best approach is gentle and consistent. Cleaning regularly prevents the kind of heavy buildup that makes you want to reach for a stronger chemical in the first place.
- Use pH-Neutral Cleaners: Stick with cleaners made specifically for sealed tile and grout. They’re formulated to lift dirt without compromising the sealer.
- Avoid Abrasive Tools: Ditch the steel wool and aggressive scrubbing pads. A soft-bristle brush or microfiber mop is all you should need for day-to-day cleaning.
- Wipe Up Spills Immediately: Even with a top-tier sealer, acidic stuff like wine, coffee, or juice can etch the surface if left to sit. Quick cleanup is your best defense.
Following these simple rules is non-negotiable, especially for porous surfaces like handmade cement tile. For more detailed advice, check out our complete guide to cement tile maintenance and cleaning.
Knowing When to Reapply Your Sealer
No sealer lasts forever. Its lifespan depends on the type of sealer you used and, most importantly, how much foot traffic the floor gets. The trick is to reapply the sealer before it fails completely.
The easiest way to check its status is with the water-drop test. Just sprinkle a few drops of water onto a grout line and watch what happens.
If the water beads up on the surface like it would on a freshly waxed car, your sealer is holding strong. If it soaks in within a few seconds and darkens the grout, the barrier has worn down. It’s time to reapply.
This simple test takes all the guesswork out of the equation, helping you stay ahead of potential damage.
Establishing a Reapplication Schedule
Based on traffic, you can map out a pretty reliable reapplication schedule. High-traffic zones—think a family entryway or a busy kitchen—will likely need a fresh coat of a penetrating sealer every 1-2 years. On the other hand, a low-use guest bathroom floor might go 5-7 years before needing attention.
In demanding commercial environments like restaurant kitchens and dining areas, this kind of maintenance is critical. Professional commercial restaurant cleaning services often build these reapplication schedules right into their ongoing maintenance plans to ensure floors stay protected.
The global market for tile and grout sealers was valued at USD 1.2 billion in 2023 and continues to grow, which tells you just how vital these products are. A properly maintained sealer can slash water absorption by up to 90%, significantly extending the life of your entire tile installation. By staying on top of a proactive maintenance schedule, you ensure your floor remains beautiful and protected for years to come.
Your Top Grout Sealer Questions Answered
Even with the best plan, real-world questions always come up on the job site. Getting them right can be the difference between a beautiful, long-lasting installation and a costly do-over. Here are the straight answers to the questions we hear most often from installers, designers, and homeowners.
Do I Really Need to Seal Grout on Wall Tiles?
Absolutely. While you might get away with it in a dry hallway, grout in kitchens and bathrooms is a completely different game. These areas are constantly hit with humidity, steam, and splashes from everything from cooking oil to soap.
In a shower, sealing the grout is non-negotiable for preventing mold and mildew. Behind a stovetop, it’s your best defense against those stubborn grease stains that can permanently discolor grout, making cleanup a breeze and keeping your tile work looking sharp.
Can a Sealer Change My Grout Color?
Yes, and these are called colorant sealers, or sometimes grout stains. Think of them as a two-in-one product: they’re a type of topical sealer that forms a uniform coating over the grout line, sealing it while also giving it a fresh, consistent color—or a completely new one.
They work wonders for reviving old, stained grout that you thought was a lost cause, saving you from the headache of a full re-grout. Just remember, because they create a surface film, they might need more frequent touch-ups in high-traffic or wet areas compared to a standard penetrating sealer.
Key Insight: Colorant sealers are a powerful tool for renovations. They blend the protection of a topical sealer with the aesthetic refresh of new paint, making them a go-to for breathing new life into tired tile installations.
What Happens If I Get Sealer on My Cement Tiles?
This is a big one, especially with porous, handmade materials like cement tile. If a penetrating sealer gets on the tile face and soaks in, it can leave a permanent dark spot. If it’s a topical sealer, you could end up with a hazy, shiny film that’s a nightmare to remove without harsh chemicals.
Prevention is everything here. Work methodically in small, manageable sections. Apply the sealer carefully, aiming only for the grout lines. Most importantly, keep a clean, dry microfiber cloth in your hand to immediately wipe any and all excess off the tile face. Always test your sealer on a spare tile or an inconspicuous spot first to see exactly how it behaves.
How Soon Can I Seal Grout After Tiling?
You have to be patient with this step. The grout must be fully cured before you even think about applying a sealer. If you seal it too early, you trap moisture inside the grout joint. This leads to a weak seal, discoloration, and creates a perfect environment for mold to grow later on.
Most cement-based grouts need at least 48 to 72 hours to cure properly. But don’t guess—always check the manufacturer’s specific instructions for both the grout and the sealer you’re using. And for any large project, getting your material estimates right from the start is crucial; our guide can show you exactly how much grout you need for your specific tile and joint size.
At Original Mission Tile, we know it’s the details that make a project last a lifetime. Protecting your handmade cement tile with the right sealing techniques is what preserves its beauty for generations. Explore our collection and find the perfect tile to build your vision around.