You've got the shower stripped to the studs, the drain exposed, and a stack of tile samples leaning against the wall. This is the point where the focus often turns to color and pattern first. A pro thinks about water first.
A shower floor isn't a decorative surface that happens to get wet. It's a drainage system with a finished face. If the layers underneath are wrong, a beautiful tile surface can still fail. If the layers underneath are right, even a demanding material can perform for years.
That matters even more when you're working with handmade cement tile. Cement tile has a velvety, porous face and inlaid color that rewards careful handling and punishes shortcuts. Generic shower advice usually stops at “set the tile, grout it, seal it later.” That approach can permanently stain cement tile. The sequence has to change.
What follows is the way to approach how to install shower floor tile when you want the work to look right and last. The standard code and drainage rules still apply. The waterproofing still has to be exact. The setting techniques still have to be disciplined. But where handmade cement tile enters the picture, the craft gets more specific.
The Foundation of a Flawless Shower Floor
A shower floor fails long before the tile loosens. It fails when the installer treats the tile as the job, instead of the top layer of a complete assembly.
I've seen showers that looked excellent on day one and were already headed for trouble. The tile lines were straight. The grout color was clean. But under the surface, the base wasn't prepared correctly, the waterproofing was careless, or the drain connection was weak. Water always finds those mistakes.
What separates a lasting installation
A durable shower floor depends on four things working together:
- Structure: The floor must be stiff, sound, and suitable for tile.
- Slope: Water must move toward the drain without hesitation.
- Waterproofing: The shower base must act like a contained waterproof basin.
- Bonding and finishing: Tile, mortar, grout, and sealers have to suit the material.
If any one of those is missing, the shower may still look finished. It won't be finished well.
That's why the substrate matters before a single tile is opened. If you're evaluating the layer beneath the tile assembly, a good primer on tile floor underlayment basics helps clarify what belongs under a tiled surface and what doesn't.
Practical rule: If you can't explain where the water goes at every layer of the shower floor, you're not ready to set tile.
Why handmade cement tile changes the conversation
Ceramic and porcelain are forgiving compared with handmade cement tile. Cement tile isn't glazed. Its face is porous. Its color is part of the body, not a printed surface film. That gives it depth and character, but it also means grout, dirty rinse water, and careless cleanup can mark it fast.
That doesn't make cement tile a bad choice. It means the installer has to respect the material. The shower floor still needs proper drainage, proper waterproofing, and full mortar support. Then the finishing sequence must protect the tile before grout touches it.
A flawless shower floor starts with restraint. Don't rush to the visible part. Build the hidden part correctly, and the finished surface has a chance to stay beautiful.
Preparing the Base for Perfect Drainage
Drainage starts before waterproofing and long before tile. The base has one job. Move water to the drain predictably, every time, with no flat spots and no birdbaths.
According to U.S. plumbing code and TCNA Handbook standards, a shower floor must be sloped at 1/4 inch per foot toward the drain, and that pre-slope sits beneath the waterproofing layer so water doesn't collect where you can't see it, as explained by the Ceramic Tile Foundation on slope-to-drain requirements.
Choosing between a mud bed and a pre-sloped tray
There are two common ways to build the base. Each can work. They don't offer the same flexibility.

| System | Where it shines | Where it struggles |
|---|---|---|
| Mortar bed and liner | Best for custom sizes, odd layouts, and drains that aren't in a convenient location | Demands more skill, more shaping, and more patience |
| Pre-sloped tray system | Faster, more uniform, and easier for standard layouts | Less forgiving when the shower shape or drain location is unconventional |
A hand-packed mortar bed is the old-school method because it solves real-world conditions. Walls aren't always perfect. Drains aren't always centered. Shower footprints are rarely as clean as product boxes suggest. Mud lets you correct and shape.
A pre-sloped tray is efficient when the shower dimensions and drain position match the system. If the tray fits the room well, it can save time and reduce variables. If it doesn't fit well, trimming and forcing it into place can create more problems than it solves.
How to calculate slope without guessing
The slope is measured from the drain to the farthest point of the shower floor. The example given by the Ceramic Tile Foundation is clear: a 26-inch run needs about 0.54 inches of rise from drain to perimeter because 26 ÷ 12 = 2.167 feet, then 2.167 ÷ 4 = 0.5417.
Use that method on your own layout:
- Measure from the drain to the farthest corner
- Convert inches to feet by dividing by 12
- Divide that number by 4
- Mark the perimeter height and build to it
That perimeter reference matters. If you eye it instead of marking it, one side often ends up flatter than the other.
Water doesn't complain when the slope is wrong. It just sits there and proves it later.
What the substrate must do before tile goes down
The base must be stable, clean, and shaped correctly. Nothing about thinset or grout will fix a weak or uneven substrate. That's especially true on a shower floor, where the tile has to follow pitch without rocking.
For shower floors, small-format tile is usually the practical choice. The Ceramic Tile Foundation notes that most shower floor tile falls between 1×1 and 4×4 inches because smaller pieces conform better to slope and create more grout lines for traction. That matters for ceramic mosaics, and it matters even more for handmade cement mosaics or small-format cement pieces, which need full support under every edge.
The mortar bed itself also has a defined mix standard. ANSI 108.1 A-4.1.2.3 calls for 1 part Portland cement to 4 parts damp sand for shower floors, which creates a richer, stronger mix suited to this environment, as noted in the same Ceramic Tile Foundation guidance already cited above.
Mastering Waterproofing and Drain Integration
A shower pan should behave like a hidden basin. Tile and grout are the wear surface. They are not the true waterproof barrier. The barrier sits below them.

If you miss that principle, everything else becomes cosmetic. The membrane must connect the floor, corners, penetrations, and drain into one continuous system. I tell clients to think of it as building a small waterproof tub first. The tile only comes after that tub is complete.
A useful overview of how moisture protection layers work behind and beneath tile is this guide to a tile moisture barrier for wet areas. It helps distinguish between what sheds incidental moisture and what forms the waterproof envelope.
Sheet membrane or liquid membrane
Both systems can work when installed exactly as intended.
Sheet membranes give you a uniform thickness and clean detailing at seams when the overlaps are done properly. They're excellent for methodical installers who like predictable coverage and visible seam control.
Liquid-applied membranes suit awkward shapes and penetrations well. They can wrap curves and irregular transitions with less cutting. But they demand disciplined application. Thin spots, pinholes, and missed corners are easier to create than many people realize.
The wrong choice isn't the material. The wrong choice is using a system you won't execute carefully.
The drain connection is where leaks like to begin
Most shower failures I'm asked to inspect show stress around transitions. Corners. Curbs. Pipe penetrations. Drain flanges.
The membrane has to marry the drain assembly without gaps, fishmouths, or weak edges. That's where many leaks begin, and it's why practical repair perspectives can be helpful. If you want to understand the kinds of failures plumbers and repair specialists encounter, Bulls Eye Repair's leaking shower advice is worth reading before you close up the floor.
Check the drain connection like a skeptic. Then check it again.
- Corners must be sealed tightly: Fold or reinforce them according to the membrane system.
- Seams need continuity: Overlaps and bonding areas must be complete, not “close enough.”
- The drain flange must be fully integrated: No voids, no skipped sealant, no loose fabric.
- Penetrations need the same care: Supply lines and fixtures are smaller targets, not smaller risks.
Later in the process, this visual walkthrough helps reinforce what a careful waterproofing stage should look like.
What works and what doesn't
What works is a complete system. One manufacturer's membrane, compatible drain parts, proper corner treatment, and disciplined seam work.
What doesn't work is mixing methods casually, leaving unsupported folds at the drain, or assuming tile and grout will compensate for a weak pan. They won't. Once the shower is in service, the water will test every shortcut for you.
Techniques for Setting Tile Like a Pro
Setting shower floor tile is a control job, not a speed job. The base is sloped. The drain is fixed. The tile has to sit tight to the surface, follow the plane, and remain comfortable underfoot. That takes rhythm, but it also takes method.

Start with layout, not mortar
Dry-lay first. Always.
You need to know how the tile lands at the drain, what the perimeter cuts will look like, and whether any sheets need adjustment before mortar enters the picture. A clean layout keeps the floor balanced visually and reduces ugly slivers around the edges.
For most shower floors, small mosaics are the practical choice because they bend with the slope rather than fighting it. Handmade cement tile can be used beautifully on shower floors, but the format matters. Large cement pieces on a compound slope ask much more of the installer and often much more of the drain layout too.
Mortar coverage is not negotiable
In wet areas, partial contact under the tile is asking for trouble. Voids trap water, weaken support, and leave edges vulnerable.
Daltile's installation guidance states that directional troweling and back-buttering are required to achieve 95 to 100 percent adhesive coverage in wet areas, and that pressing the tile perpendicular to the trowel ridges helps collapse them so air can escape. The same source says this method delivers a 98% success rate, compared with 65% for non-directional methods, in properly executed installations, as detailed in Daltile's floor tile installation instructions.
That's the technical explanation. The practical explanation is simpler. Comb the mortar one way. Set the tile across those ridges, not along them. Press firmly so the ridges flatten into a continuous bed.
Shop habit: Pull up a tile early and inspect the back. Don't assume coverage. Verify it.
How this changes with handmade cement tile
Cement tile needs a steady hand because its face and edges don't behave exactly like mass-produced glazed tile.
A few habits matter:
- Use the right pressure: Don't hammer cement tile into place aggressively. Bed it firmly and evenly.
- Keep the face clean as you work: Thinset smears are easier to remove fresh than after they tighten up.
- Watch sheet-mounted mosaics closely: Some mesh-backed products need adjustment by hand so joints remain even.
- Support every edge: Cement tile doesn't like unsupported corners or hollow spots.
Back-buttering becomes even more valuable here. On handmade tile, minor irregularities in the back can leave voids if you rely only on the mortar ridges on the floor.
Keeping the plane clean around the drain
Drain cuts reveal the installer's discipline. The tile should approach the drain cleanly, with consistent joints and no proud corners that catch toes or interrupt drainage.
Use a straightedge often, but don't flatten the slope while chasing flatness. On a shower floor, the goal isn't a dead-level field. The goal is a smooth, even plane that follows the intended pitch.
If a tile rocks, stop and correct it while the mortar is fresh. If one corner sits high, fix it now. Shower floors don't forgive “I'll hide that in grout.”
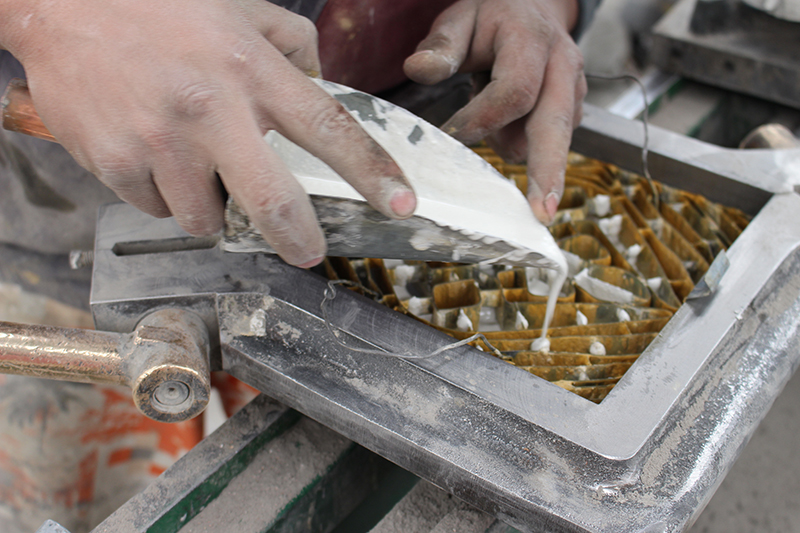
The Art of Grouting and Sealing Cement Tile
Installation of handmade cement tile diverges from generic shower-floor advice.
With standard ceramic or porcelain, installers often set the tile, allow it to cure, grout it, clean it, and then think about sealing if the material calls for it. With handmade cement tile, that order is wrong. If you grout first, the pigments in the grout can lodge in the porous face of the tile and leave staining or haze that's difficult to remove cleanly.
For cement tile, the correct sequence is Seal, Grout, Seal.
Why pre-sealing is not optional
Cement tile has an open, absorbent surface. That's part of its beauty. It's also why grout wash can mark it.
The first coat of penetrating sealer helps protect the face before grout is introduced. It doesn't mean you can be sloppy. It means you've given the tile a fighting chance. Then, after grouting and cleanup, the second sealing stage protects the finished surface and grout joints as a complete assembly.
If you need a deeper look at product categories and what sealers are designed to do, this guide on ceramic tile sealers and related sealing considerations is useful context when comparing porous and less-porous tile surfaces.

Grout technique that preserves the face of the tile
Use a grout that suits the joint width and tile edge condition. Then work clean.
A disciplined approach looks like this:
- Seal the tile face first: Follow the sealer manufacturer's directions and allow it to dry fully.
- Pack the joints completely: Use a rubber float and work diagonally across the lines.
- Clean early, not aggressively: A damp sponge should shape and remove residue, not flood the surface.
- Buff off haze carefully: Don't leave a film to harden on cement tile.
- Apply the final sealer after curing: Protect both tile and grout as a finished system.
Lippage looks worse at the grouting stage
Grout has a way of revealing every setting flaw. Uneven edges that seemed minor while setting suddenly become obvious once the joints are filled.
Rubi notes that the most common DIY pitfall is lippage, and says the substrate should be flat within 1/8 inch over 10 feet before tiling. The same source states that 70% of shower floor failures are tied to inadequate substrate preparation rather than adhesive failure, as explained in Rubi's tile floor installation guidance.
That statistic points backward to the truth every setter learns. Grout doesn't fix alignment. It exposes it.
Cement tile rewards careful hands. It also exposes careless cleanup faster than almost any glazed tile will.
Standard tile and cement tile are not the same job
On porcelain, a bit of extra grout haze cleanup may be an annoyance. On cement tile, it can become a restoration problem. On porcelain, delayed sealing may be acceptable depending on the grout and tile. On cement tile, delaying the first seal until after grouting can leave permanent evidence.
If the shower floor is handmade cement tile, don't improvise here. Seal, grout, seal is the method that protects the surface and preserves the color.
Curing, Final Cleanup, and Long-Term Care
The installation isn't finished when the joints are full. It's finished when the assembly has cured, the surface is clean, the drain runs freely, and the owner knows how to care for the material without stripping away the work.
Respect curing time
Rushing a shower into service is one of the easiest ways to damage fresh work. Adhesive and grout need time to harden and stabilize according to their manufacturers' instructions. Earlier in the process, it's also important to remember that grouting should be delayed long enough for the adhesive to cure properly. A floor that feels firm under hand pressure can still be too green for use.
Before handoff, inspect these points:
- Drainage: Water should move to the drain cleanly, with no obvious pooling.
- Joint condition: Grout should be full, consistent, and free of pinholes.
- Surface haze: Cement tile especially should be buffed clean without harsh residue removers that can alter the face.
- Movement edges: Perimeter joints and transitions should remain properly treated, not jammed full where movement belongs.
Cleanup products matter more on handmade cement tile
Use pH-neutral cleaners for routine maintenance. Avoid harsh acids, aggressive descalers, bleach-heavy experiments, and abrasive powders unless the product manufacturer specifically permits them for that tile and sealer system.
Cement tile's finish is part of its character. Treating it like indestructible glazed porcelain is a mistake. Daily care should be gentle and consistent. Clean the floor, keep soap residue from building up, and reseal as needed based on wear and exposure.
Drain maintenance matters too. A well-built shower floor still needs a drain that stays open. For homeowners who want practical upkeep habits, this Las Vegas shower drain prevention guide offers sensible ways to reduce clog problems before they affect drainage.
Why careful work pays for itself
A shower floor is not a cheap place to learn by failure. Angi reports that the average cost to tile a shower floor is about $2,700, with labor often running $10 to $20 per square foot. The same cost guide notes that a small DIY project might land around $500 to $600, while complex installations can exceed $10,000, according to Angi's shower tile cost breakdown.
Those numbers explain why method matters. A shortcut in slope, waterproofing, coverage, or sealing can wipe out the value of all the other work around it.
The long view is simple. Build the base so water moves. Waterproof it like it will be tested daily, because it will. Set the tile with full support. If the material is handmade cement tile, protect it before grout ever touches the face. Then maintain it with products and habits that respect what it is.
If you're planning a shower floor with handmade cement tile and want material made with the kind of old-world discipline this process deserves, explore Original Mission Tile. Their heritage cement tile collection, custom design capabilities, and installation guidance make them a strong resource for homeowners, designers, and builders who care about craft as much as appearance.